In this guide, we will show you the steps to flash or install a custom kernel in Android using its Config file. A few years back, custom kernels were among the most sought-after tweaks in the custom development domain. While that isn’t the case anymore, yet the tech enthusiasts are still inclined towards these kernels due to the plethora of goodies that it has to offer.
For example, you could overclock or underclock the device’s CPU/GPU, select from a plethora of CPU governor profiles depending on whether you give higher preference to battery life or to usage performance, force fast charging (if supported by the chipset), tweak the memory, enable certain schedulers or create your own custom tunables.
Along the same lines, some devices (such as Pixel 4A) require you to flash a custom kernel that supports (LZMA/LZ4 Ramdisk) before you could install a custom recovery like TWRP. Hence owing to all these benefits, these kernels are still in demand. So if you are also in the same boat and wish to flash or install a custom kernel on your Android device, then this guide is here to help you out. Follow along for the instructions.
Table of Contents
How to Flash a Custom Kernel in Android via its Config File
There exist two different methods through which you could flash a custom kernel- via TWRP and using the kernel’s configuration file. As far as this guide goes, we will be focusing on the latter method. This is because nowadays many devices require you to have a custom kernel installed before you could flash the TWRP (because of the LZMA/LZ4 Ramdisk support). So this would straightaway nullify the method of flashing kernel via TWRP.
As a result, the only method that we would have is to flash via its config file. Owing to this reason, we will show you the steps to flash or install a custom kernel on your Android device. Follow along. Droidwin and its members wouldn’t be held responsible in case of a thermonuclear war, your alarm doesn’t wake you up, or if anything happens to your device and data by performing the below steps.
STEP 1: Root your device
First and foremost. your device needs to be rooted. You could either do so by flashing Magisk ZIP via TWRP or patching the Magisk boot.img via Magisk and flashing it via Fastboot.
Considering most of you might not be having a custom recovery installing, you could opt for the second (patch and flash) method. We have shared the resources for both these methods, you may refer to the one that is in sync with your requirement:
Root without TWRP
- How to Root Android 12 via Magisk patched boot.img (without TWRP)
- Root Android 11 via Magisk Patched boot.img (without TWRP)
- Patch Stock Boot Image via Magisk and Flash it using Fastboot
Root Using TWRP Recovery
- How to Root Android Devices via TWRP Recovery
- Guide to Install TWRP Recovery on Android
- How to Flash Stock and Magisk Patched Boot.img via TWRP
STEP 2: Download a Kernel Manager app
- Next up, you will have to download a Kernel Manager app that supports the ability to load the kernel config file or its URL.
- In this regard, near about every popular Kernel Manager comes with this support, but still do read their description before downloading it.
- As for this guide, I am using the Franco Kernel Manager [Download Link] (it’s a paid app but this is where the Google Opinion Rewards App comes in handy!). Anyways, you are free to choose any app of your choice.
- Once you have downloaded the app, launch it and grant it the Magisk request.

STEP 3: Copy the Kernel Config File’s URL
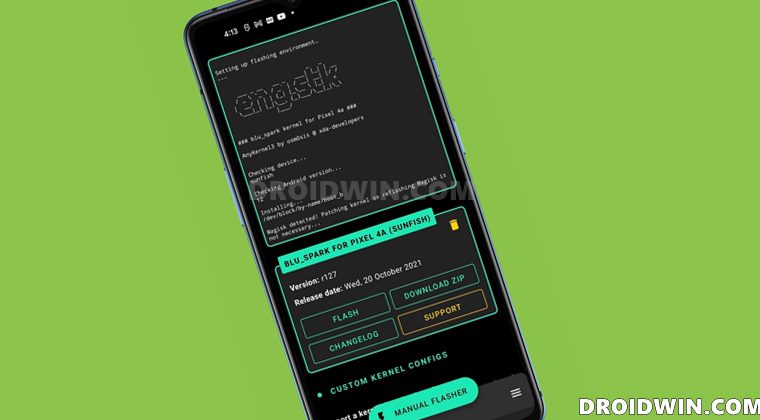
You will now have to download your custom kernel’s configuration file URL. In this regard, most of the developers over at XDA Developers tend to upload their kernel’s JSON configuration file URL along with the flashable ZIP. So all you need to do is just copy that URL (no need to download that JSON file). As for reference, here’s the BlueSpark custom kernel for Pixel 4A where the Dev has shared the config URL’s file as well.
![]()
STEP 4: Take a Backup of Stock Kernel
[From now on, we will be listing the steps using the Franco Kernel Manager. The steps for other Kernel Manager apps should be along the same lines as well]. Let’s start off with taking a backup of the current stock kernel so that if anything goes south after flashing the custom kernel, we could easily restore the stock one.

- So launch the Franco Kernel Manager app on your device.
- Then tap on the hamburger menu situated at the bottom right and select the Kernel Backups option.
- Now tap on the Backup button situated at the bottom bar, give this backup a name of your choice, and hit Apply.
That’s it. You have successfully taken the backup of the Stock Kernel. Let’s now proceed ahead with the steps to flash the custom kernel on your Android device.
STEP 5: Flash Custom Kernel on Android via its Config File
- To begin with, launch the Franco Kernel Manager app on your device.
- Then tap on the hamburger menu situated at the bottom right and select Flasher.
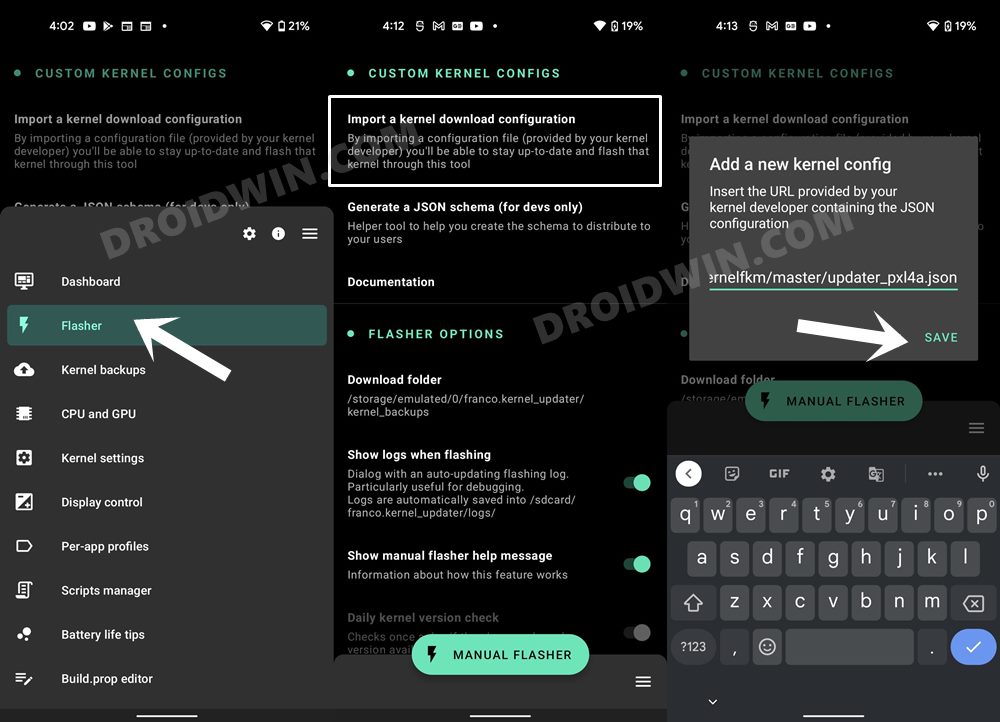
- After that, tap on Import a kernel download configuration.
- Now paste the URL that you had copied in STEP 3 and hit Save.
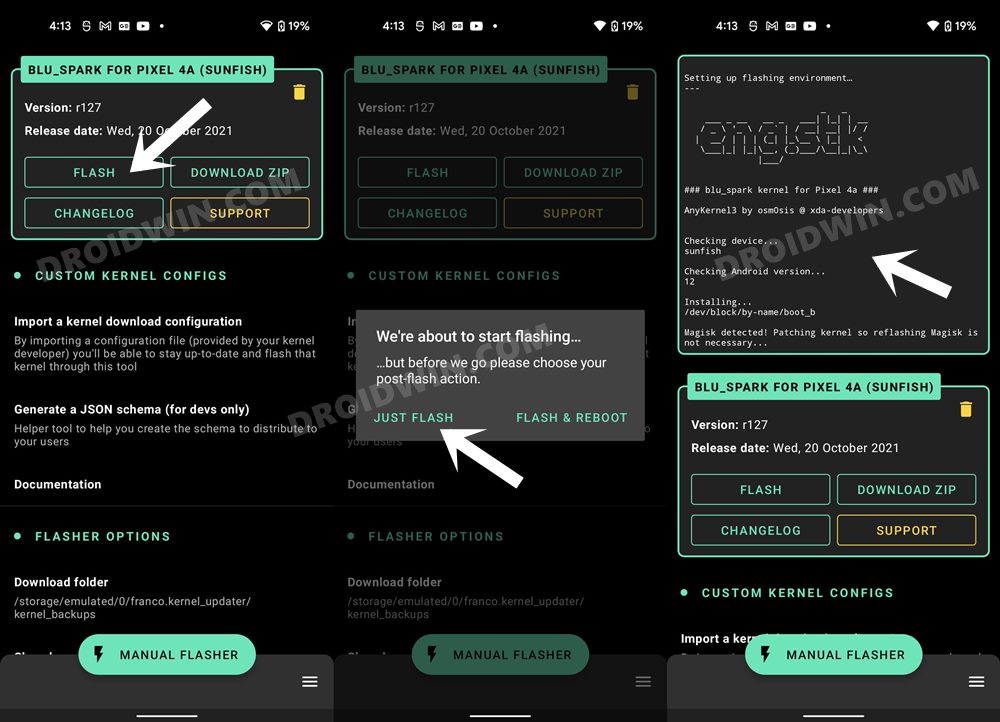
- It shall now bring up the information related to that kernel. If it’s all well and good, then tap on Flash.
- After that, tap on Flash & Reboot. The flashing process will now begin and would take a few seconds.
- Once the flashing is complete, your device shall automatically reboot. And with that, your task stands complete.
So with this, we round off the guide on how you could flash or install a custom kernel on your Android device using the config file. If you have any queries concerning the aforementioned steps, do let us know in the comments. We will get back to you with a solution at the earliest.


