In this guide, we will show you the steps to enable call recording in the OnePlus 9/9 Pro and the 9R variants. The latest flagships from the Chinese OEM have bought plenty of goodies for the end-users. Among them, there were two major talking points that managed to grab much of the limelight. First off is the addition of the Hasselblad camera which has taken the camera quality a notch higher as compared with its predecessors.
On the other hand, the OEM’s decision to replace its popular OxygenOS with Oppo’s ColorOS skin was highly questionable. Anyways, keeping that aside, it seems to have followed in the footstep of its predecessor in at least one aspect- the incorporation of the native call recorder feature.
However, as is the case with other OnePlus devices, this feature has been disabled out of the box in these flagships as well. But thanks to the open-source ecosystem, there do exist a few workarounds through which you could enable call recording in OnePlus 9/9 Pro/9R devices. And in this guide, we will show you how to do just that. So without any further ado, let’s get started.
Table of Contents
How to Enable Call Recording in OnePlus 9/9 Pro/9R

There exist five different methods through which you could carry out the aforementioned task. Two of them are the non-root methods (in which one requires ADB Commands and the other one requires TWRP) whereas the other three are root methods. We have listed all these methods below, you may try out the one that meets your requirement.
Check for the legality of this feature in your region and proceed ahead only if you are authorized to do so. Droidwin and its member won’t be held responsible if the legal team comes knocking at your door in the middle of the night!
Method 1: Enable Call Recording on OnePlus 9/9 Pro/9R via ADB Command (Non-Root)
- To begin with, download and install the Android SDK Platform Tools on your PC.

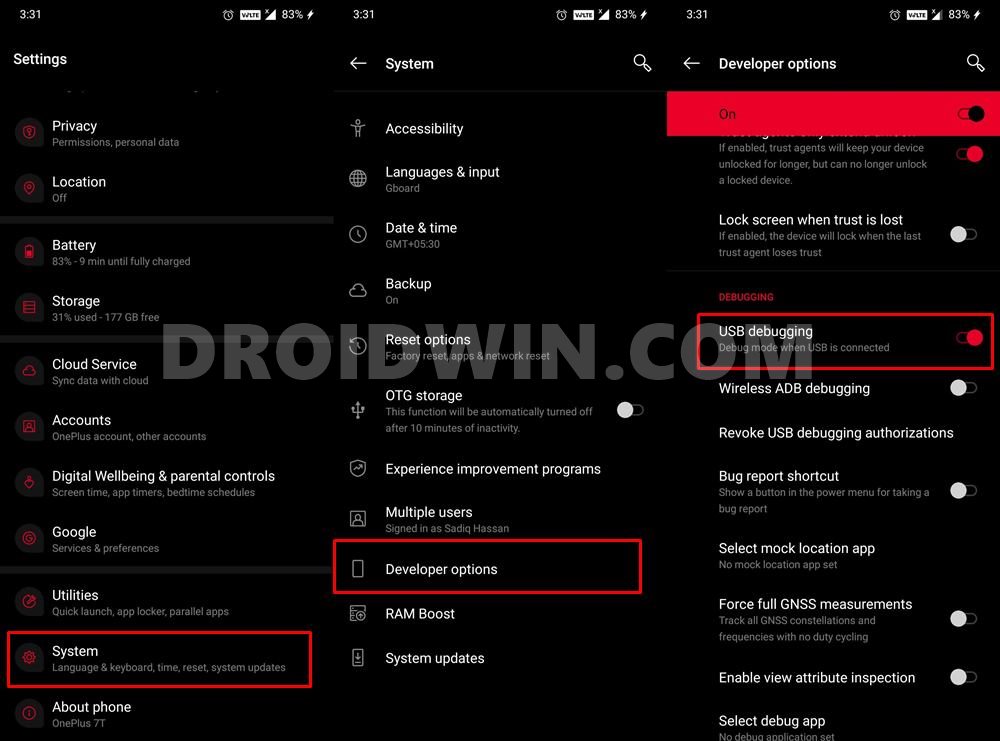
- Then enable USB Debugging on your device as well. For that, go to Settings > About Phone > Tap on Build Number 7 times > Go back to Settings > System > Developer Options > Enable USB Debugging and OEM Unlocking.
- Now connect your device to the PC via USB cable.
- Head over to the platform-tools folder, type in CMD in the address bar, and hit Enter. This will launch the Command Prompt.
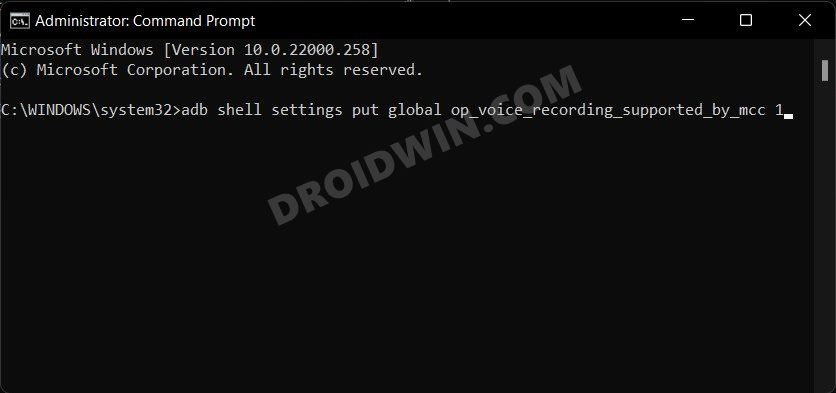
- Finally, execute the ADB below command to enable the call recorder on your OnePlus 9/9 Pro/9R device:
adb shell settings put global op_voice_recording_supported_by_mcc 1
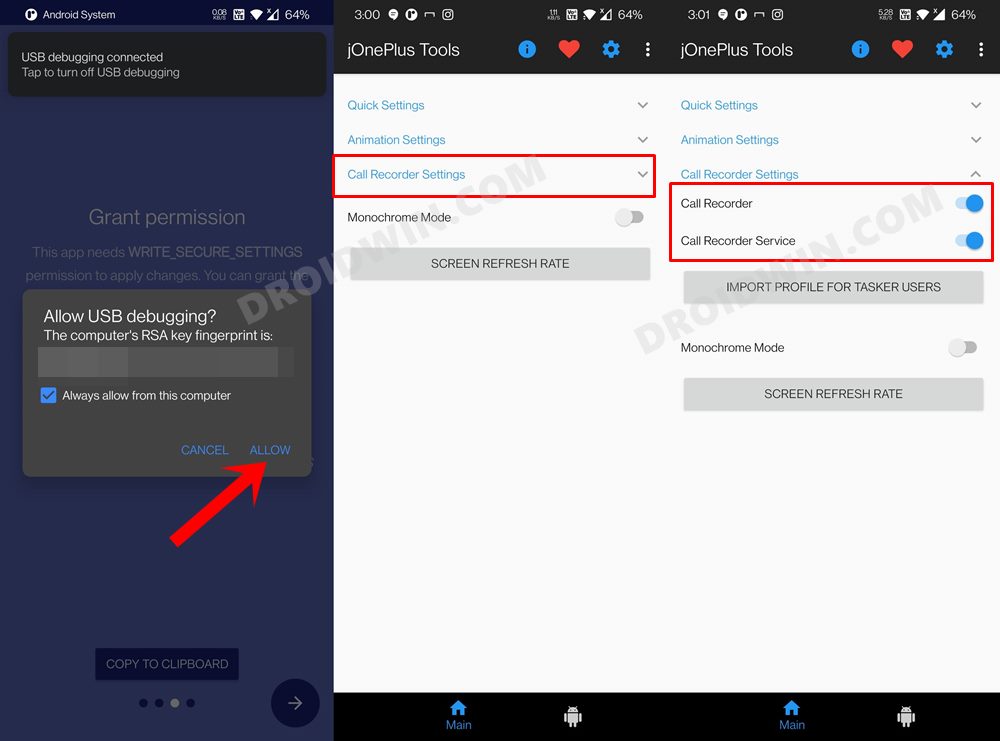
- If you get a prompt on your device, make sure to tap Allow. With this, the call recording has been enabled, but at this stage, it is still temporary and wouldn’t be able to survive a reboot.
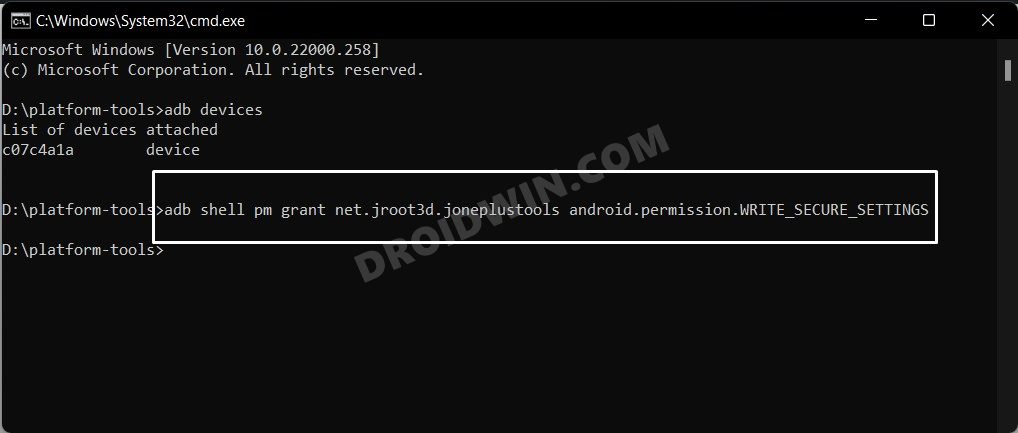
- So to make the Call Recording a permanent feature on your device, head over to the Play Store and install the jOnePlus Tools app.
- Then execute the below commands in the CMD window to give the app the required permission to force start the call recording feature:
adb shell pm grant net.jroot3d.joneplustools android.permission.WRITE_SECURE_SETTINGS
- Now launch the app, expand the Call Recorder Settings and enable the Call Recorder and the Call Recorder Service toggles.
- That’s it. You have now successfully enabled the Call Recorder feature on your OnePlus 9/9 Pro/9R device which shall survive after a reboot as well.


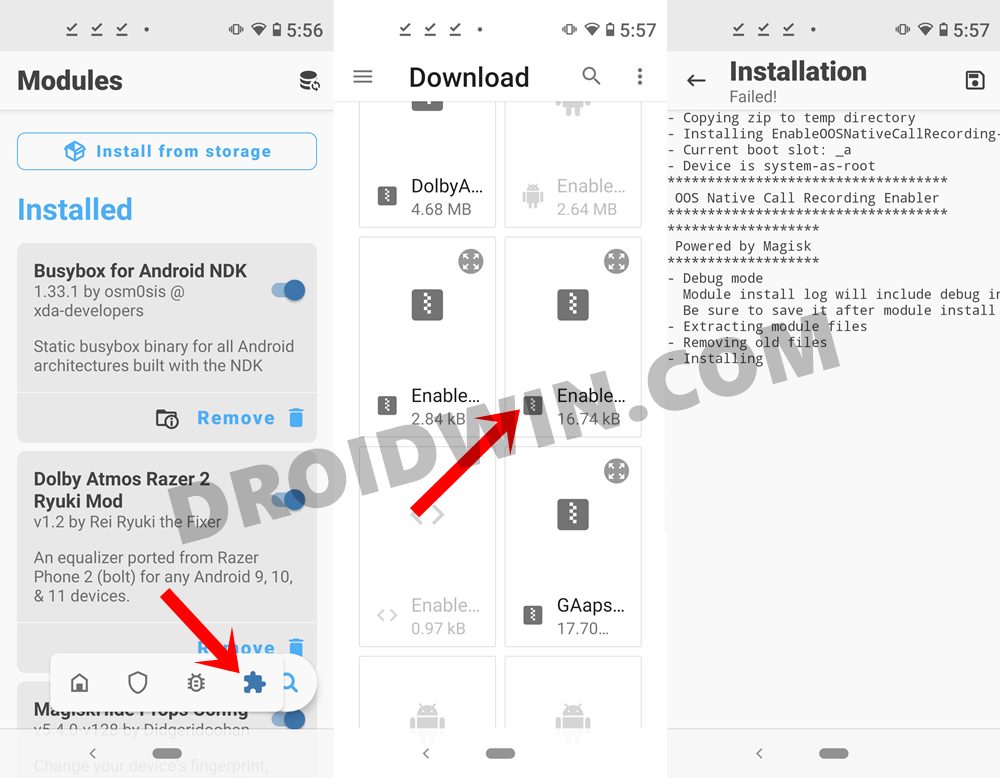
Method 2: Enable Call Recording on OnePlus 9/9 Pro/9R via Magisk Module (Root)
- To begin with, download the given Magisk Module and send it to your device: EnableOOSNativeCallRecording-Magisk.ZIP
- Then launch the Magisk App and tap on the Modules icon situated at the bottom right.
- After that, tap on the Install from Storage button situated at the top.
- Browse to the downloaded Magisk ZIP file and select it.
- The flashing will now begin and could take a few seconds.
- Once done, tap on the Restart button that appears at the bottom right.
- Once your device reboots, the module will be active and you could now easily record calls.
So these were the steps to enable the call recorder on your OnePlus 9/9 Pro/9R device using a Magisk module. While it requires a rooted device, but it is able to survive every reboot.
Method 3: Enable Call Recording on OnePlus 9/9 Pro/9R via TWRP (Non-Root)
This device doesn’t require a rooted device, but it does require you to have the TWRP Recovery installed [Read: How to Install TWRP Recovery on OnePlus 9/9 Pro].
- So if you checkmark this requirement, then download the flashable ZIP module and transfer it to your device: Enable-OOS-Native-Call-Recording-Flashable.zip
- Now boot your device to TWRP. You may do so via hardware key combination or using the below command (inside the CMD window that is opened in the platform-tools folder).
adb reboot recovery
- Once your device reboots to TWRP, go to Install, select the flashable ZIP file and perform a right swipe to flash it.
- You may now reboot the device to the OS. For that, go to Reboot and select System.
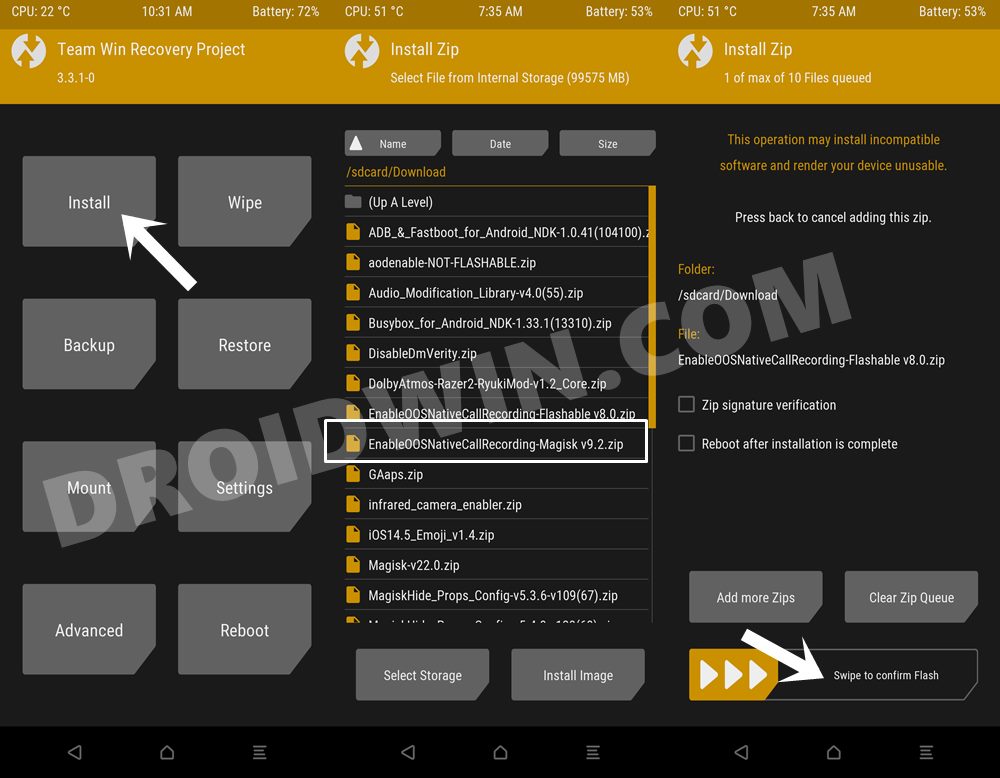
With this, you have successfully enabled Call Recording on your OnePlus 9/9 Pro/9R device. While it does require an unlocked bootloader and a custom recovery installed, but it is also able to survive a reboot.
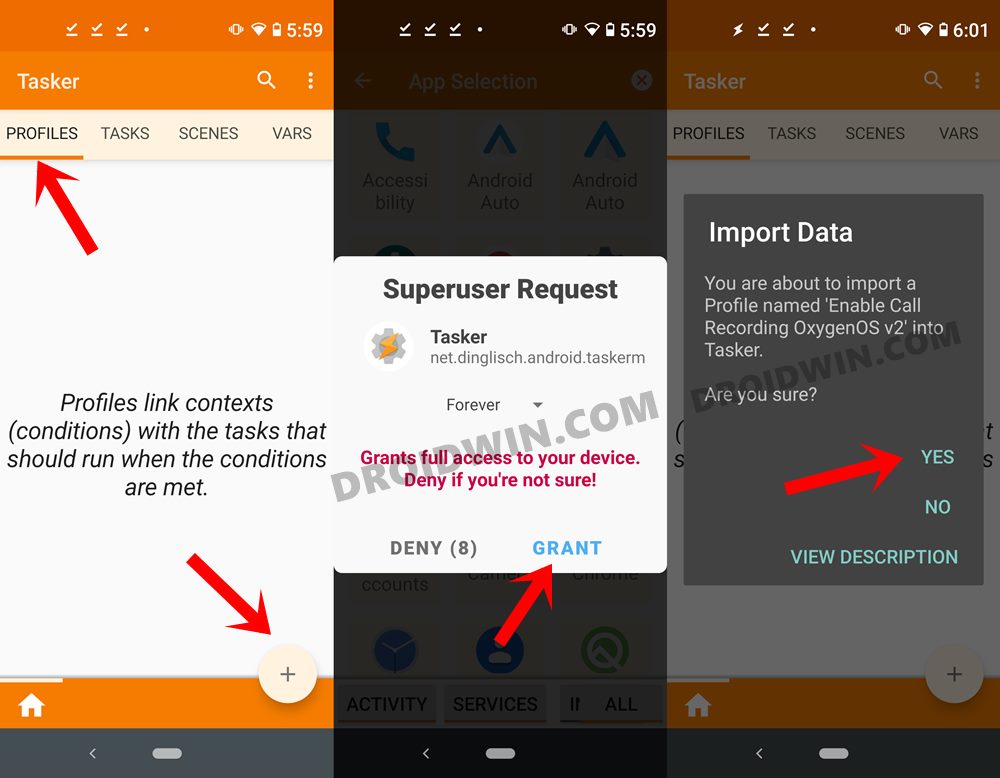
Method 4: Enable Call Recording on OnePlus 9/9 Pro/9R via Tasker (Root)
- To begin with, download and install the Tasker app on your device.
- Then download the required XML profile: EnableOOSNativeCallRecordingv2.prf.xml
- Now launch the Tasker, give it the required SuperUser permission.
- Finally, import the above XML files as a profile. If you are unable to do so, then go to your File Explorer app, select the XML file and open it via the Tasker app. Then just follow the instructions and the profile will be imported.
- This method does require a rooted device, but it is able to survive a reboot without any issues.
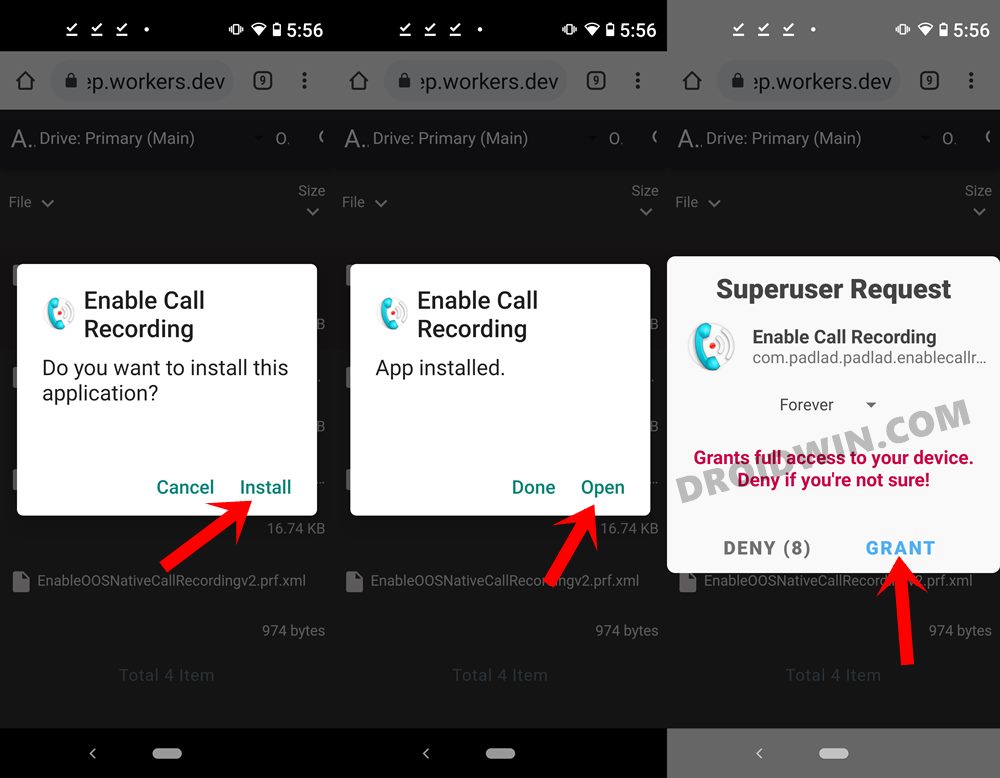
Method 5: Enable Call Recording on OnePlus 9/9 Pro/9R via APK (Root)
- Download and install the given APK: EnableOOSNativeCallRecording v2.0.apk.
- Now launch the app and grant it the Magisk request.
- That’s it, the task stands complete. While this is perhaps the easiest method and it survives a reboot as well, but sometimes it just refuses to work.
So this was all from this guide on how to enable call recorder on OnePlus 9/9 Pro/9R devices. We have shared five different methods for the same, do let us know in the comments which one spelled out success for you.


David Zangy
Does solution 1 will work on oxygen 12?
im running all the mentioned steps, no error when running the command “adb shell settings put global op_voice_recording_supported_by_mcc 1” with command prompt (with admin rights), i got no error message, but nothing has been changed in the dialer app under “call recording” menu.
maybe there is another solution for this please?
umair
I am getting errors while enabling the Call recording by method 1.
adb is listing the device but after that the PUT and GRANT command are giving issues
Jari
Thank you
Everything looks good, I did Method 1.
But I can’t find the folder where the recordings are …?
OnePlus 9 Pro
I don’t know if this is recording?
Jari