In this guide, we will show you the steps to downgrade your OnePlus 9/Pro device from Android 12 (OxygenOS 12) to Android 11 (OxygenOS 11). The Chinese OEM follows a specific update rollout schedule- it first releases the update in the closed testing environment. After that, the domain is further expanded to include the beta testers- users who have voluntarily decided to test out these builds. Once both these builds have been released, it takes the feedback from the user and then irons out all the bugs and issues.
Finally, it is then released as a stable build for the general public. But in the case of OnePlus, all this sounds good only on paper. This is because their stable build is near about equally buggy as its developer versions. And unfortunately, it is now becoming its USP. One doesn’t need to look any further than the latest Android 12 update for its flagships. Just see this list:
- No network issues leading to the inability to make calls, send and receive messages or use carrier data [FIXED].
- The device is stuck at 60Hz most of the time.
- The Icon field in the Personalization section crashes at regular intervals.
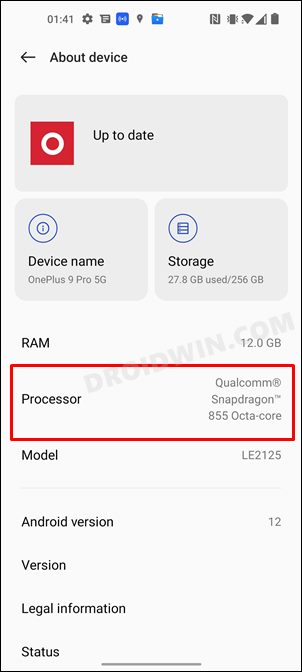
- Incorrect chipset information under the Settings menu (Snapdragon 855 instead of 888).

- All the app permissions (for location/microphone/files/camera/etc) are all reset to the factory default state.
- The Local Upgrade as well as other system update options are not visible under the Update Settings page.
- Inability to launch certain apps (such as dialer) from the home screen.
Well, this list could go on but the point that we are trying to make here is how could so many bugs creep into a stable build? While that is anyone’s guess, fortunately, there does exist a method through which you could rectify these issues- but it comes at a cost. You will have to downgrade your OnePlus 9/Pro from Android 12 to Android 11 but in the process, bid adieu to all your precious data. So if that’s all well and good, then let’s get started with the instructions.
Table of Contents
How to Downgrade OnePlus 9/Pro from Android 12 to Android 11

The below instructions will wipe off all the data from your device, so please take a backup beforehand. Droidwin and its members wouldn’t be held responsible in case of a thermonuclear war, your alarm doesn’t wake you up, or if anything happens to your device and data by performing the below steps.
METHOD 1: Downgrade OnePlus 9/9 Pro via the Official Method
This is the official method of carrying out the downgrade process. In this, we will be installing the Android 11 rollback package via the Local Upgrade method. This rollback firmware has been officially provided by OnePlus itself.
STEP 1: Download OnePlus 9/Pro Android 12 to Android 11 Rollback Firmware
Get hold of the downgrade firmware as well as the Rollback APK for your device from below
OnePlus 9 Downgrade Firmware
OnePlus 9 Downgrade APK
OnePlus 9 Pro Downgrade Firmware
OnePlus 9 Pro Downgrade APK
STEP 2: Transfer Files to Device
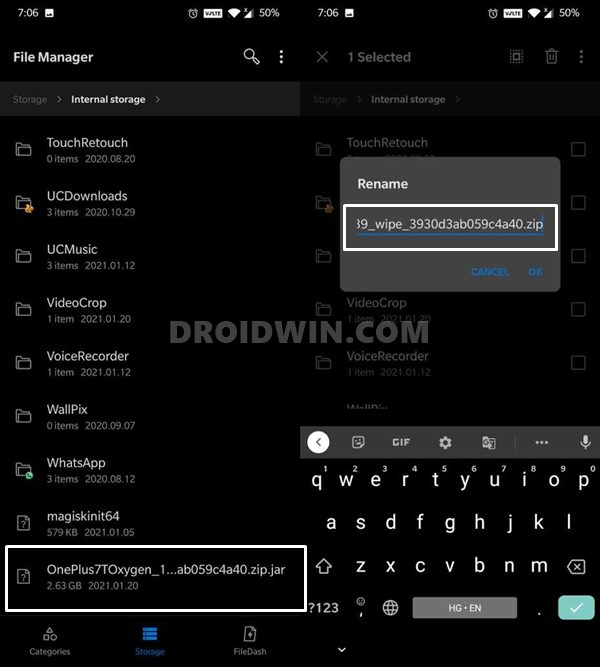
- To begin with, download the Rollback firmware and APK file from the above post.
- Then transfer both of them to your device’s Internal Storage, but not inside any further (in technical terms- place it in the root directory).
- In some instances, the downgrade firmware might be having the .JAR extension at the name. Make sure to delete that .JAR from the end so that the package ends with .ZIP.
Reference Image
STEP 3: Downgrade OnePlus 9/Pro from Android 12 to Android 11 via Local Upgrade
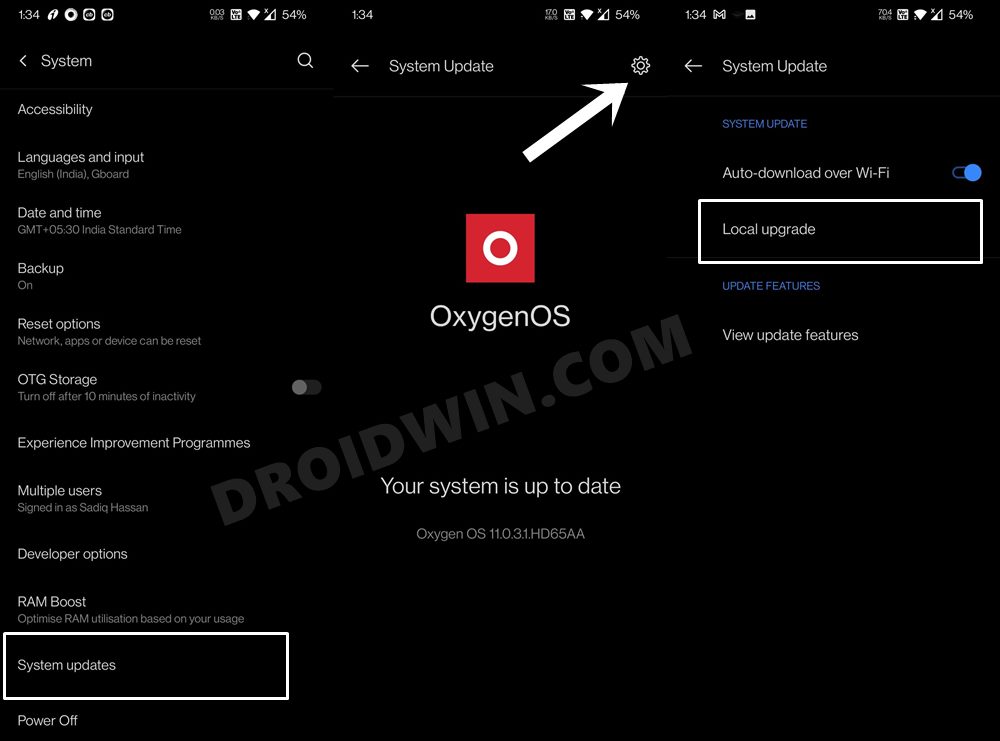
- To begin with, install the OnePlus 9/Pro downgrade APK.
- Then head over to the Settings > System > System Update.
- After that, tap on the settings (gear icon) present at the top right.
Reference Image - Then select Local Upgrade and choose the downgrade firmware.
- If you get a confirmation dialog box, then reply in the affirmative (YES/Confirm/OK).
- Now, wait for the process to complete. Once done, your device will automatically reboot.
- Complete the setup and that’s it, welcome the bug-free OxygenOS 11 onto your device.
METHOD 2: Downgrade OnePlus 9/9 Pro via MSM Tool
MSM Download Tool is the software used by OnePlus service center employees to unbrick the devices. and due to some great work by the developers at XDA, this tool is now available for everyone to use. Using this tool, we will be flashing the Android 11 OFP firmware to your device. While it does not require an unlocked bootloader, still the process is quite technical and could result in a few issues if not done correctly. With that in mind, let’s get started.
STEP 1: Install Android SDK

First and foremost, you will have to install the Android SDK Platform Tools on your PC. This is the official ADB and Fastboot binary provided by Google and is the only recommended one. So download it and then extract it to any convenient location on your PC. Doing so will give you the platform-tools folder, which will be used throughout this guide.
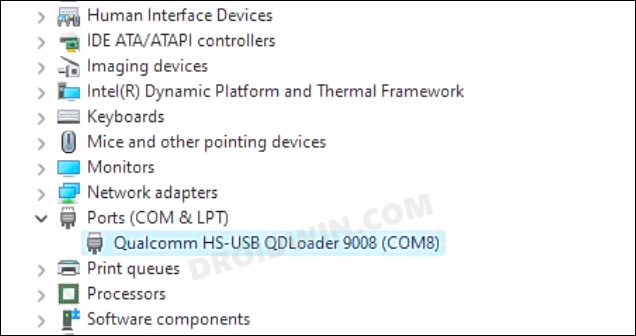
STEP 2: Install Qualcomm USB Drivers
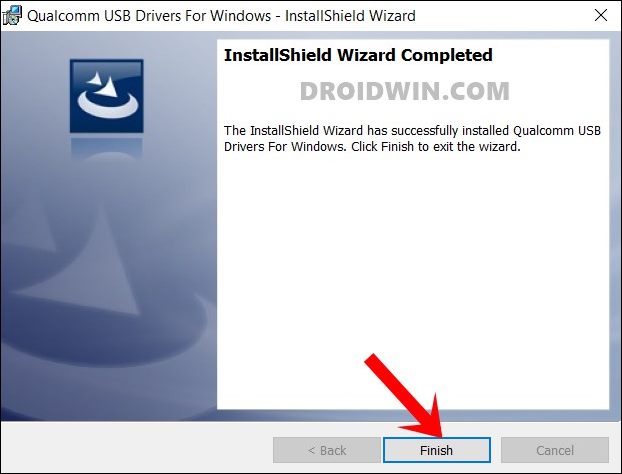
Next up, you will have to download and install the Qualcomm USB Drivers. This is needed so that your PC (and the MSM Tool) is able to identify the connected device in EDL Mode. So refer to our guide on Qualcomm HS-USB QDLoader 9008 Drivers: Download & Install
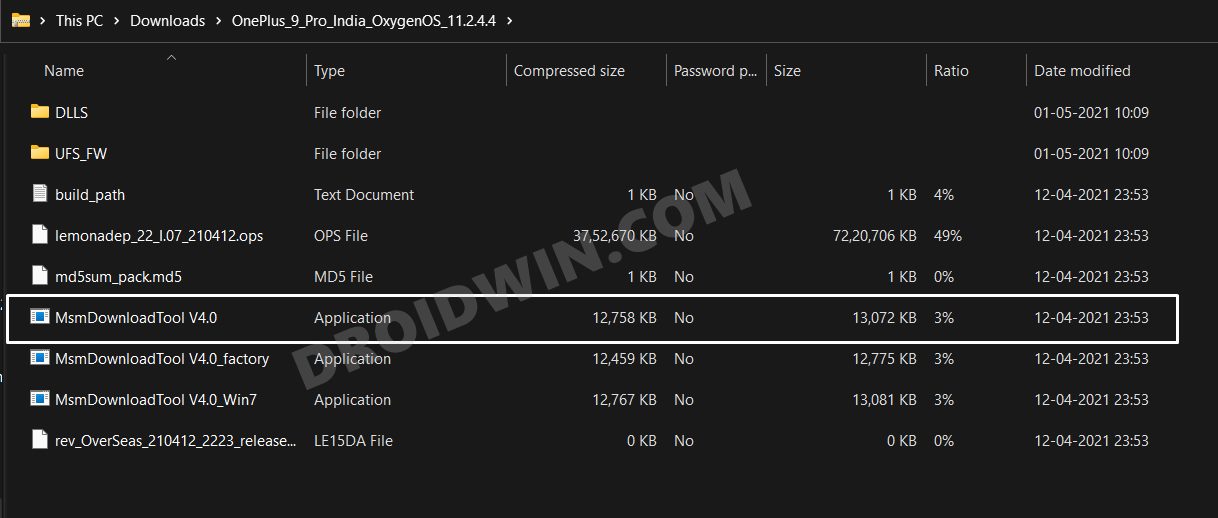
STEP 3: Download MSM Download Tool
Next up, get hold of the MSM Download Tool corresponding to your OnePlus 9/9 Pro from this post [make sure to download the Android 11 firmware]. Once downloaded, extract it to any convenient location on your PC. This will give you the Tool as well as the OPS Firmware for your device.

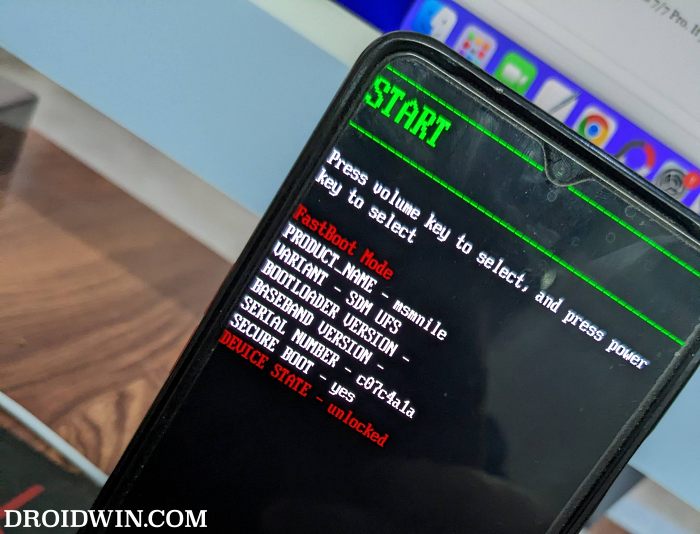
STEP 4: Boot OnePlus to EDL Mode
you will now have to boot your OnePlus device to Emergency download mode. For that, please refer to our comprehensive tutorial on How to Boot any OnePlus Device to EDL Mode. Or you could also refer to the below shorter instructions.
- To begin with, power off your device.
- Then press and hold the Volume Up and Volume Down keys together.
- With both these keys pressed, connect your device to the PC via USB cable.
- That’s it. Your device is now booted to EDL Mode. To verify the same, press Windows+X and select Device Manager.
- Then expand the Other Device or Ports section and your device will be listed as Qualcomm HS-USB QDLoader 9008.
If your device is still being shown as QHUSB_BULK, then reverify driver installation, use USB 2.0 Port, or try using a different USB cable. Any one of these tweaks could fix the EDL connection error.
STEP 5: Flash Android 11 on OnePlus 9/9 Pro via MSM Download Tool
- To begin with, launch the MSM Tool by double-clicking on the MsmDownloadTool V4.0.exe file.
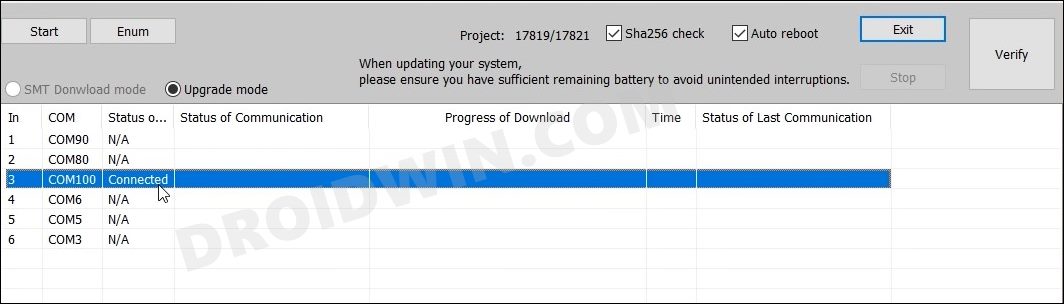
- In the Login screen, select Others under User Type. Leave Username and Password blank and click Next.
- The tool will now load and it should detect the connected device.
- You could verify the same from the COM/Status of Connection section.
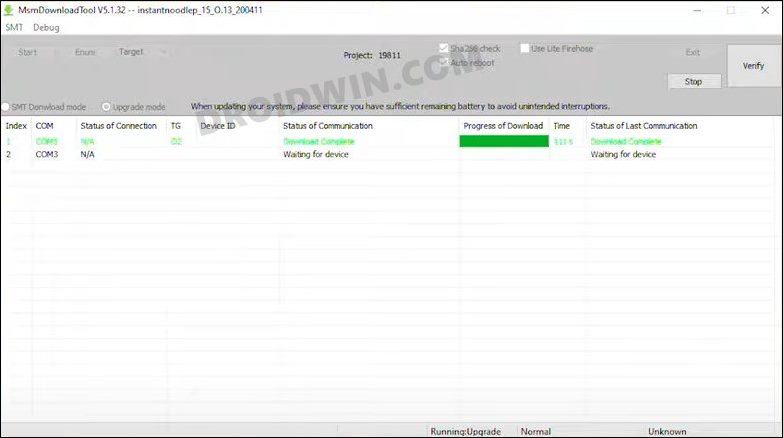
- If that’s well and good, then press Start to initiate the flashing process. It could take a few minutes for the process to complete.
- Once done, you will be notified of the same and your device will automatically boot to Android 11.

So these were the two different methods to downgrade your OnePlus 9/Pro device from Android 12 (OxygenOS 12) to Android 11 (OxygenOS 11). To be fair, stable OS users shouldn’t have to go through all these in the first place. But unfortunately, we don’t have much say in this and this is our only escape route.
Well, the only silver lining out of all this fiasco is the fact that we could still enjoy the OxygenOS environment rather than ColorOS! On that note, we round off this guide. All your queries are welcomed in the comments section below.
METHOD 3: Downgrade OnePlus 9/Pro Via Fastboot Enhance Tool
This is a tool created by XDA Senior Member xzr467706992 and beholds a slew of intriguing features, including the ability to directly flash the payload.bin file, without the need to even manually extract it first. Do note that even though this tool was created for OnePlus 8T but it should work across other OnePlus devices too. [Well, I have personally tested it on OnePlus 7T and OnePlus 10 Pro, it works well and good even on those devices].
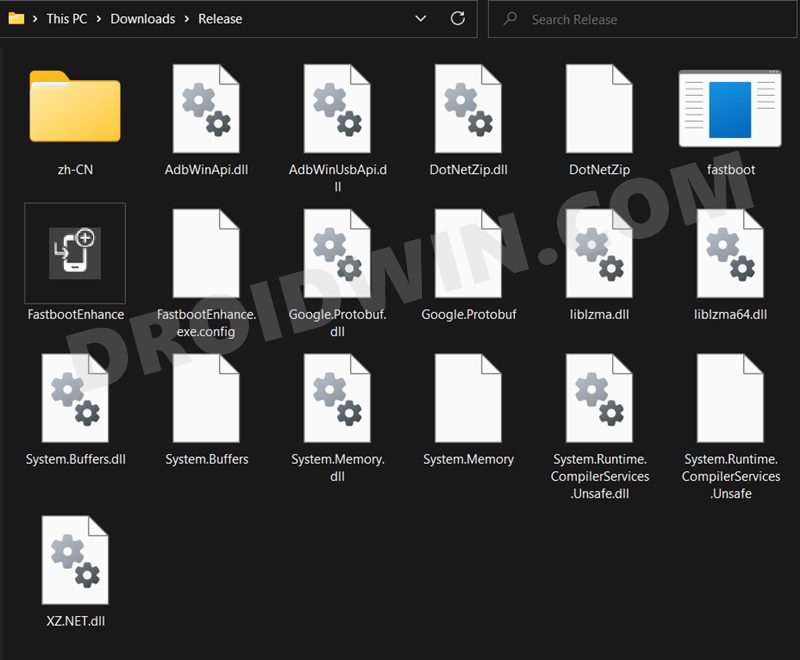
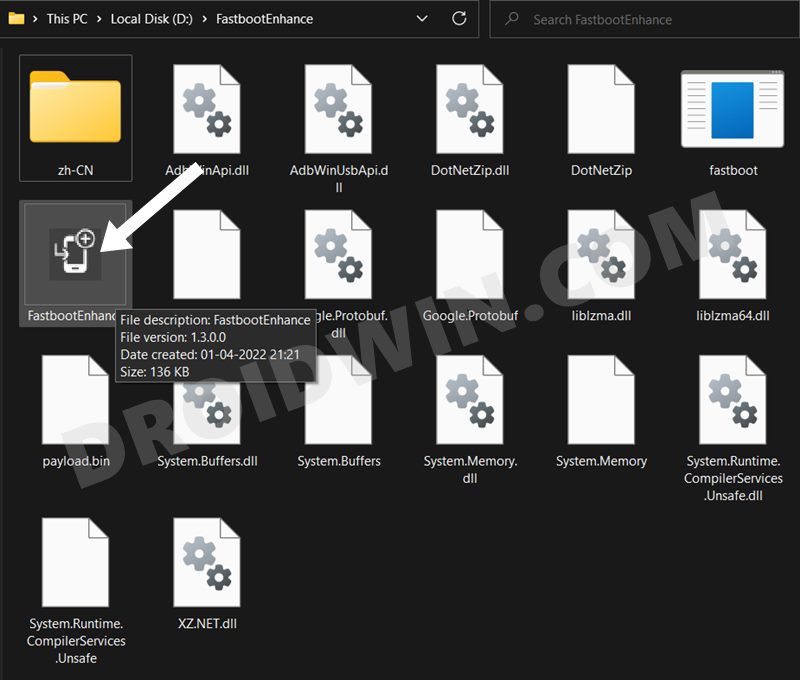
STEP 1: Download Fastboot Enhance Tool
Download the Fastboot Enhance Tool from GitHub [direct link]. Once downloaded, extract it to any convenient location on your PC. The biggest advantage of this tool is that you could directory flash the payload.bin file, there is no need to extract it and get the resultant IMG files!
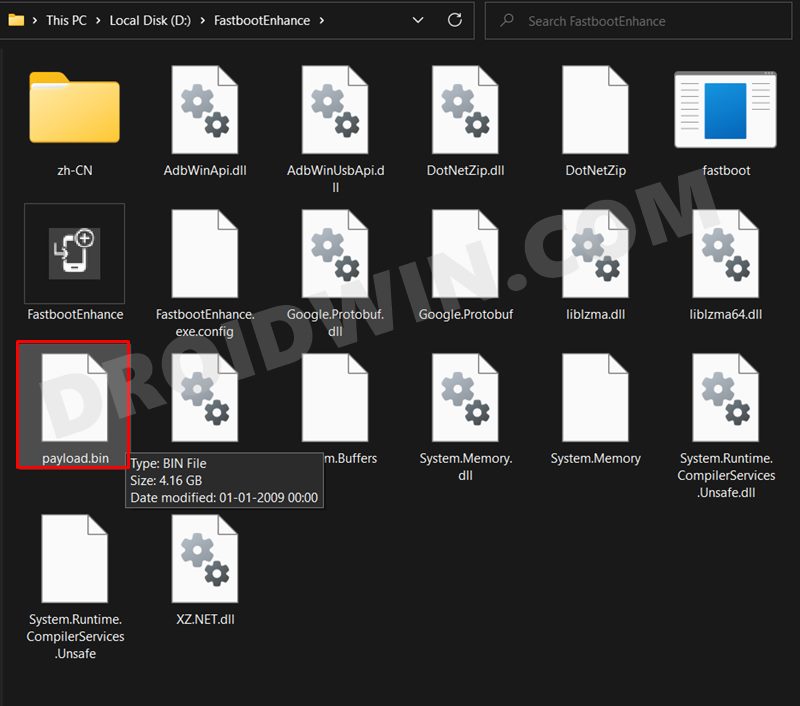
STEP 2: Download OnePlus OnePlus 9/Pro ROM
- Next up, get hold of the firmware for your device from below:
OnePlus 9/Pro Stock Firmware
- Once downloaded, extract it and transfer the resultant payload.bin file to the Fastboot Enhance Tool folder.
STEP 3: Install Android SDK
Next up, install the Android SDK Platform Tools on your PC. This is the official ADB and Fastboot binary provided by Google and is the only recommended one. So download it and then extract it to any convenient location on your PC. Doing so will give you the platform tools folder, which will be used throughout this guide.
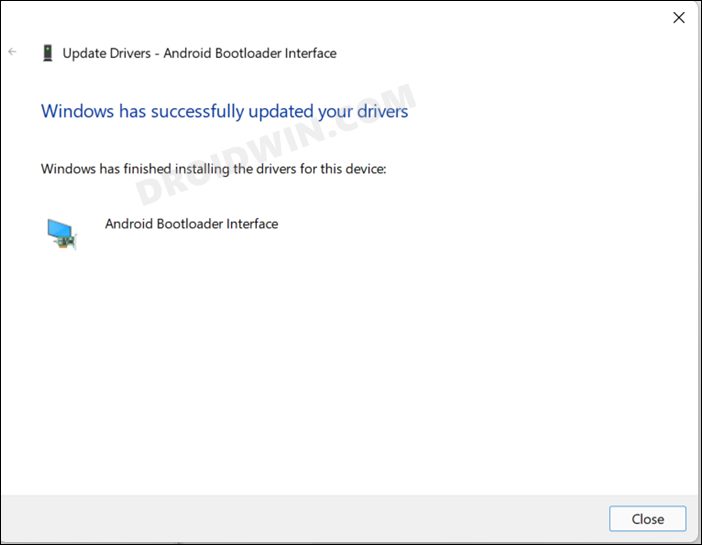
STEP 4: Install Fastboot Drivers
The tool doesn’t come with the Fastboot Drivers, so you will manually have to install it on your PC. For that, please refer to our guide on How to Install Fastboot Drivers in Windows 11. Likewise, make sure to install the OnePlus USB Drivers as well [they are usually automatically installed as soon as you connect your device to the Windows PC for the first time].
STEP 5: Boot to Fastboot Mode
- Connect your device to the PC via a USB cable. Make sure USB Debugging is enabled.
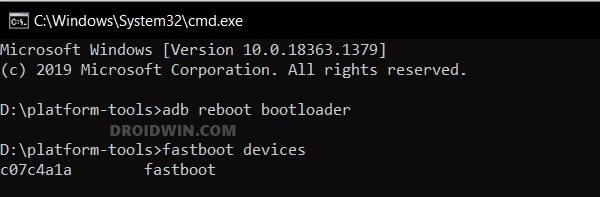
- Then head over to the platform-tools folder, type in CMD in the address bar, and hit Enter. This will launch the Command Prompt.
- After that, type in the following command in the CMD window to boot your device to Fastboot Mode
adb reboot bootloader
- To verify the Fastboot connection, type in the below command and you should get back the device ID.
fastboot devices
STEP 6: Flash Downgrade Firmware on OnePlus 9/Pro via Fastboot
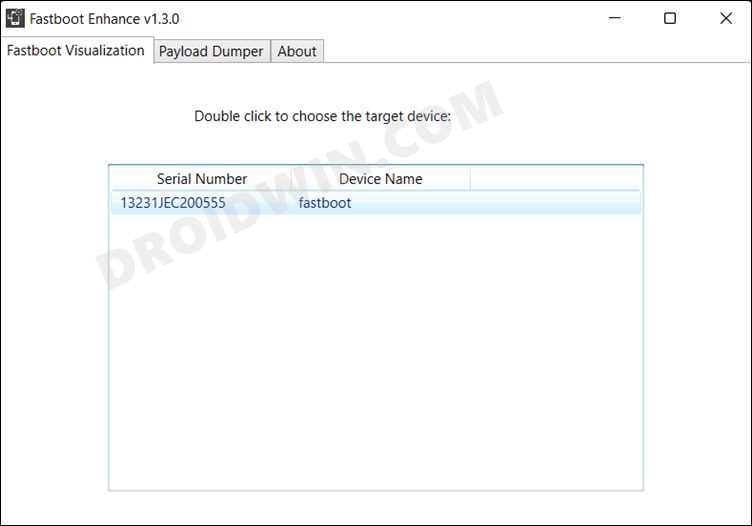
- To begin with, launch the Fastboot Enhance Tool via its EXE file.
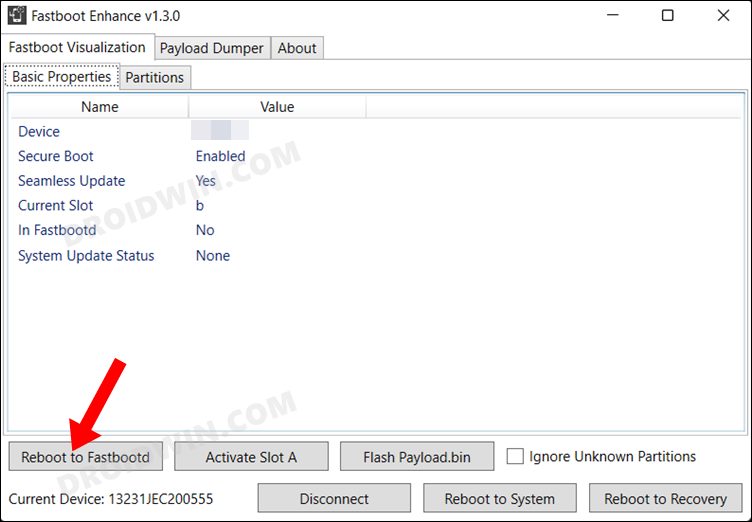
- Your device should be listed under the Fastboot Virtualization tab, select it.
- After that, click on the Reboot to FastbootD button.
- Your device will boot to FastbootD Mode.
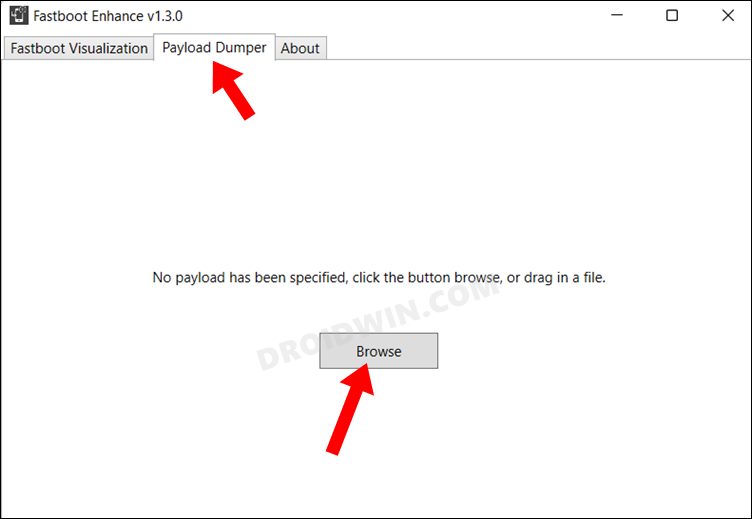
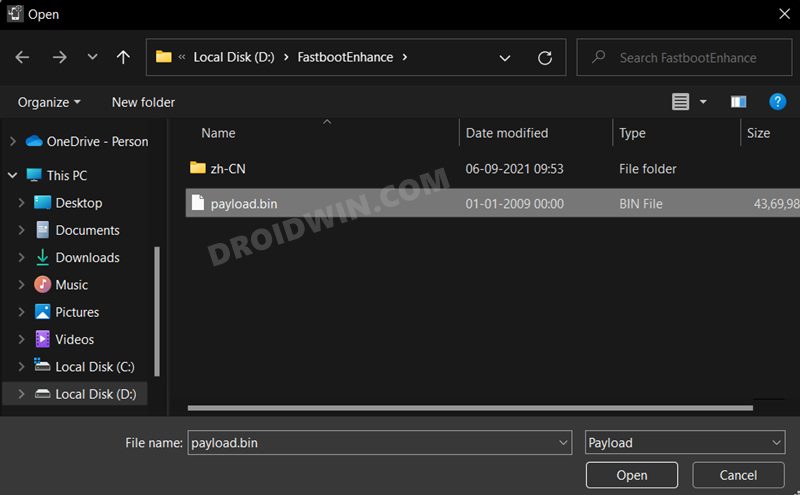
- Now go to the Payload Dumper tab and click on Browse.
- Navigate to the payload.bin file, select it and click Open.
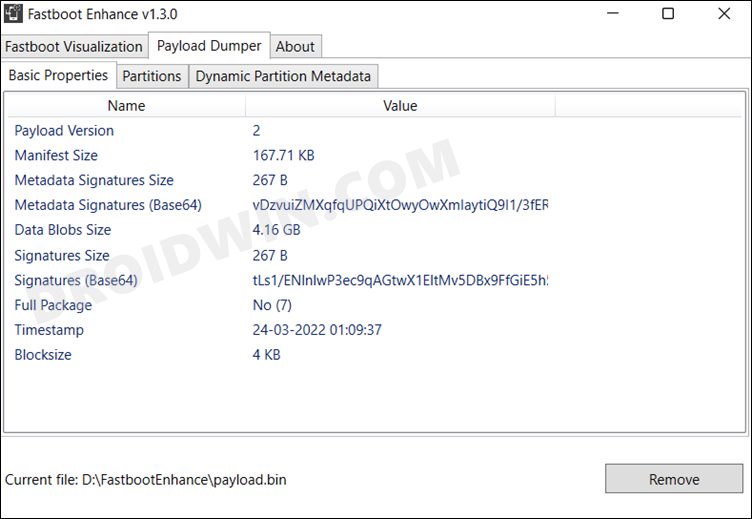
- The file will now be loaded in the tool, displaying the resultant information.
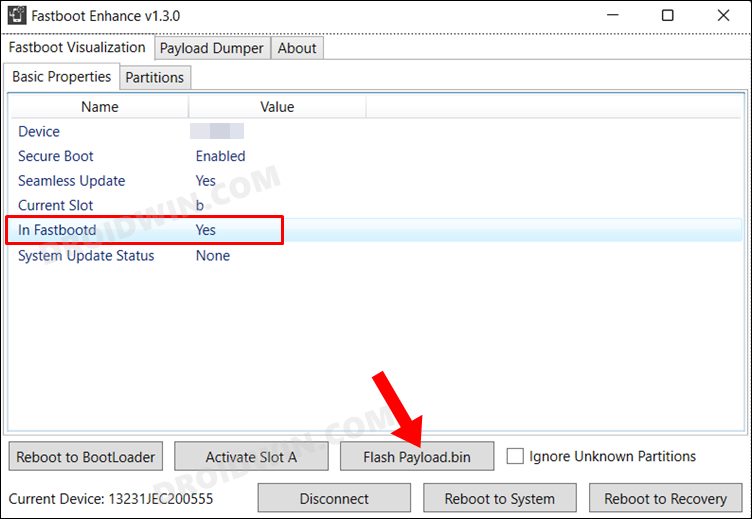
- Now go to the Fastboot Virtualization tab and click on Flash payload.bin. If the flashing starts, well and good.
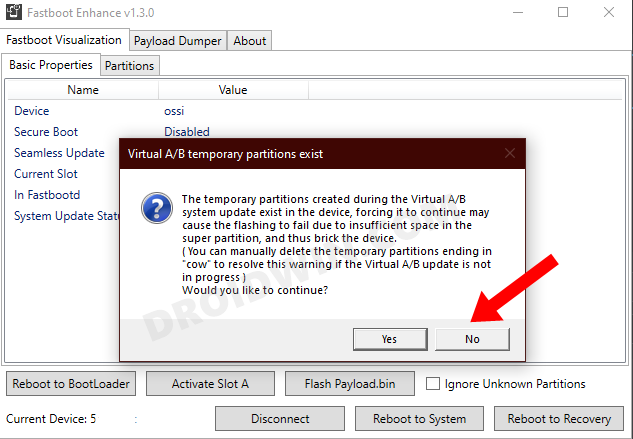
- However, if you get the ‘Virtual A/B temporary partitions exist’ popup, then click on No.
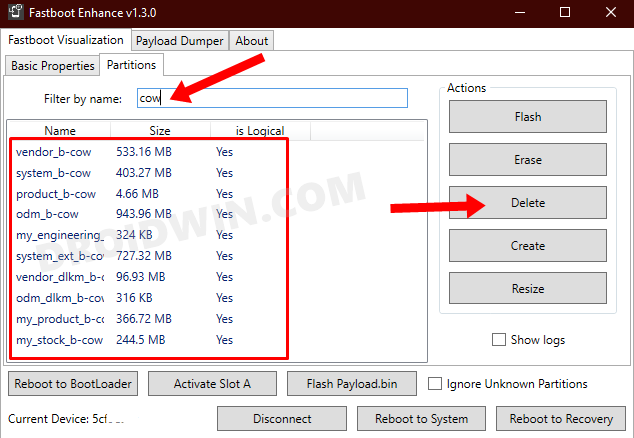
- After that, go to the Partitions tab and type in cow in the Filter by name box.
- Select all the partitions from the results that have cow in their name and hit the Delete button.
- Once done, click on Flash payload.bin. This time the flashing will start without any issues.
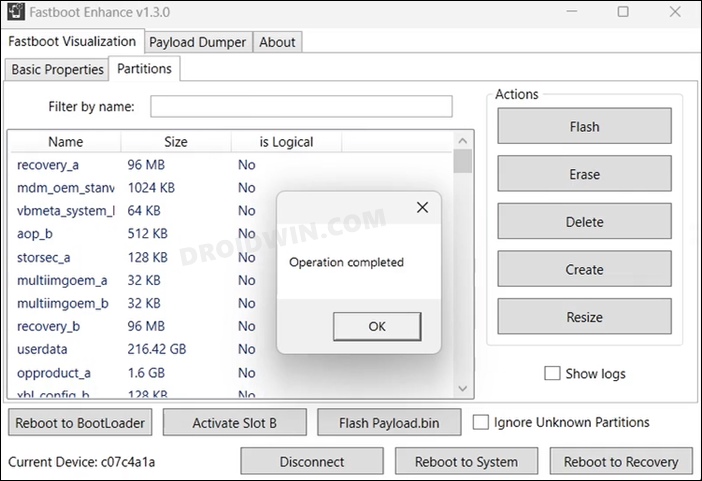
- Once complete, you will be notified of the same. You may now boot to the OS by clicking on Reboot to System.

That’s it. These were the steps to downgrade OnePlus 9/Pro from Android 12 to Android 11 using Fastboot Enhance Tool. All your queries regarding the same are welcomed in the comments section below.


saad
fastboot enhance method is 100% or not …….
GsmExpert
its work but msm tool method is best
mn
fastboot enhance method is 100% or not …….
Rahat
hy again i have done it all
del all cow partitions and then proceeded after reboot i was stuck into
g.co/ABH PAGE
ANY IDEA i have screen freeze in recovery
what can be done thanks
Rahat
hy i do want to downgrade op9 from oos12 to oos11 via adb enhanced tool
sorry to say but best to my knowledge it has super partition consisting all logical partitions
well is it safe to del it thanks for reply ………..
Enrico
Hey guys, I am having a message “Verification Failed” when selecting the OS zip file from the local update installer. Anyone else? Solutions?
Sadique Hassan
Hi Enrico, could you reverify that you have downloaded the downgrade firmware for the correct region?
erdka
my device have (One Plus 5g) LE2115 model number. Which one is true rom for my device
Marion
ich habe die AKP installiert und wenn ich sie öffe erscheint ein Bild von einem Sateliten mit dem Text: Installati9nspaket ins Root-Verzeichnis schieben….nur leider nichts zum auswählen…
Jyrki Väyrynen
Thank you! 3 month frustration with crappy Ox12 is finally over.
Alexis
It would be nice to have a method to downgrade while keeping every data on the phone, just like when making an update. Please tell us more about it.
Josh
There is no way to do a local update in my system settings
Morten
its the APK you download, you need to open it after installation, its an app called system update, which will open the oxygenOS updater where you can choose the file.
i missed that part to 🙂
Morten
same here, seems the author didn’t care to use screenshots from Android 12, which looks much different to 11 on the update part of it.
Fabio
it is possible to access the gear through the apk installed from the tutorial.
Avinash jain
same here