In this guide, we will show you the steps to convert your OnePlus 11R from ColorOS to OxygenOS. The newest addition to the OnePlus family has grabbed the attention of the masses, thanks in large part to the OEM’s decision of going back to its USP of providing feature-rich devices at an aggressive price. But while there’s plenty to rejoice for the general users, things are at a standstill for tech enthusiasts.
Ever since Oppo added the authorization to the MSM Download Tool, there has been a considerable decline in the custom development for this device. And that is completely unstable. With that said, there still does exist a few handy workarounds that could easily be carried out from the Fastboot Mode without the need to interact with the EDL Mode and MSM Tool.
One such tweak is the ability to convert your OnePlus 11R from ColorOS to OxygenOS. So if you currently own/imported a Chinese variant of this device and are looking to welcome abode the Global Firmware, then this guide will help you out. Follow along for the instructions.
Table of Contents
How to Convert OnePlus 11R from ColorOS to OxygenOS

The below process will wipe off all the data from your device. So take a complete device backup beforehand by any means possible. Droidwin and its members wouldn’t be held responsible in case of a thermonuclear war, your alarm doesn’t wake you up, or if anything happens to your device and data by performing the below steps.
STEP 1: Install Android SDK

First and foremost, you will have to install the Android SDK Platform Tools on your PC. This is the official ADB and Fastboot binary provided by Google and is the only recommended one. So download it and then extract it to any convenient location on your PC. Doing so will give you the platform-tools folder, which will be used throughout this guide to unbrick your OnePlus 10 Pro via Fastboot commands.
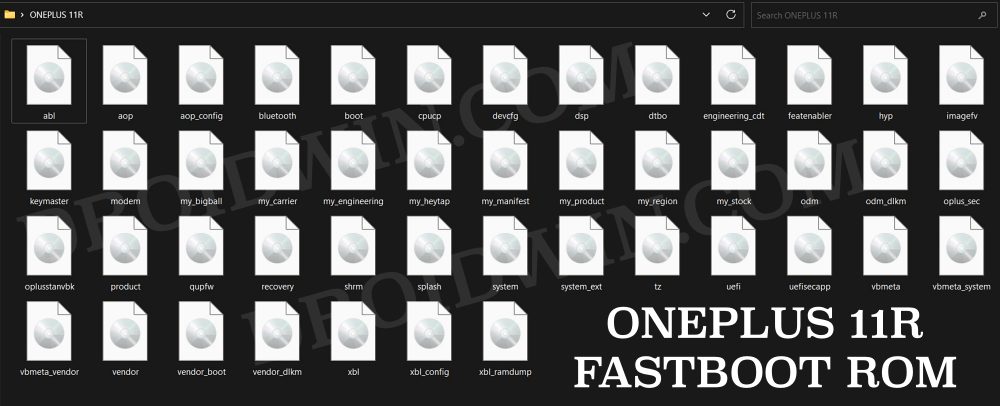
STEP 2: Download OnePlus 11R Fastboot ROM
Next up, download the Fastboot ROM for your device from the below link. OnePlus provides its firmware in payload.bin, which you need to extract in order to get hold of the partition files. I have already done that for a few firmware versions. So if your device has the same firmware/build installed, then you could directly download the Fastboot ROM [extracted payload] instead of the payload.bin. Or else move over to the next step to manually do this task.
ONEPLUS 11R FASTBOOT ROM
STEP 3: Extract OnePlus 11R Payload.bin
If you have downloaded the Fastboot ROM, then you could skip this step. On the other hand, if you have a payload.bin firmware, then you will have to extract it first and get the resultant IMG files. To do so, you may refer to our guide on How to Extract OnePlus Payload.bin file. Once extracted, make sure to transfer all the files to the platform-tools folder.
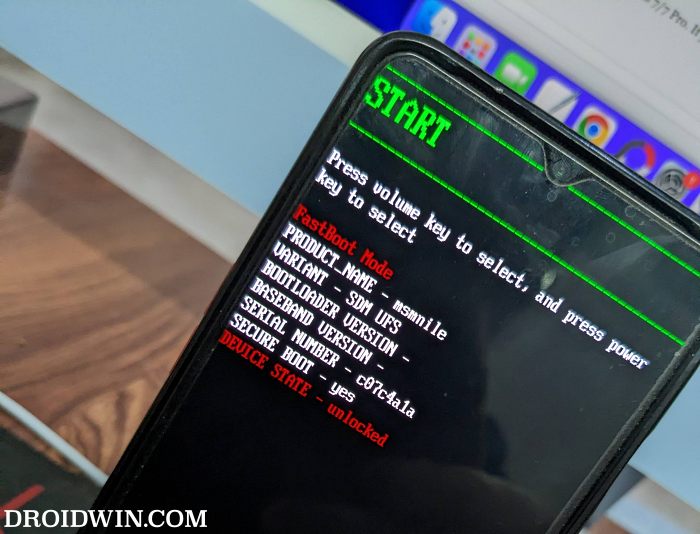
STEP 4: Boot OnePlus 11R to Fastboot Mode
- Connect your device to the PC via a USB cable. Make sure USB Debugging is enabled.
- Then head over to the platform-tools folder, type in CMD in the address bar, and hit Enter. This will launch the Command Prompt.

- Type in the following command in the CMD window to boot your device to Fastboot Mode
adb reboot bootloader

- To verify the Fastboot connection, type in the below command and you should get back the device ID.
fastboot devices
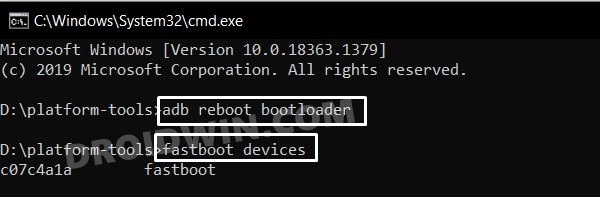
- if you are not getting a serial ID, then please install Fastboot Drivers on your PC.
STEP 5: Format Device via Fastboot
- Head over to the platform-tools folder where the extracted ROM is present.
- Then go to its address bar, type in CMD in its address and hit Enter. This will launch the CMD window.
- Now execute the below command to perform a factory reset (optional but recommended)
fastboot -w
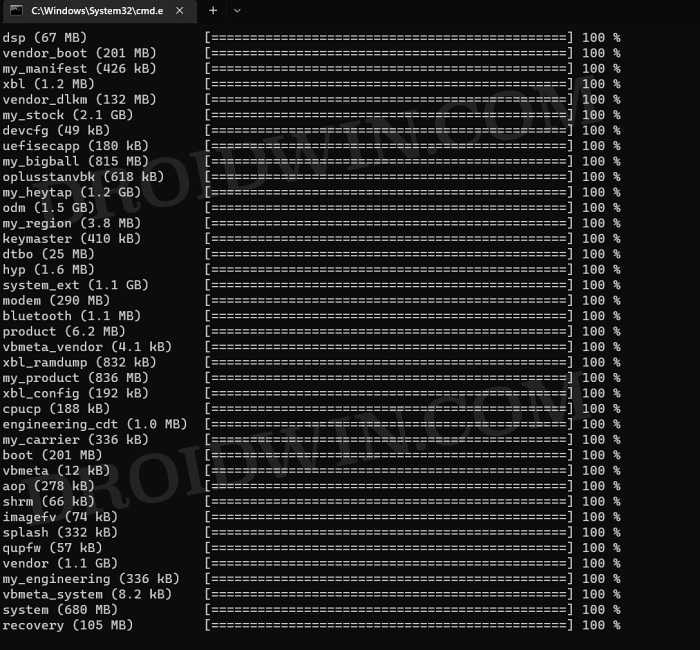
STEP 6: Flash OnePlus 11R OxygenOS in Fastboot Mode
Execute the below commands in the CMD window [that is opened in the platform-tools folder] to flash the partition file. Make sure to execute one command at a time. Furthermore, if you get an error, then don’t leave the process mid-way, rather move over to the next flashing command.
fastboot --set-active=a

fastboot flash --slot=all boot boot.img
fastboot flash --slot=all modem modem.img
fastboot flash vendor_boot vendor_boot.img
fastboot flash vbmeta vbmeta.img
fastboot flash vbmeta_system vbmeta_system.img
fastboot flash vbmeta_vendor vbmeta_vendor.img
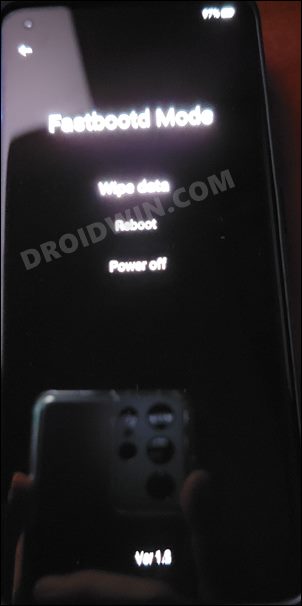
STEP 7: Flash OnePlus 11R OxygenOS in FastbootD Mode
You will now have to flash the remaining firmware files in the FastbootD Mode. So type in the below command to boot your device to this mode
fastboot reboot fastboot
Now execute the below commands in the CMD window [one at a time] to flash the remaining files:
fastboot flash --slot=all abl abl.img
fastboot flash --slot=all aop aop.img
fastboot flash --slot=all aop_config aop_config.img
fastboot flash --slot=all bluetooth bluetooth.img
fastboot flash --slot=all cpucp cpucp.img
fastboot flash --slot=all devcfg devcfg.img
fastboot flash --slot=all dsp dsp.img
fastboot flash --slot=all dtbo dtbo.img
fastboot flash --slot=all engineering_cdt engineering_cdt.img
fastboot flash --slot=all featenabler featenabler.img
fastboot flash --slot=all hyp hyp.img
fastboot flash --slot=all imagefv imagefv.img
fastboot flash --slot=all keymaster keymaster.img
fastboot flash --slot=all oplus_sec oplus_sec.img
fastboot flash --slot=all oplusstanvbk oplusstanvbk.img
fastboot flash --slot=all qupfw qupfw.img
fastboot flash --slot=all recovery recovery.img
fastboot flash --slot=all shrm shrm.img
fastboot flash --slot=all splash splash.img
fastboot flash --slot=all tz tz.img
fastboot flash --slot=all uefi uefi.img
fastboot flash --slot=all uefisecapp uefisecapp.img
fastboot flash --slot=all xbl xbl.img
fastboot flash --slot=all xbl_config xbl_config.img
fastboot flash --slot=all xbl_ramdump.img xbl_ramdump.img

fastboot flash system system.img
fastboot flash system_ext system_ext.img
fastboot flash vendor vendor.img
fastboot flash product product.img
fastboot flash my_product my_product.img
fastboot flash odm odm.img
fastboot flash my_engineering my_engineering.img
fastboot flash vendor_dlkm vendor_dlkm.img
fastboot flash my_stock my_stock.img
fastboot flash my_heytap my_heytap.img
fastboot flash my_carrier my_carrier.img
fastboot flash my_region my_region.img
fastboot flash my_bigball my_bigball.img
fastboot flash my_manifest my_manifest.img
Finally, execute the below command to boot your device to the OS
fastboot reboot
That’s it. These were the steps to convert your OnePlus 11R from ColorOS to OxygenOS. If you have any queries concerning the aforementioned steps, do let us know in the comments. We will get back to you with a solution at the earliest.


Sajid
I have an indian oneplus 8t. Which i have installed colors os 13, i want to go back to oxygen os, can perform a local update, via the zip from oxygen updater application
Isa
Writing ‘xbl_ramdump.img’ FAILED (remote: ‘No such file or directory’)
fastboot: error: Command failed
Why?
Henry
My phone is a Chinese version, and I converted it from ColorOS to OxygenOS. However, I am experiencing some issues with the brightness settings.
I came across a post on XDA Developers forum that addresses this issue specifically for OnePlus 11 (not 11R): https://forum.xda-developers.com/t/maybe-a-proper-way-to-fix-issues-after-converting-color-to-oxygen.4583321/
Have you also experienced this problem? If so, do you know how to fix it?
Thank you.