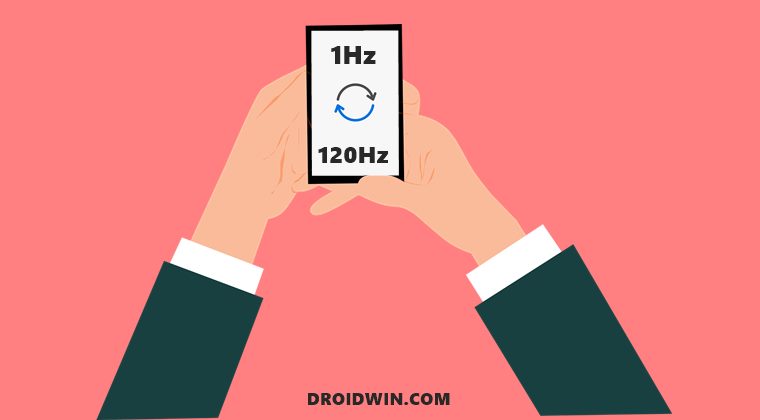
In this guide, we will show you the steps to change the refresh rate on your Android device using ADB Commands. Initially, it was just the flagships that allowed their display to be refreshed 120 times per second, however, we are now witnessing even the budget devices boasting of this 120hz refresh rate. As far as the minimum value is concerned, most devices have capped it at 60hz. Apart from that, some devices also offer a mid 90/96Hz rate as well. And that’s just it.
You do not have the option to choose any other value of your choice. But why would anyone want to do so? Well, there could be a plethora of reasons for the same. For example, rather than adopting 60Hz as the minimum value, you could further take it down to 10-20Hz, which will in turn result in a considerable amount of battery being saved. Then there are some users who wish to manually cap the limit to a value of their choice. Some users even prefer to have the display refresh rate at 120Hz at all times, even though it would come at a cost of battery drainage
But as already discussed, the OEM doesn’t give such granular controls to the users and is usually confined to Standard [60Hz fixed at all time] or Adaptive [oscillate between 60-120Hz depending on the current usage scenario]. However, with the help of ADB Commands, you could set any refresh rate of your choice on your Android device, right from 1Hz all the way up to 120Hz. Let’s check out how this could be carried out.
Table of Contents
How to Change Refresh Rate in Android via ADB Commands
The below instructions are listed under separate sections for ease of understanding. Make sure to follow the same sequence as mentioned. Droidwin and its members wouldn’t be held responsible in case of a thermonuclear war, your alarm doesn’t wake you up, or if anything happens to your device and data by performing the below steps.
STEP 1: Install Android SDK

First and foremost, you will have to install the Android SDK Platform Tools on your PC. This is the official ADB and Fastboot binary provided by Google and is the only recommended one. So download it and then extract it to any convenient location on your PC. Doing so will give you the platform-tools folder, which will be used throughout this guide.
STEP 2: Enable USB Debugging
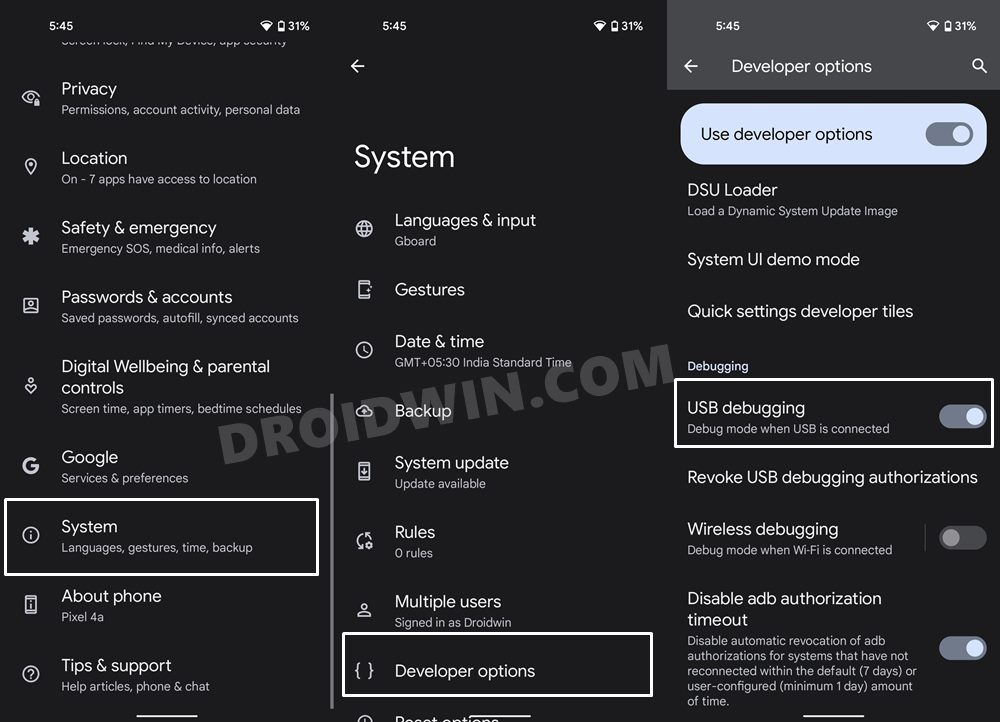
Next up, you will have to enable USB Debugging on your device so that it is recognizable by the PC in ADB mode. So head over to Settings > About Phone > Tap on Build Number 7 times > Go back to Settings > System > Advanced > Developer Options > Enable USB Debugging.
STEP 3: Establish ADB Shell Connection
- To begin with, connect your device to the PC via USB cable. Make sure USB Debugging is enabled.
- Then head over to the platform-tools folder, type in CMD in the address bar, and hit Enter. This will launch the Command Prompt.

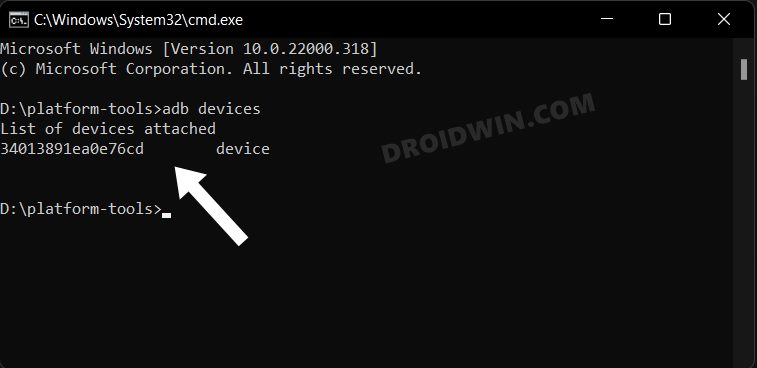
- Now in the following command in the CMD window to verify the ADB connection:
adb devices

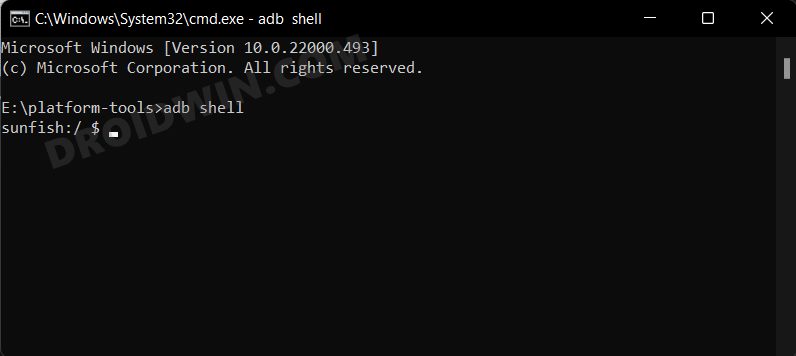
- If you get the device ID, then the connection stands successful. Now type in the below command to open the Shell environment:
adb shell
- It will now list out your device codename/name, which means that the shell connection has been successfully established and you are good to go ahead.
STEP 4: Change Refresh Rate on Android via ADB Commands
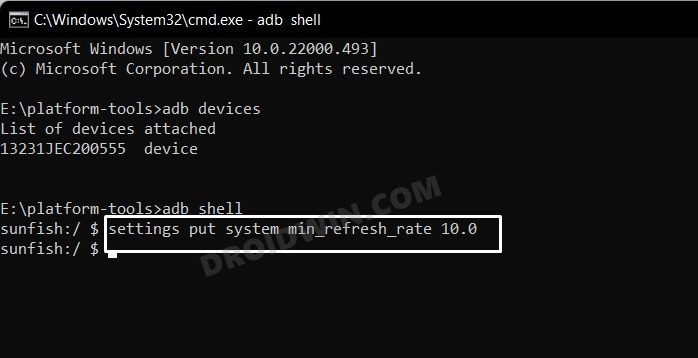
- Use the below command to set the desired level of minimum refresh rate. Here x could take the following values= 1, 10, 24, 48, 60, 96, and 120
settings put system min_refresh_rate x.0
- For example, if you wish to set the minimum refresh rate to 10, then the command will transform to:
settings put system min_refresh_rate 10.0
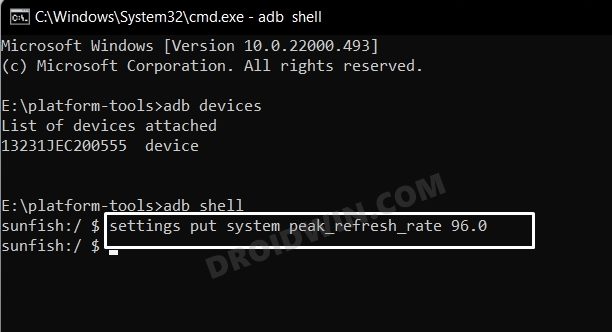
- Next up, use the following command to set the desired level of maximum refresh rate. As before, x could take the following values= 1, 10, 24, 48, 60, 96, and 120
settings put system peak_refresh_rate x.0
- For example, if you wish to set the maximum refresh rate to 96hz, then the above command will transform to:
settings put system peak_refresh_rate 96.0
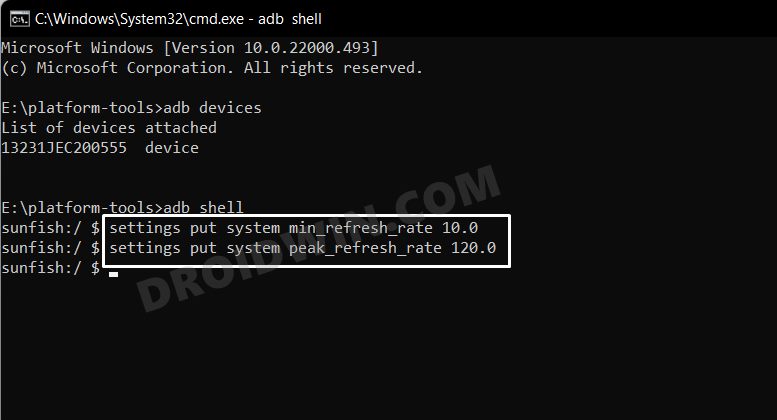
- So combining the two examples that we have shared above, the device’s refresh rate will oscillate between 10hz to 96Hz. You could customize the values accordingly and get the results that are in sync with your requirements.
How to Fix a Specific Refresh Rate on Android
There are a few users who don’t want this adaptive refresh rate but rather wish to stick to a particular rate. In this regard, the most commonly asked query is how to get the most fluid usage experience by capping the refresh rate at the maximum 120hz. Well, in that, you will have to set both the minimum and maximum refresh rate to 120hz. You may use the following two commands to do so:
settings put system min_refresh_rate 120.0
settings put system peak_refresh_rate 120.0
While you will get the best user experience from your device, but it will also result in excessive battery drainage. So, if you wish to take a less aggressive approach, then you could also opt for 96Hz. To do so, just replace 120.0 with 96.0 in the above two commands, namely:
settings put system min_refresh_rate 96.0
settings put system peak_refresh_rate 96.0
With this, we round off the guide on how you could change the refresh rate on your Android device using ADB Commands. Likewise, we have also listed the steps to fix the specific refresh rate for your device. If you have any queries concerning the aforementioned steps, do let us know in the comments. We will get back to you with a solution at the earliest.


zDiplo
hi, i have this error how do i solve it???
D:\platform-tools>adb shell
RE54ABL1:/ $ settings put system min_refresh_rate 10.0
Exception occurred while executing ‘put’:
java.lang.SecurityException: com.android.shell was not granted this permission: android.permission.WRITE_SETTINGS.
at android.provider.Settings.isCallingPackageAllowedToPerformAppOpsProtectedOperation(Settings.java:17123)
at android.provider.Settings.checkAndNoteWriteSettingsOperation(Settings.java:17011)
at com.android.providers.settings.SettingsProvider.mutateSystemSetting(SettingsProvider.java:2161)
at com.android.providers.settings.SettingsProvider.insertSystemSetting(SettingsProvider.java:2095)
at com.android.providers.settings.SettingsProvider.call(SettingsProvider.java:600)
at android.content.ContentProvider.call(ContentProvider.java:2473)
at android.content.ContentProvider$Transport.call(ContentProvider.java:521)
at com.android.providers.settings.SettingsService$MyShellCommand.putForUser(SettingsService.java:382)
at com.android.providers.settings.SettingsService$MyShellCommand.onCommand(SettingsService.java:278)
at com.android.modules.utils.BasicShellCommandHandler.exec(BasicShellCommandHandler.java:97)
at android.os.ShellCommand.exec(ShellCommand.java:38)
at com.android.providers.settings.SettingsService.onShellCommand(SettingsService.java:50)
at android.os.Binder.shellCommand(Binder.java:970)
at android.os.Binder.onTransact(Binder.java:854)
at android.os.Binder.execTransactInternal(Binder.java:1226)
at android.os.Binder.execTransact(Binder.java:1163)
Qori
i tried to lower my device refresh rate to 10-20hz but it didnt change. i also reboot it but still nothing. im using redmi 8a pro
Hamid
Hi
My phone is poco f1 official global rom , android 9 miui10
I want to reduce peak refresh rate from 60 to 30 hz for better battery
But first i want to know the deffault value of the two register to revert back later
What is adb command to read value of this registers ?
I used app “SetEdit” but i cant find this two register
Can i create this two register in setedit or adb? and is it work for me?
Sadique Hassan
Hi Hamid, as far as the SetEdit app is concerned, you will first need to add those two values using the Add New Setting button. I have covered something similar in this guide, you may check it out: Enable 120Hz Refresh Rate in Snapchat, Instagram, GCam Camera
As far as the values are concerned, I guess it doesn’t have dynamic refresh rate, so both the peak and minimum refresh rate would be fixed at 60Hz. [There might be an option to display refresh rate under Developer options. You may enable it and verify the results].