In this guide, we will show you the steps to get back the old Windows 10 context right-click menu on your Windows 11 PC. The latest OS offering from the Silicon Valley giants has bought in quite a truckload of new features. Most of them are mostly related to UI changes and tweaks. These include the likes of changes to the Start menu, icon UI change, taskbar icons occupying the center stage among others. Along the same lines, the Windows right-click menu has also undergone a few changes.
Not only the available options, but even the look and feel of this menu is in stark contrast to what it used to be in its predecessor (well, even the Refresh option was removed from this menu, but with the second Insider Preview, it is finally back). All in all, many users still prefer to revert to the old-styled UI. If you also echo this thought, then this guide will show you how to get back the old Windows 10 context right-click menu on your Windows 11 PC. Follow along.
- How to Replace PowerShell with Command Prompt in Windows 11
- Get Back the Windows 10 Start Menu on Windows 11
- How to Decrease Folder Spacing in Windows 11 File Explorer
Table of Contents
Windows 11 Right Click: How to Get Windows 10 Context Menu
There are four different menus through which you could carry out this task. Each of them comes with its own set of perks and caveats, which have been mentioned below in the tabular form. So before you try it out, make sure to have a go through all these methods once.
| Method Name | Pros | Cons |
| Via Show More Option | Easiest Method | Temporary in nature. You will have to perform it every time you want the Windows 10 right-click menu. |
| Via Folder Option | Permanent in nature | Only bring back the Windows 10 Context Menu inside the File Explorer. On your desktop, you will still continue to get the Windows 11 Context menu. Moreover, it would also bring the old File Explorer UI, even though we didn’t ask for the same! |
| Via Registry Editor | Bring back the Windows 10 Context right-click menu on Windows 11, both in the File Explorer as well as on your Desktop. | Difficult to execute |
| Windows 10 Context Menu + Windows 11 File Explorer UI | It brings back the Windows 10 Context Menu and at the same time retains Windows 11 File Explorer | Difficult to execute |
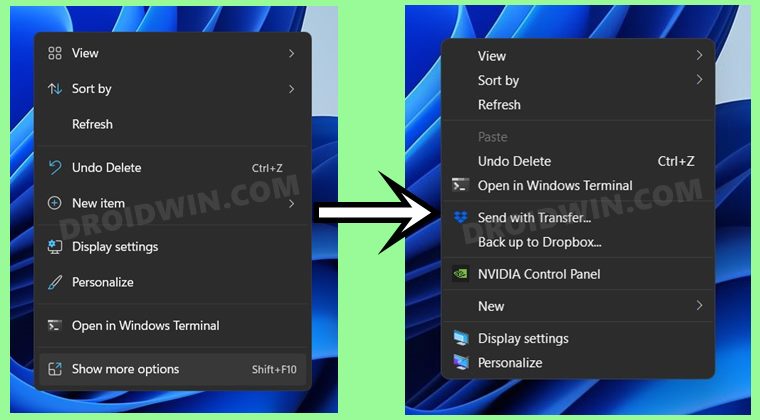
Method 1: Via Show More Option
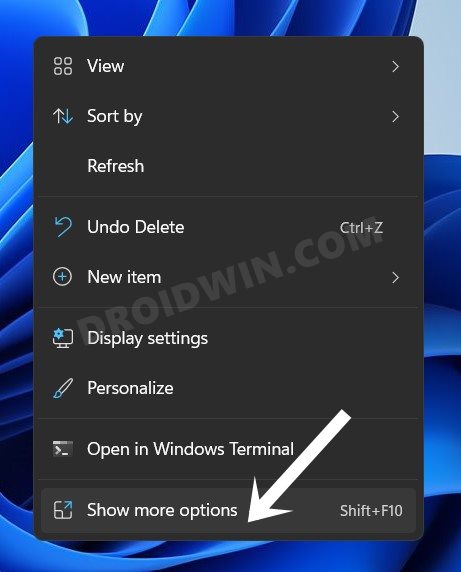
- Right-click anywhere on your Desktop/File Explorer, etc.
- Then select Show More Options. You may also use the Shift+F10 shortcut to bring up this menu.
- That’s it, the familiar Windows 10 menu will now appear.
Method 2: Via Folder Option
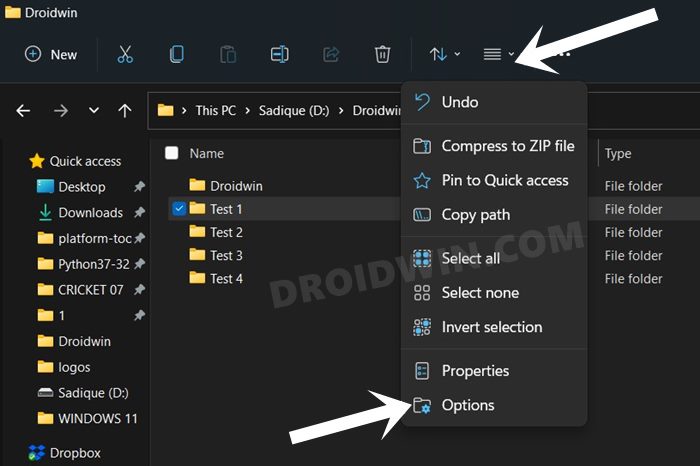
- To begin with, launch File Explorer on your PC.
- Then click on the three horizontal dots situated at the top menu bar and select Options.

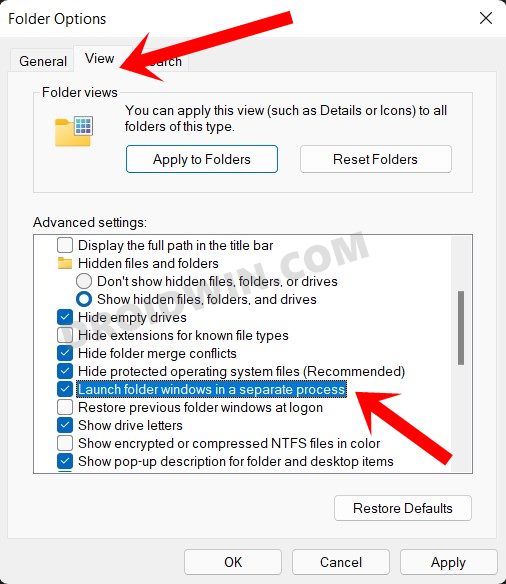
- Go to the View tab and enable the “Launch folder windows in a separate process” option.
- Finally, click OK and restart File Explorer for the changes to take place.
Method 3: Via Registry Editor
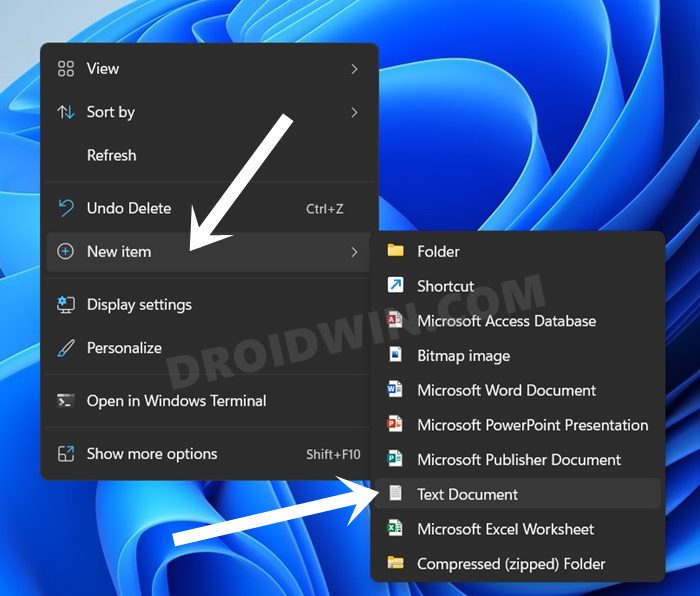
- Let’s start off by creating the required Registry file. So right-click on your desktop > New Item > Text Document.
- Give it any name of your choice (such as Windows_10_menu).
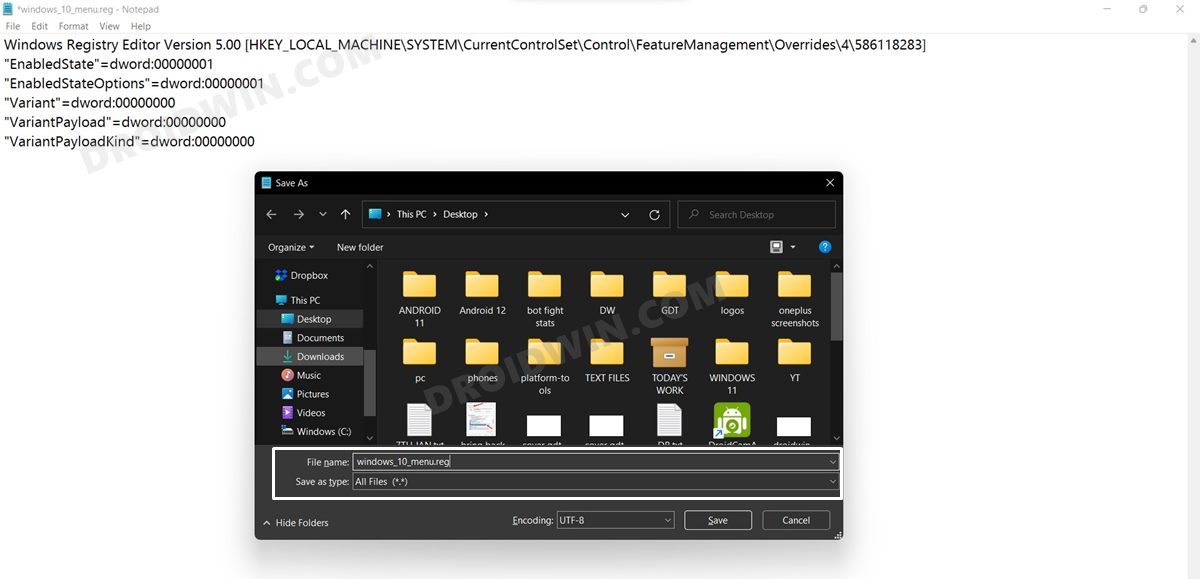
- Now open this file and copy-paste the below command:
Windows Registry Editor Version 5.00 [HKEY_LOCAL_MACHINE\SYSTEM\CurrentControlSet\Control\FeatureManagement\Overrides\4\586118283]
"EnabledState"=dword:00000001
"EnabledStateOptions"=dword:00000001
"Variant"=dword:00000000
"VariantPayload"=dword:00000000
"VariantPayloadKind"=dword:00000000
- Now hit the Ctrl+Shift+S shortcut to bring up the Save As dialog box. Change the Save As to All Files.
- Then name it Windows_10_menu.reg. That’s it, the Registry file has been successfully created.
- Launch it and click Yes in the confirmation dialog box. That’s it.
- Restart your PC and you shall see the Windows 10 Context menu on your Windows 11 PC, both on your desktop as well as File Explorer.

Method 4: Windows 10 Context Menu + Windows 11 File Explorer UI
[UPDATE: If you are planning to take the Registry Editor route, then I would suggest you first try out Method 5. Why? Because Method 5 is a more efficient method, takes slightly less time, and if you ever plan to get back the Windows 11 Context Menu then it would be easier if you had done Method 5 in comparison with Method 4].
Now there are two different methods to carry out this task. The first one is a pre-created Registry Editor File that you only need to launch once. It will carry out all the work on its own and your tasks stand complete. On the other hand, if you wish to manually carry out this tweak, then the second method will come in handy.
Automatic Approach
- Download the pre-built Registry Editor File: Link [Credits: NerdsChalk].
- Once downloaded, launch it and click Yes in the confirmation dialog box [see the below note].
- The required registry will be created within seconds.
- Once done, restart your PC and the task stands complete.
NOTE: If you wish to first verify the contents of this registry file, then right-click on it and select Show More Options > Edit. The reg file will now be opened in the Notepad and you could verify its credibility. Once done, relaunch the registry file, and this time click Run. However, if you still have any doubts, then it’s better you try out the manual method, given below.
Manual Method
- Head over to the Start Menu and search Registry Editor.
- Now copy-paste the below location in its address bar
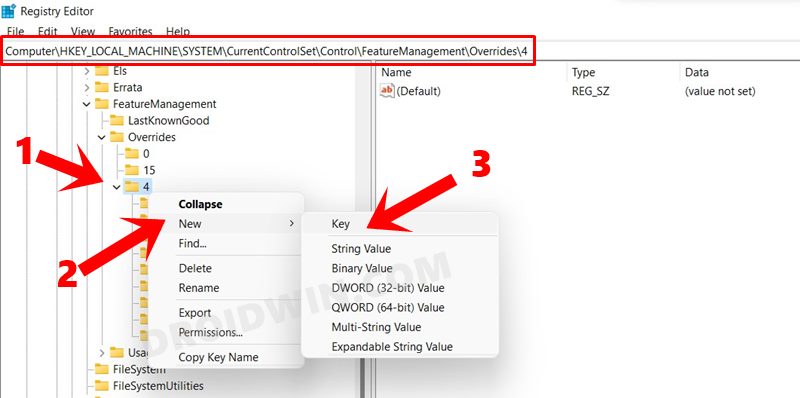
Computer\HKEY_LOCAL_MACHINE\SYSTEM\CurrentControlSet\Control\FeatureManagement\Overrides\4
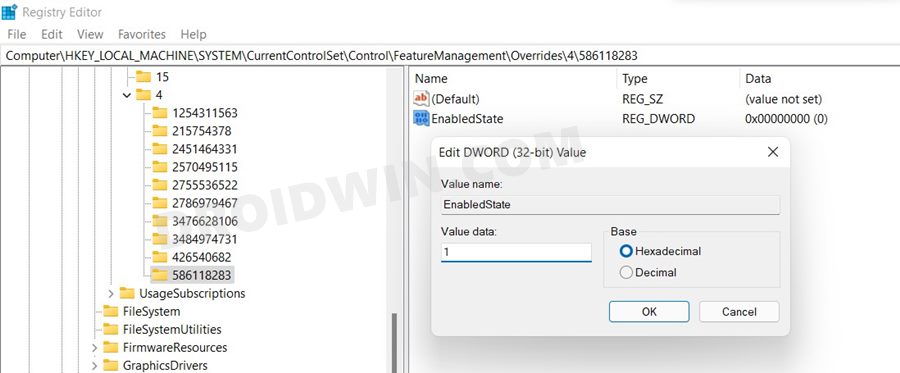
- Right-click on the ‘4’ folder, select New > Key.
- Name this key 586118283 and hit Enter.
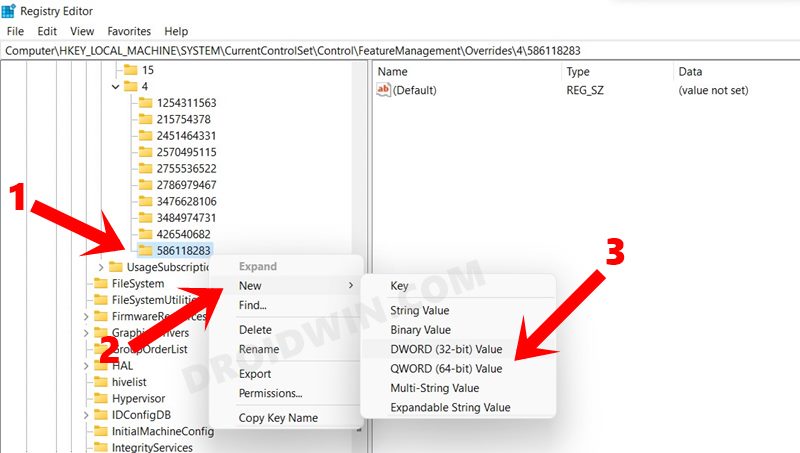
- Now right-click on this 586118283 key, select New > DWORD (32-bit) Value.
- Name it EnabledState. Then double click on it and type in 1 under Value Data.
- You will now have to create four more DWORD (32-bit) Value files inside the 586118283 key. Their names and Value Data are as follows:
EnabledStateOptions: 1
Variant: 0
VariantPayload: 0
VariantPayloadKind: 0
- Once all the five value data have been created, close the Registry Editor and restart your PC for the changes to take place.
Method 5: Via Registry Editor [Recommended]
This is another registry editor hack that would allow you to get the old Windows 10 context right-click menu on your Windows 11 PC. And as before, we will be sharing two different approaches to carry out this task: via One-Click Registry Hack and using the Manual Method. You may refer to the one that is in sync with your requirement.
Automatic Method
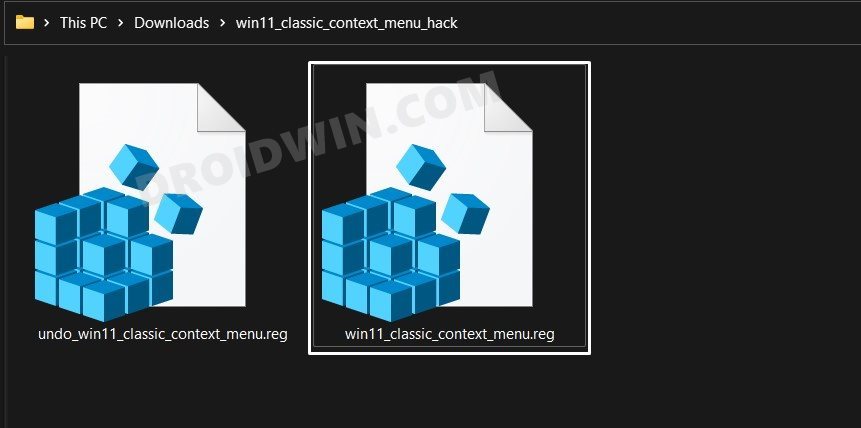
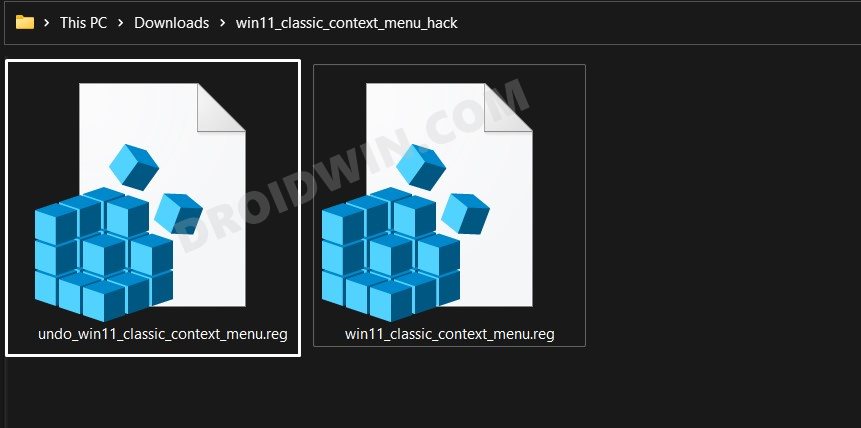
- To begin with, download the One-Click Registry Hack onto your PC: LINK [Credits: How-To-Geek].
- Once downloaded, extract it to any convenient location on your PC.
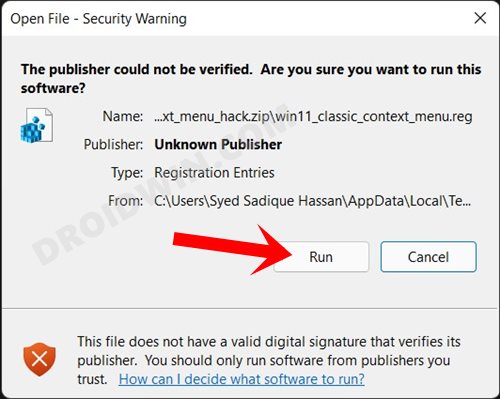
- Now double-click on the win11_classic_context_menu.reg file.
- You will now get a warning dialog box, click Run [refer to the below note if you wish to verify its contents].
- The registry settings will be added within seconds. Once done, restart your PC for the changes to take place.
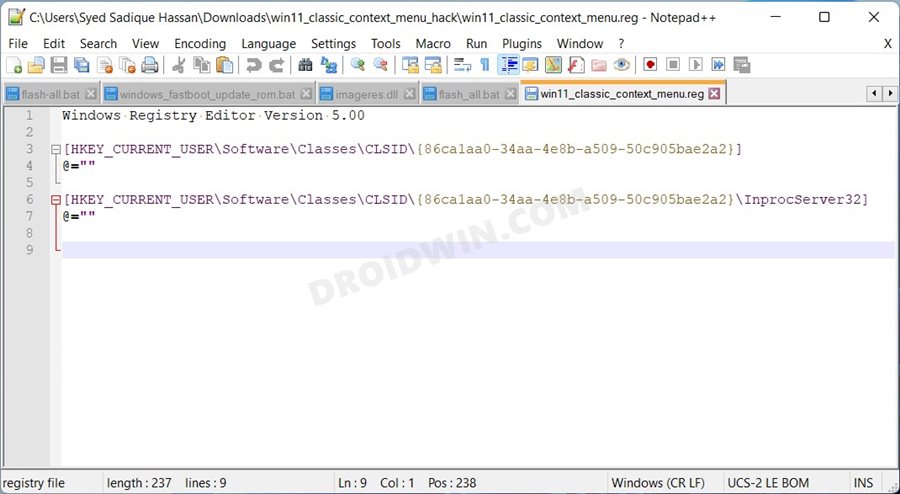
NOTE: If you wish to first verify the contents of this registry file, then right-click on it and select Show More Options > Edit. The reg file will now be opened in the Notepad and you could verify its credibility (see below image).
Once done, relaunch the win11_classic_context_menu.reg file, and this time click Run. [However, if you still have any doubts, then it’s better you try out the manual method given below].
Manual Method
Not everyone is comfortable in executing a registry file that has been downloaded from the internet. And that is totally understandable. Therefore, in this section, we will be carrying out the task manually what the registry hack did automatically in the above section. Follow along for the steps to get back the old Windows 10 context right-click menu on your Windows 11 PC via this registry editor tweak.
- To begin with, bring up the Run dialog box via Windows+R shortcut keys.
- Then type in regedit and hit Enter. It shall launch the Registry Editor.
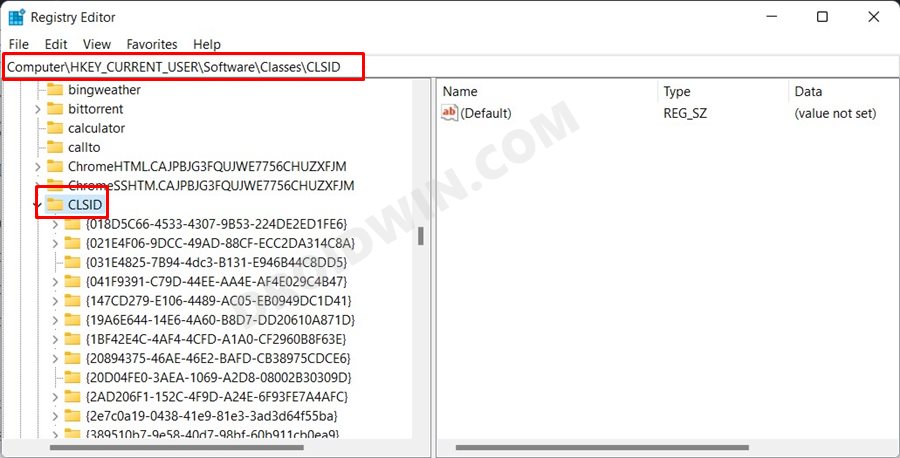
- Now copy-paste the below location in its address bar and hit Enter:
Computer\HKEY_CURRENT_USER\SOFTWARE\CLASSES\CLSID\
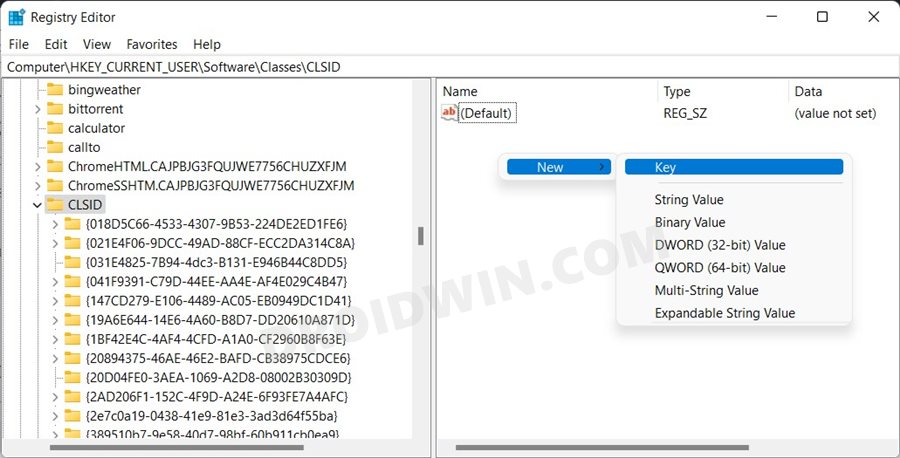
- With the CLSID folded selected, right-click in an empty area on the right-hand side menu and select New > Key.
- Give it the following name:
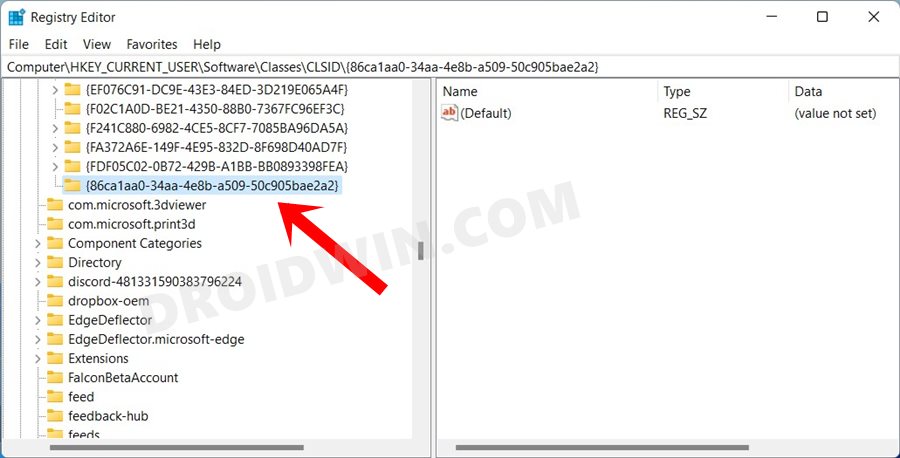
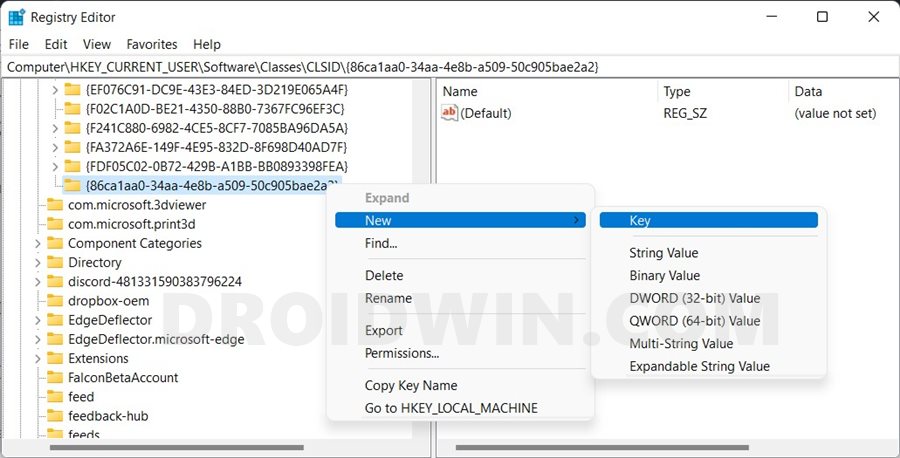
{86ca1aa0-34aa-4e8b-a509-50c905bae2a2} - Now right-click on this newly created key and select New > Key
- Then name this key as:
InprocServer32
- Then go to this key’s right-hand side menu and double click on the Default file to open it.
- Don’t make any change to it, just click OK to close this dialog box (we did this to replace the ‘value not set’ with a blank value under the Value Data field).
- Finally, restart your PC once for the changes to take place.

How to Revert to Windows 11 Context Menu
If for some reason you wish to get back the Windows 11 right-click menu, then there are two different approaches for the same:
Automatic Approach
- First off, download the Registry Hack file from Method 5
- Then extract it to any convenient location on your PC.
- Now double click on the undo_win11_classic_context_menu.reg file.
- Click Run in the warning message that appears (as before you could edit this file via Notepad to verify its content).
- Finally, restart your PC and you shall get back the windows 11 context menu.
Manual Approach
- Launch Registry Editor and go to the below location (copy-paste it in its address bar):
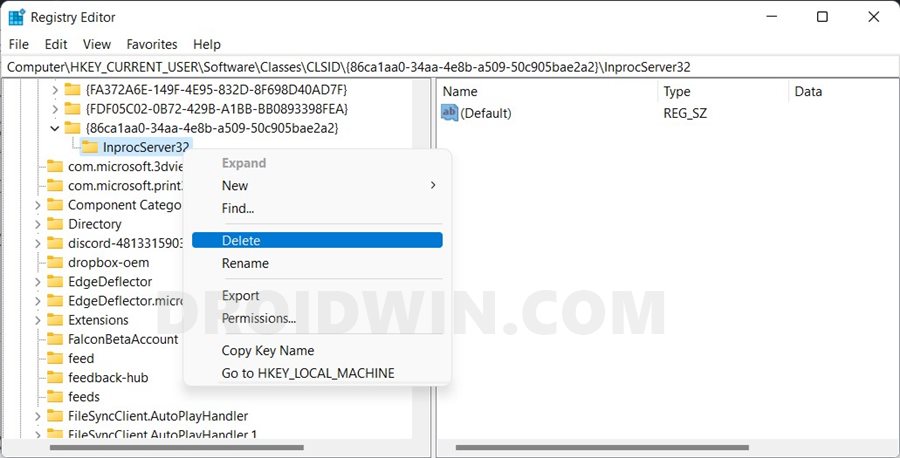
HKEY_CURRENT_USER\Software\Classes\CLSID\{86ca1aa0-34aa-4e8b-a509-50c905bae2a2}\InprocServer32 - Now right click on the InprocServer32 folder and select Delete. Likewise, also delete the {86ca1aa0-34aa-4e8b-a509-50c905bae2a2} key that we had created.
- Finally, restart your PC and your task stands complete.
Concluding Remarks
So with this, we round off the guide on how you could get back the old Windows 10 context right-click menu on your Windows 11 PC. We have shared five different methods for the same. Likewise, we have also listed the steps to revert to the stock Windows 11 context menu. If you have any queries, do let us know in the comments section below. We will get back to you with a solution at the earliest.


jaro
hHi,perfect!thx a lot!
Sadique Hassan
Thanks for the appreciation Jaro