In this guide, we will show you the steps to flash custom ROMs on your Android device using a web browser. Owing to the open-source ecosystem of the OS, there exist a plethora of tweaks that you could try out. Then the tech enthusiasts take this a step further by entering into custom development. There’s only one prerequisite that you need to check-mark: an unlocked bootloader. Once you do so, you could flash custom ROMs, replace stock recovery via custom ones like TWRP or root your device via Magisk.
In this regard, it is no hidden secret that flashing a customized Android-based ROM has always been the fan-favorite. Be it the highly customized ones such as HavocOS or the basic ones part of the AOSP family, you have a lot to choose from. However, there still exists a few doubts in the mind of the users when it comes to flashing these ROMs. And the concerns grew only more in case of absence of working of a custom recovery.
But as of now, there’s a new development brewing up that has the potential to completely change this landscape, and for good. You could now flash custom ROMs onto your Android device right from a web browser. In this guide, we will make you aware of the detailed instructions set to carry out this task. But first, let’s check out some of the associated advantages of using this ‘new’ method of flashing ROMs.
- Root Android 11 via Magisk Patched boot.img (without TWRP)
- How to Root Google Pixel 5 via Magisk without TWRP (Android 11)
- Fix Magisk patched boot.img issue while Rooting Android 11
- How to Take Screenshots in Restricted Apps on Android
Table of Contents
Why you should Flash Custom ROMs via Web Browsers?
The general method of flashing a custom ROM requires the use of a custom recovery like TWRP. You just need to wipe some device partitions, decrypt the data partition if required, and then flash the ROM ZIP file. So can’t we install a custom one without TWRP? Well, you can, and it requires flashing the custom ROM files to their respective partitions via Fastboot Commands.
However, this process is only valid for a limited set of ROMs that have their files packed inside paylaod.bin. So since flashing ROMs via TWRP is such an easy and widely approved method, why the need for a change? Well, first and foremost, not every device has a working TWRP build. For this set of devices, you might notice a lack of custom ROM support.
Furthermore, even if your device supports TWRP, installing them might prove to be a challenging task. Due to the presence of A/B partition devices (aka absence of recovery partition and flashing recovery via boot), some users could have a tough time installing this recovery. And this would lead to the reluctance in flashing ROMs as well.
Apart from all these facts, there are tons of ADB and Fastboot issues that you might face from time to time. Whereas flashing of ROM via a web browser requires nothing apart from, well, a web browser! All these reasons would have given you a perfect idea as to why I am inclined towards this project. So let’s now start off with the guide to flash custom ROMs on your Android device using a web browser.
How to Flash Custom ROMs on Android using Web Browser
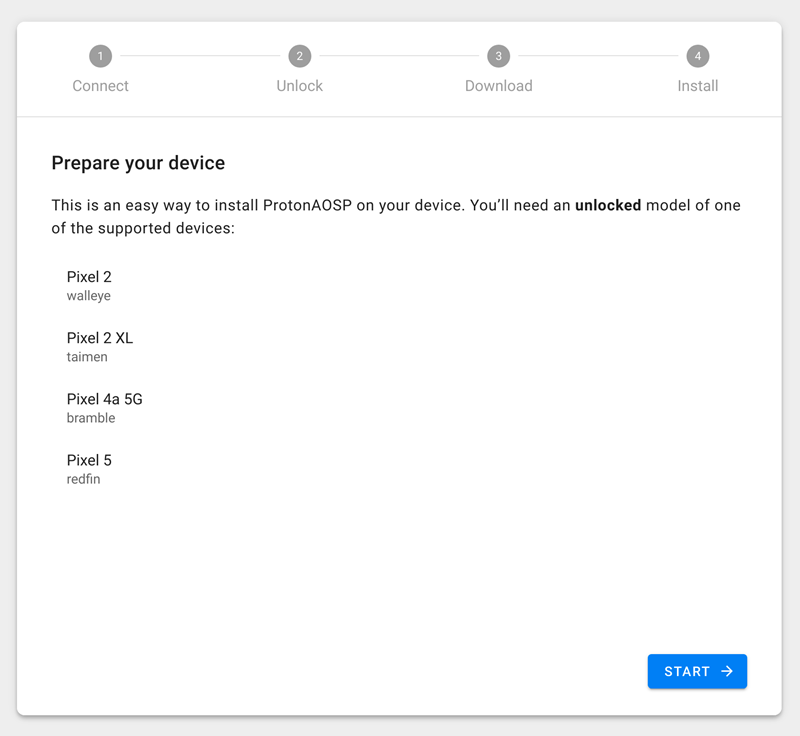
This project has been created by XDA Senior Developer kdrag0n. He also maintains the ProtonAOSP ROM for the Google Pixel 5 and other Pixel devices. So as of now, this project supports flashing the ProtonAOSP ROM onto the following Pixel devices:
Supported Device List
- Pixel 2 (walleye)
- Pixel 2 XL (taimen)
- Pixel 4a 5G (bramble)
- Pixel 5 (redfin)
This JavaScript-based flashing tool already has a working Android web installer that would allow you to flash custom ROMs on Android directly via web browsers. However, since it is an open-source project whose source code is available on GitHub, there is every possibility of other developers porting this project onto other devices and for other ROMs as well. Well, XDA has rightly titled their write up “The future of flashing custom ROMs will be through a web browser”, and we couldn’t have agreed more.
It’s just a matter of time before this becomes the go-to choice for a large chunk of the userbase and developers alike. With that said, if your device is part of this support list, then you may proceed with the below steps to flash custom ROMs on Android using a web browser. Droidwin and its members wouldn’t be held responsible in case of a thermonuclear war, your alarm doesn’t wake you up, or if anything happens to your device and data by performing the below steps.
- How to Pass SafetyNet test after installing Xposed or EdXposed
- How to Pass Magisk SafetyNet on Rooted Android 11
- A Detailed Guide to Use Core Only Mode in new Magisk Manager
- How to Fix ctsProfile Mismatch Error on Rooted Android
STEP 1: Unlock Bootloader
First and foremost, you will have to unlock the device’s bootloader. Do keep in mind that doing so will wipe off all the data on your device and would also make the device’s warranty null and void. So if that’s fine with you, then refer to our detailed guide: How to Unlock Bootloader on Google Pixel Devices. When devices from other OEMs get added to the support list, we will add the unlocking guides for those devices as well.
STEP 2: Boot your device to Bootloader Fastboot Mode
Next up, you will have to boot your device to Fastboot Mode. As for Pixel devices, you will have to power it off. Then press and hold the Power and Volume Down buttons for a few seconds until you are taken to the said mode. Do keep in mind that this hardware key combination is only valid for Pixel devices. For other OEMs (if they get added to the support list in near future), you may have to find the device-specific combination or use the below universal method:
![]()
- To begin with, install Android SDK Platform Tools on your PC. This is the official tool provided by Google that provides the required ADB and Fastboot binaries for your PC.
- Then enable USB Debugging on your device. This will make your device recognizable by your PC in ADB mode. So head over to Settings > About Phone > Tap on Build Number 7 times > Go back to Settings > System > Advanced > Developer Options > Enable USB Debugging.
- Now connect your device to the PC via USB cable.
- Then head over to the platform-tools folder, type in CMD in the address bar, and hit Enter. This will launch the Command Prompt.

- Type in the following command in the CMD window to boot your device to Fastboot Mode
adb reboot bootloader
- Now that your device is booted to Fastboot, let’s move over to the next step to flash custom ROMs on Android devices using a web browser.

STEP 3: Install Custom ROM on Android via Web Browser
As already mentioned before, as of now the below instructions focus on installing the ProtonAOSP ROM onto various Pixel devices. As and when more devices and ROMs get added to this list, we will update this guide (and more importantly this section) accordingly. Furthermore, you could use any Chromium-based browser such as Google Chrome, Microsoft Edge, etc to carry out the below process. With that said, let’s now start off the tutorial.
- To begin with, head over to the Android Web Installer page and click on the Start button situated at the bottom right.
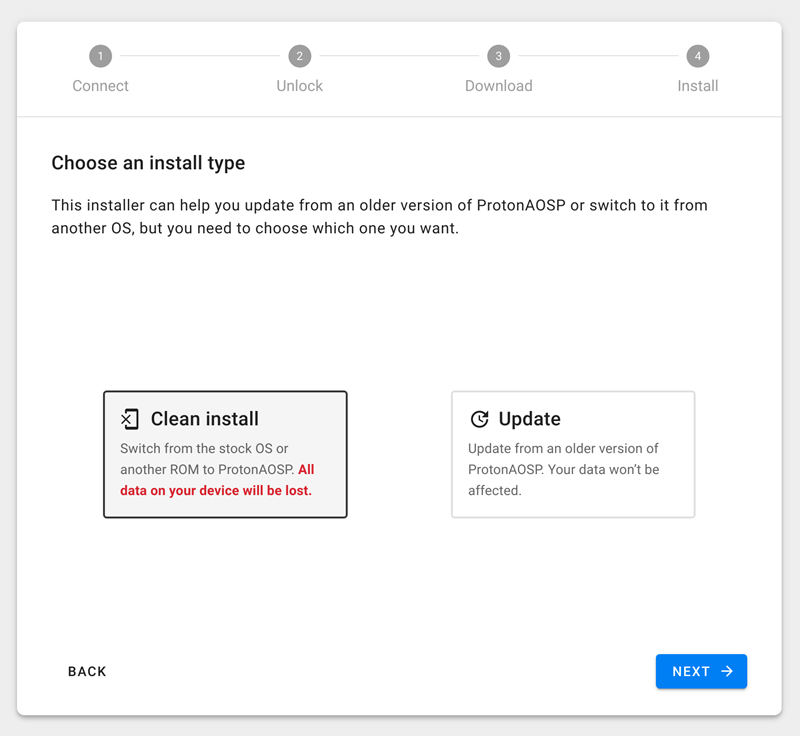
- You should now see two options: Clean Install and Update. The first option is for those who are coming from the stock firmware or from any other custom ROM. The second option is for those who already have the ProtonAOSP ROM and are just looking to update it to the latest build. As for this guide, we are installing it for the first time, so select Clean Install and click Next.
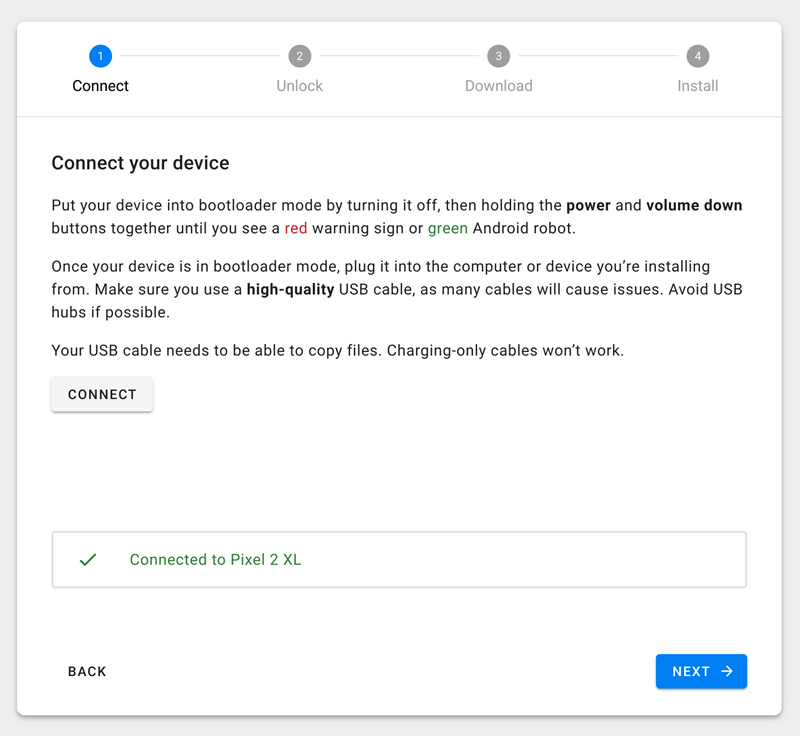
- Now connect your device to the PC via USB cable (make sure that it is booted to Fastboot and the bootloader is unlocked) and click Connect. Once it recognizes your device, it will let you know of the same. You may now click on Next.
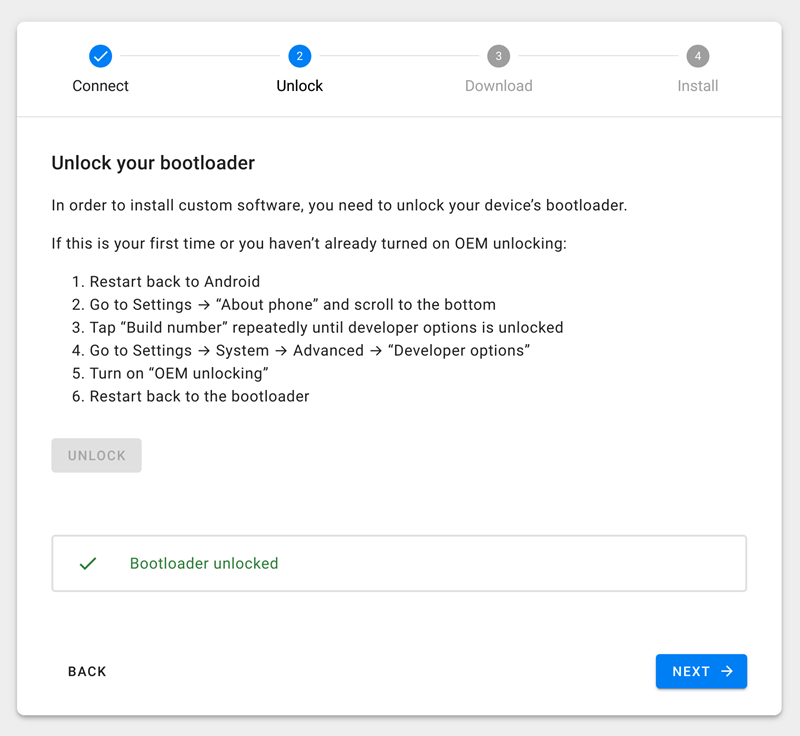
- It will now ask for bootloader unlock, since we have already done so, you should get the Bootloader Unlocked message. Click Next to proceed ahead.
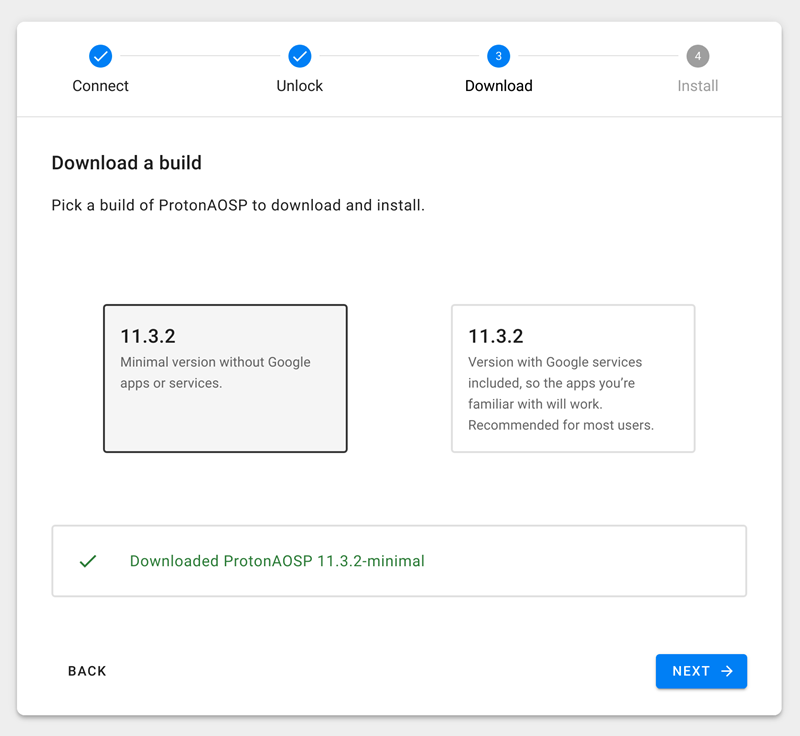
- It may now prompt you to choose the ROM variant. One will be the minimal version that doesn’t come preloaded with Google apps and services. Consider it as flashing a custom ROM but without flashing GApps. The other option is for those users who wish to have the Google Apps and Services onto their device. So select the one of your choice and hit Next.
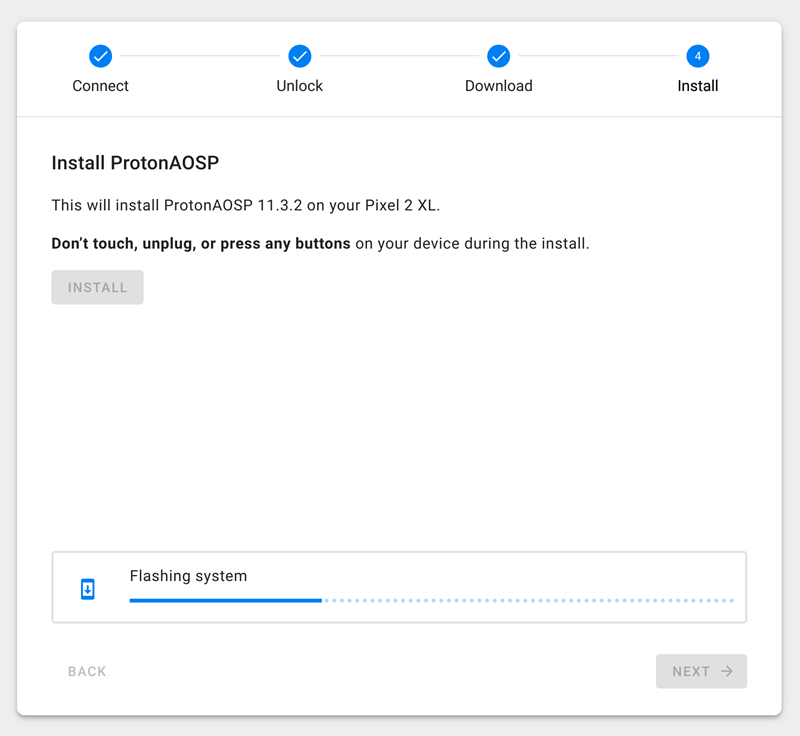
- The downloading and installing of ROM will now begin and could some time. Leave the device idle while the flashing is going on.
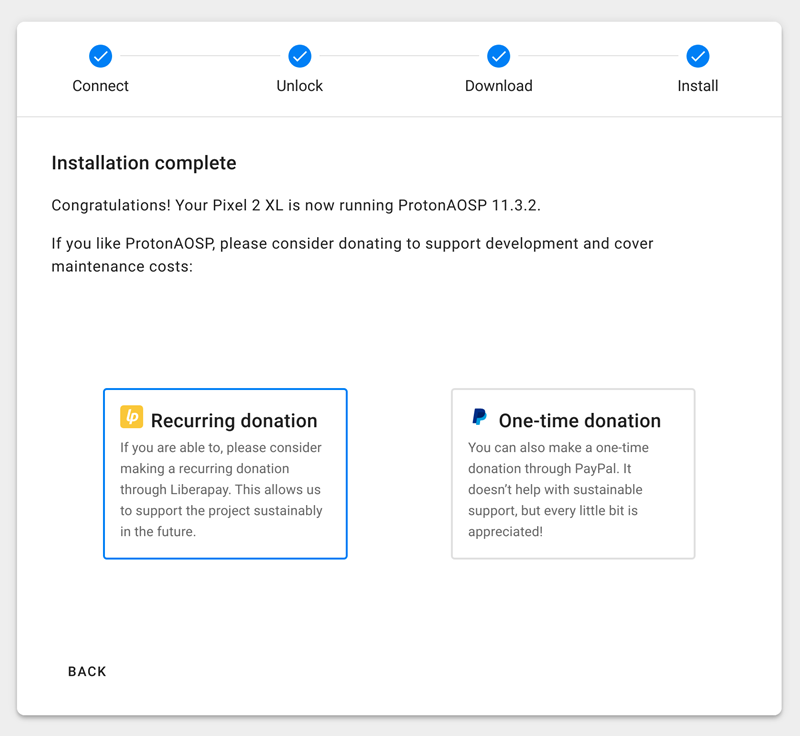
- Once done, you should get the Installation complete message. That’s it, the process stands complete.
So this was all from this guide on the steps to install or flash custom ROMs on Android devices using a web browser. If you have any queries concerning the aforementioned steps, do let us know in the comments. Furthermore, we will be regularly updating this guide as and when more devices/ROMs are added to the support list. So don’t forget to bookmark this page and stay up to date! [Screenshots Credit: GitHub ].


