In this guide, we will show you the steps to fix the Windows 11 search not working issue. When Microsoft announced the first Insider Preview build, many tech enthusiasts were quick to grab hold of the same and try it on their PC. To be fair, we haven’t seen such enthusiasm from the end-users in trying out the developer build, not of an application, but of the OS as a whole. Considering the fact that bugs and issues were imminent, users still decided to give it a shot nevertheless.
With that said, the operating system’s unpolished and rough edges seem to be giving a tough time to many users. For them, the search option situated in the Taskbar isn’t working along the expected lines. Sometimes it just refuses to launch, while other times, it isn’t able to search the input query. Furthermore, the issue seems to be prevalent in both online and offline searches. Fortunately, there do seem to be a few workarounds that are able to fix the Windows 11 search not working issue. Let’s check them out.
- How to Fix File Explorer keeps crashing in Windows 11
- Fix Windows 11 Registry Backup RegBack Folder is Empty/0KB
- Where is the Never Combine Taskbar Buttons in Windows 11
Table of Contents
How to Fix Windows 11 Search Not Working Issue [5 Methods]
There isn’t any universal fix as such. You will have to try out each of the below-mentioned workarounds until one of them spells out success for you. So keeping that in mind, let’s get started.
FIX 1: Try out the Basic Fixes
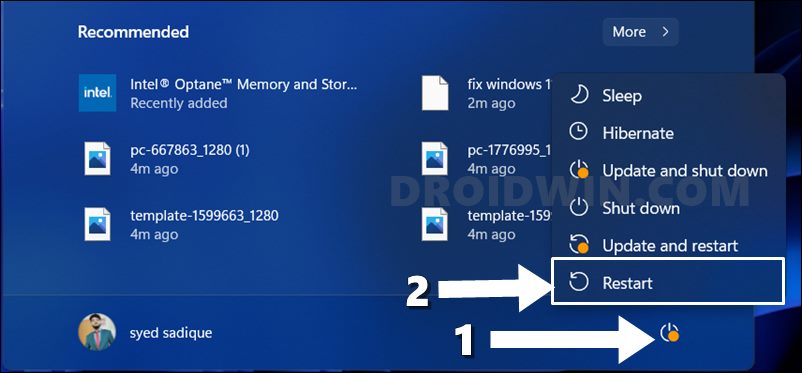
Let’s start off with the basic ones. First off, it is recommended that you restart your PC once and then check if it does any good. Likewise, for online searches, make sure your network connectivity is working well and good. You may try switching over to the wired connection (Ethernet) or use your device’s carrier network (Hotspot). So try out these tweaks and check if they were able to fix the Windows 11 search not working issue.
FIX 2: Re-Enable Search Feature
You may also try turning off and then restarting the Search feature present in the Taskbar. Doing so shall give it a fresh instance to work upon and this could well fix the underlying issue.
- So use the Windows+I shortcut keys to bring up the Settings menu.
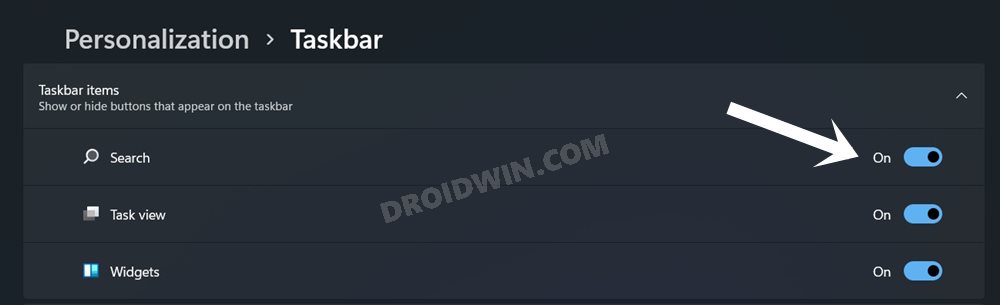
- Within that, go to the Personalization section from the left menu bar and select Taskbar.

- Disable the toggle next to Search, wait for a few seconds, and then re-enable it back on.
- Check if it is able to fix the Windows 11 search not working issue.

FIX 3: Use Search TroubleShooter
Windows comes built-in with various troubleshooter apps, each of which focuses on different components of the OS. They are used to scan the associated software side issue and fix them accordingly. In this regard, one of the troubleshooter apps has been specifically designed for Search functionality. So let’s try and make full use of the same:
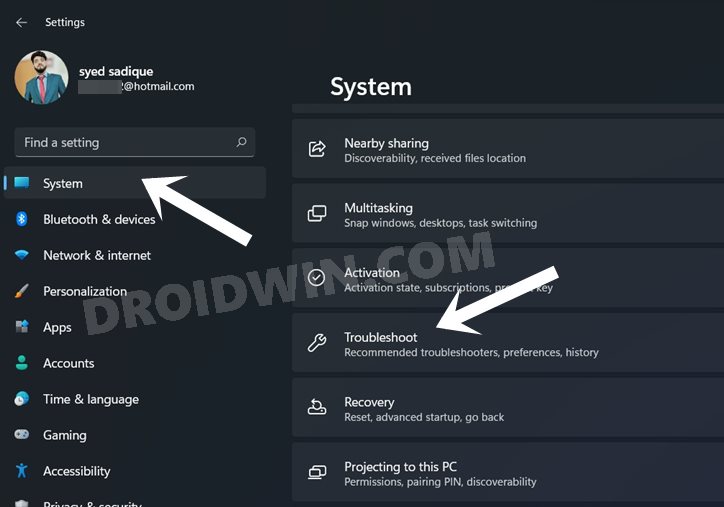
- Right-click on the Windows icon and select Settings.
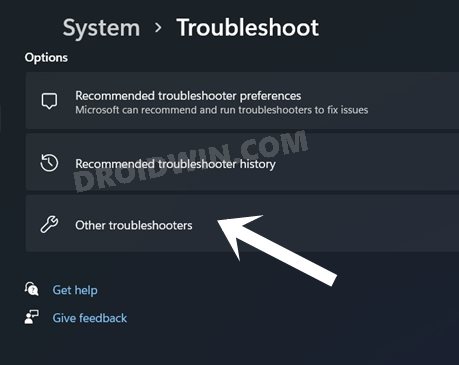
- Then go to the Troubleshooter section.
- After that, head over to Other Troubleshooters.
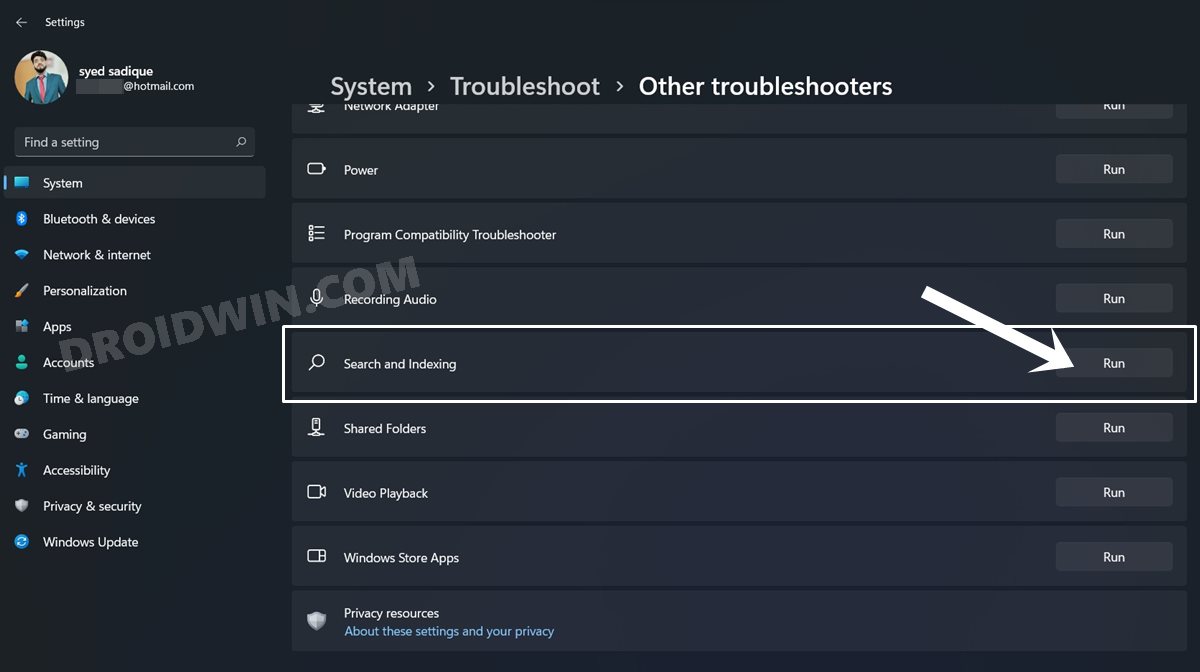
- Within that, scroll to the Search and Indexing section and hit the Run button next to it.
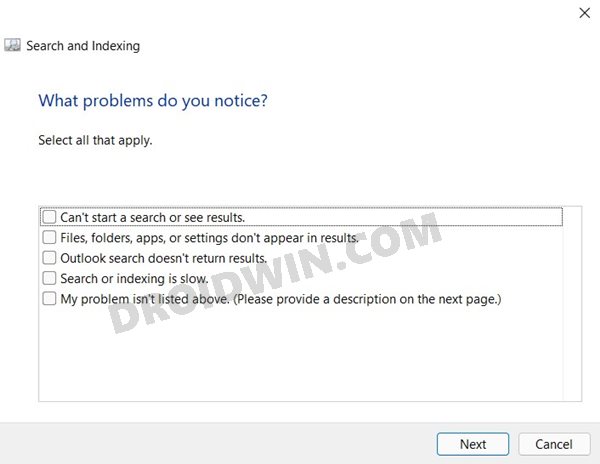
- You will now have to select the issues that you were facing. So checkmark them and hit Next.
- The troubleshooter will now scan for the underlying issues and then fix them as well.
- Once done, verify if the Windows 11 search not working issue has been fixed or not.
FIX 4: Restart File Explorer
If the search functionality isn’t working in File Explorer, then you should consider restarting its underlying process, i.e. Windows Explorer. This will restart the Explorer and give it a fresh instance to work upon, which in turn might rectify the underlying issue as well.
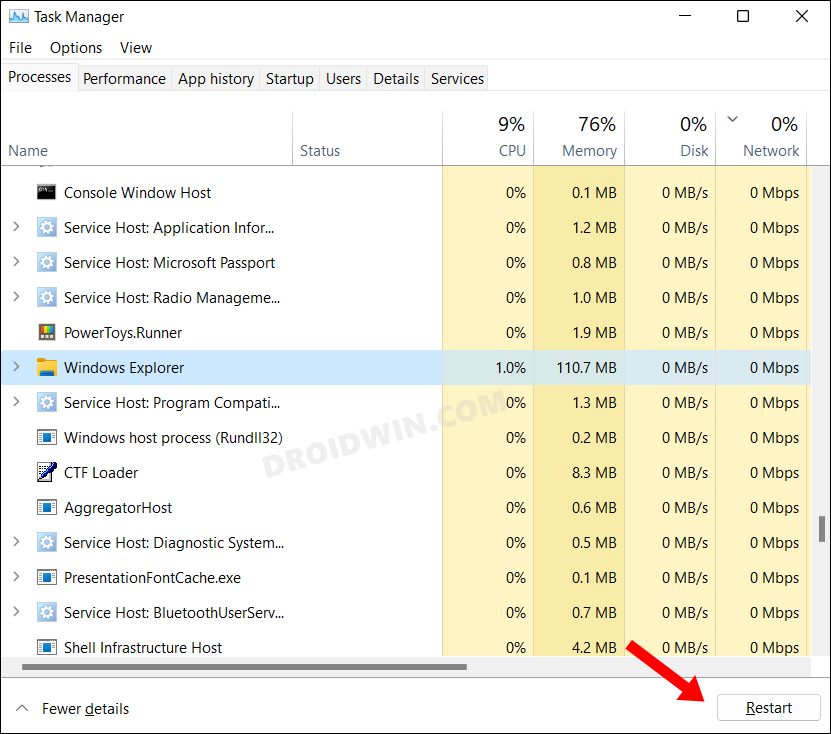
- Launch Task Manager via Ctrl+Shift+Esc shortcut keys.
- Then select Windows Explorer from the list and hit Restart.
- Wait for a few seconds and then open File Explorer.
- Check if it fixes the Windows 11 search not working issue.
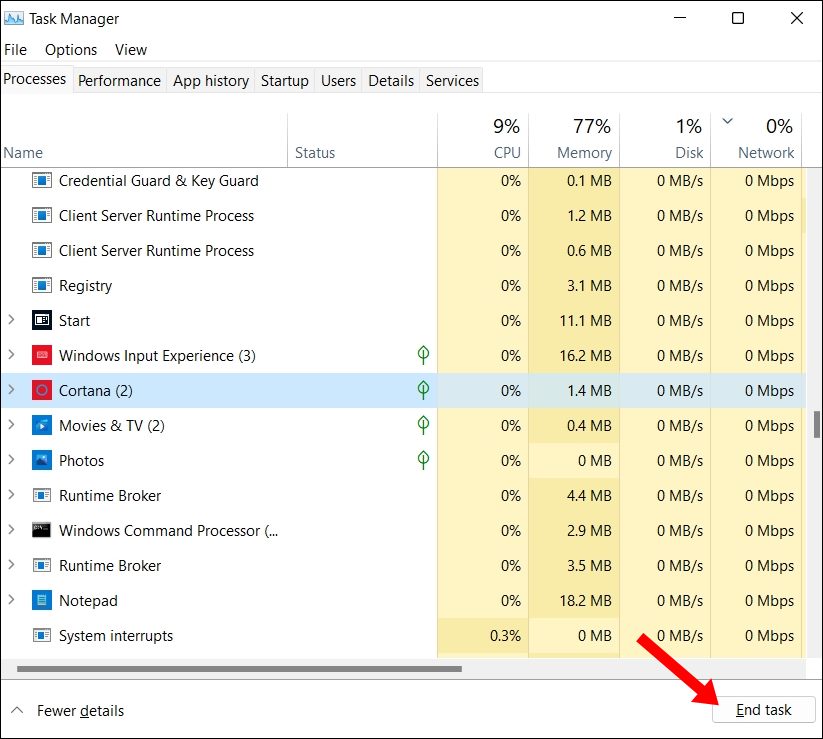
FIX 5: Stop Cortana
In some instances, it has been noted that Windows Virtual Assistant ends up conflicting with the text-based search functionality. Therefore, you should consider closing Cortana and then test out the results. Here’s how it could be carried out:
- Launch Task Manager via Ctrl+Shift+Esc shortcut keys.
- Then select Cortana from the list and hit End Task.
- Check if it fixes the Windows 11 search not working issue.
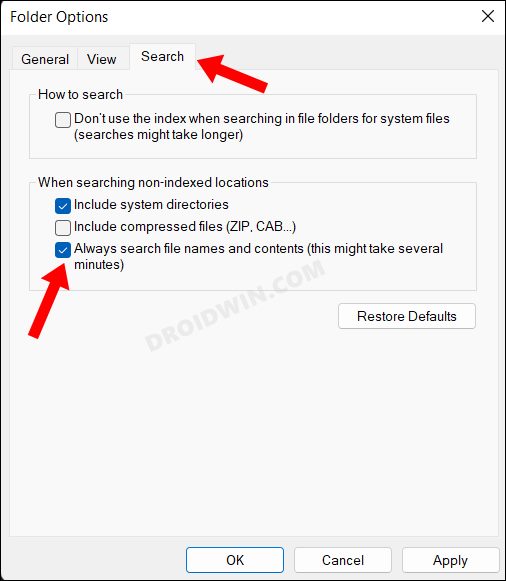
FIX 6: Enable “Always search file names and contents”
Next up, you should also consider enabling the “Always search file names and contents” feature to allow the system to carry out a more comprehensive and in-depth search. So refer to the below instructions and turn on this feature right away-
- To begin with, launch File Explorer via Windows+E shortcut keys.
- Then click on the overflow icon situated at the top and select Options.
- Now go to the Search tab and checkmark “Always search file names and contents”
- Then click OK to save it and check if it fixes the Windows 11 search not working issue.
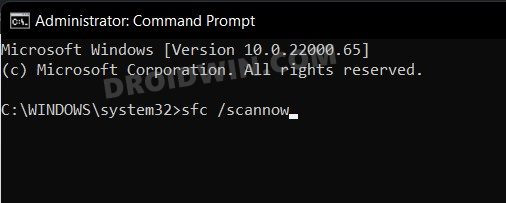
FIX 7: Use SFC and DISM Commands
System File Checker and Deployment Image Servicing and Management are two command-line utility tools that scan for corrupt Windows files and then replace them with their working counterpart. The major difference between the two is whereas the SFC replaces the corrupt files with the working ones from the cached directory on your PC, DISM does so by downloading the working files from the online Microsoft servers. And as of now, we would be making use of both these tools to fix the underlying mouse issue. Follow along.
- To begin with, right-click on the Start Menu and select Windows Terminal (Admin).
- Then click on the down arrow present next to the new tab icon and select Command Prompt from the list.
- Once the CMD window is opened, copy-paste the below command to open the SFC Tool:
sfc /scannow
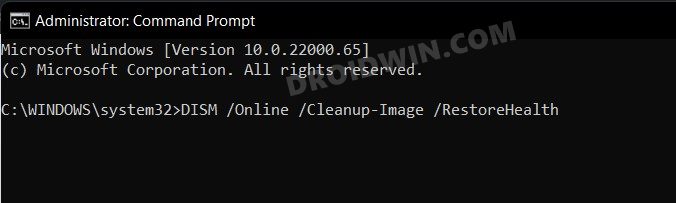
- Once the SFC Scanning is complete, it’s time to use the DISM Tool. So copy-paste the below command:
DISM /Online /Cleanup-Image /RestoreHealth
- Now restart your PC and check if it fixes the Windows 11 search not working issue.
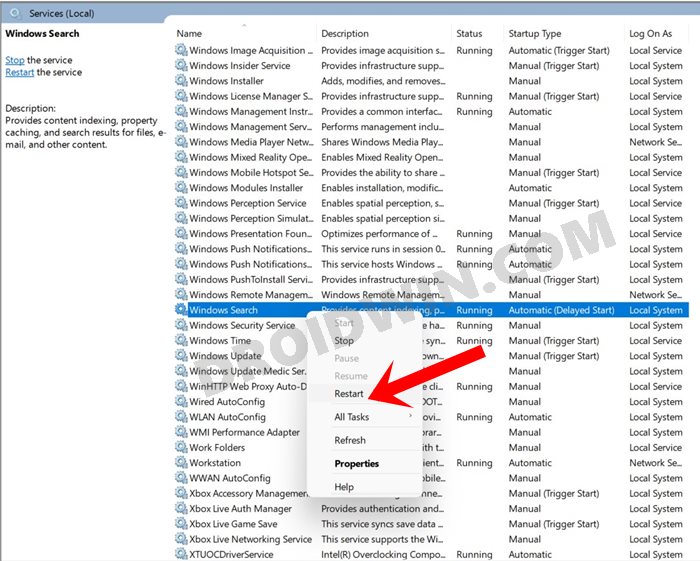
FIX 8: Restart Search Service
If there’s an issue with the Search’s background service, then it could result in the non-functioning of the Windows search feature. Therefore, you should consider restarting the service, via any of the two methods that we have mentioned below. Follow along.
- Bring up the Run dialog box via Ctrl+R shortcut keys.
- Type in services.msc in the Run dialog box and hit Enter,
- Scroll to the Windows Search listing, right-click on it, and select Restart.
- Once it restarts, verify whether the issue has been resolved or not.
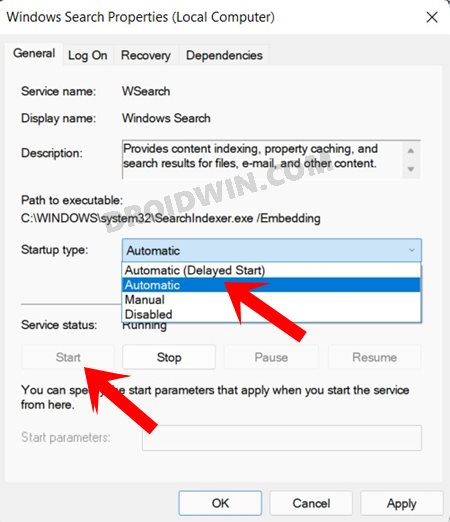
- If it’s still there, then again right-click on the Windows Search service, and this time, select Properties.
- Now go to the Startup type section and select Automatic from the drop-down menu.
- Finally, click Start > OK and check if it fixes the Windows 11 search not working issue.
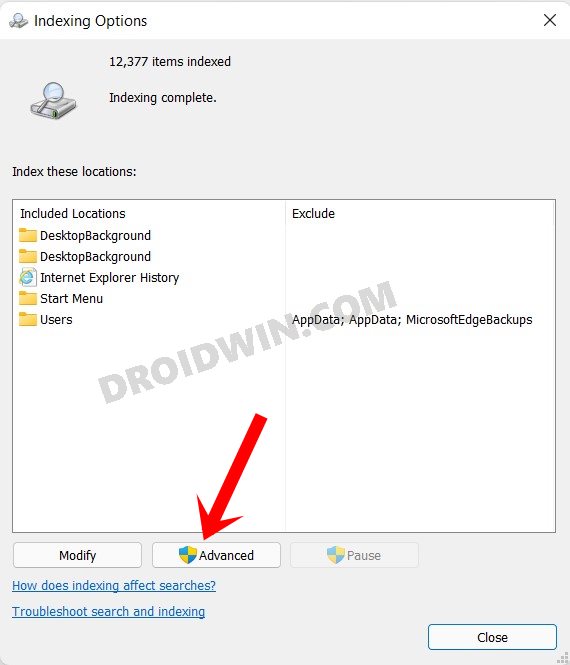
FIX 9: Rebuild Search Index
Similar to how Google indexes the search results, Windows also performs this task in the background so that it could display the correct results from the plethora of contents that it needs to look into. But if there’s an issue with the indexing, then it might take ages in displaying the correct result, or in some instances, might not even display the result in the first place. To fix it, you would have to rebuild its search indexing, which could be done as follows:
- Head over to the Start menu and search Indexing Options.
- Then click on the Advanced button situated at the bottom.
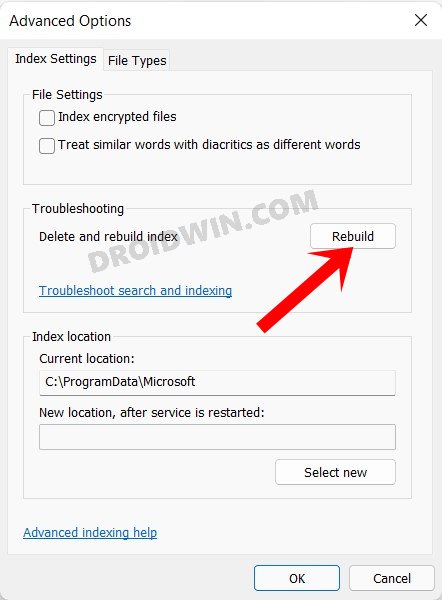
- Now click on the Rebuild button under Troubleshooting.
- Finally, hit OK in the confirmation dialog box and wait for the process to complete.
- The rebuilding process will now start and could take a couple of minutes. Once done, the underlying search issue would have been rectified.
So with this, we round off the guide on how you could fix the Windows 11 search not working issue. We have shared five different methods for the same. Do let us know in the comments section which one spelled out success for you.