In this detailed coverage, we will show you how to fix the Sahara communication failed error in MSM Download Tool. Thanks to the open-source nature of the Android ecosystem, you could try out a wide variety of tweaks on your device. The general users could try out various themes, icon packs, launchers, etc. but when it comes to the tech enthusiasts, they take it a step further and step into custom development. Talking about which OnePlus seems to be among the most active member of this family. Once you have unlocked the bootloader on your device, you could then carry out a plethora of modifications.
These include the ability to flash Custom ROMs (AOSP or heavily modified like HavocOS, etc) or replace the device’s stock recovery with a custom one like TWRP or LineageOS Recovery. Along the same lines, you could also gain administrative rights to your device and gain access to the system partition. This is also known as rooting a device that could be using TWRP or without TWRP (using Magisk patched boot.img file). Once rooted, you could then flash Magisk Modules, Xposed Frameworks, custom kernels among others.
However, all these tweaks do bring in some associated risks as well. In general cases, your device might get stuck in a bootloop or soft brick. If that happens, then you could easily bring it back to stock by flashing the Fastboot firmware. But things might get a little bit tricky when it comes to the hard-brick cases. But even then, the devices that have an underlying Qualcomm chipset might find out a handy way out. All these Snapdragon devices have a standalone EDL mode through which you could repair your device.
As far as OnePlus devices go, not only does it has EDL mode, but there’s a pretty popular tool that the company’s service uses to unbrick the device. This tool then got leaked and the rest, as you all know is history. Making use of this MSM Download Tool, you could bring back your device to life, with a few efforts. However, the real issue begins when the tool itself throws in a few errors. In this regard, the Sahara communication failed error in MSM Download Tool seems to be the most concerning and frequently occurring issue. Today, we will be listing ten different methods that will help you bid adieu to this error once and for all.
- How to Fix TWRP Error 70 [With Screenshots]
- How to Fix TWRP Error 20 GApps after flashing LineageOS
- Fix TWRP Error 7 (While Flashing Custom ROM via TWRP)
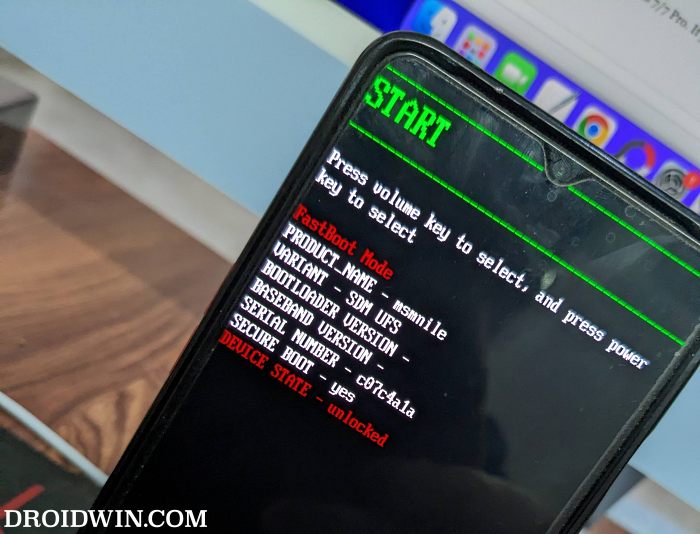
- How to Boot into Recovery (TWRP/Stock) from Fastboot Mode
Table of Contents
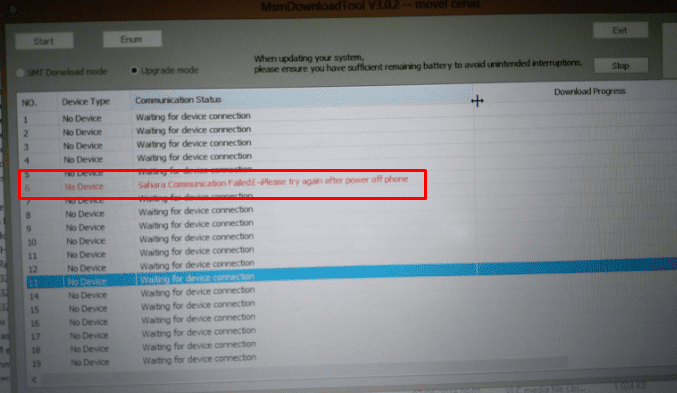
Sahara communication failed error in MSM Download Tool

All the devices with an underlying Qualcomm chipset have an Emergency Download Mode. This makes it possible to access the primary bootloader even if the secondary bootloader has been corrupted. This, in turn, allows you to flash the fastboot firmware package on your device and hence bring back the device to life. In this regard, all the OnePlus devices releases to date (and even the ones that will be released in the future) come with Qualcomm Snapdragon chipset.
So if you ever end up hard bricking your OnePlus, you could easily use the MSM Download Tool, flash the required firmware and repair your device. Alas, it isn’t that simple as it may sound. There are a plethora of errors and issues that you might face while using this tool. Given below is the comprehensive list that could face inside the MSM Download Tool. After this, we will be listing 10 different methods that will help you fix all these issues (including the Sahara Communication Failed Error).
Common MSM Download Tool Errors
Here are all the common errors that you are likely to encounter while trying to unbrick your OnePlus device through this tool:
- Sahara communication failed, please try again.
- Stuck in param preload
- Firehouse Check ESP Failed, Errno 258
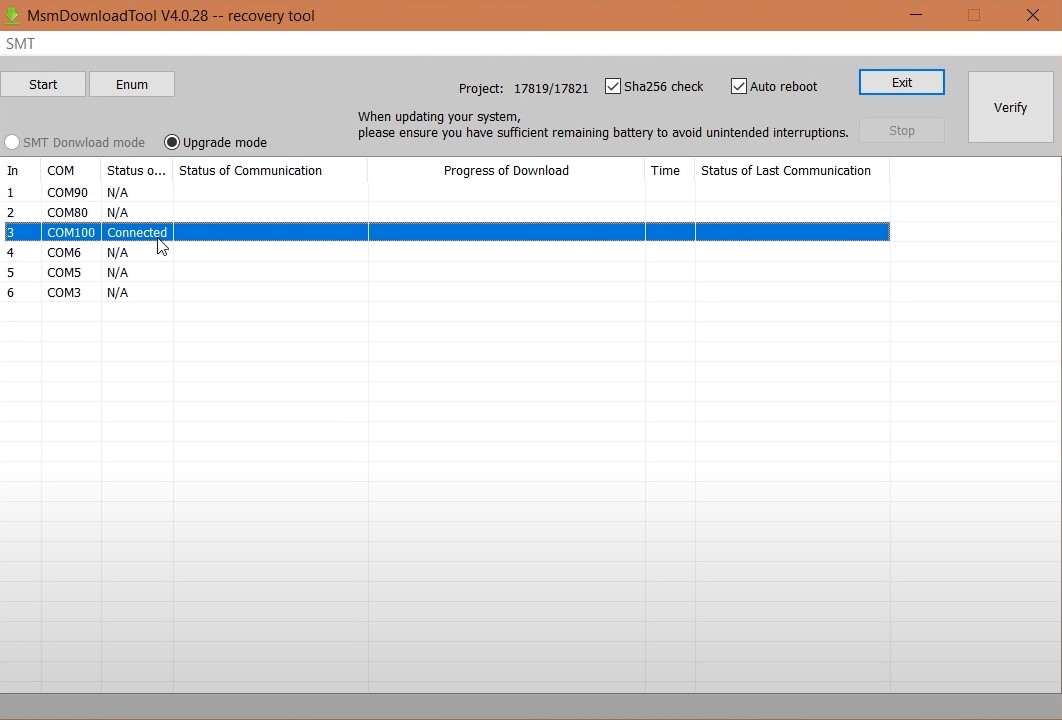
- The status of Connection passes to N/A
- CrashDump mode

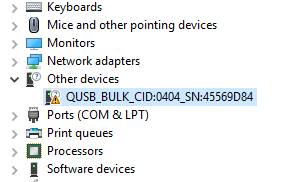
- Mobile detected as ‘QUSB_BULK‘ interface in Device Manager.
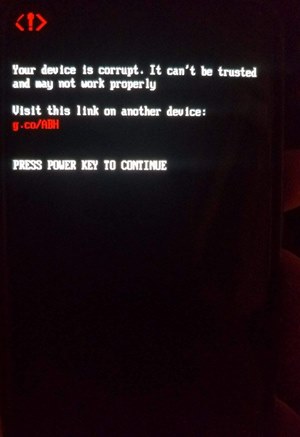
- ‘Your Device is corrupt’ error message.
- EDL Session Breaks after x Seconds.
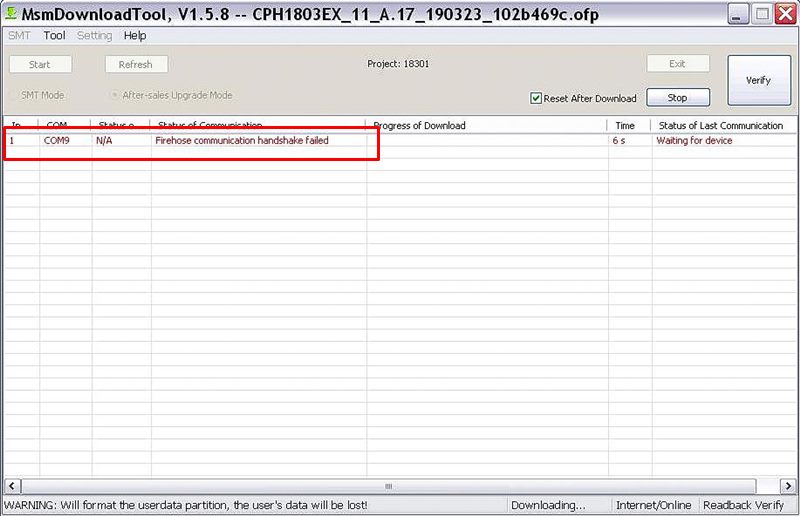
- Firehose Communication Handshake Failed.
With that said, here are all the various methods to fix the Sahara communication failed error in MSM Download Tool. Follow along for the detailed instruction set.
- How to Install OxygenOS OTA on Rooted OnePlus devices
- How to Extract Stock Boot.img from OnePlus OxygenOS Stock ROM
- Fix Android stuck in Recovery Mode: No Command screen
- How To Unlock Bootloader of OnePlus 8, 8 Pro, and 8T
Before starting off with any of the fixes, it is recommended that you delete all the temporary log data of the MSM Download Tool. To do so, head over to C:\Users\Your-Username\AppData\Local, and you should find the MsmDownloadTool_Log folder there. Delete the entire folder. Once done, proceed with the methods to fix the Sahara communication failed error in MSM Download Tool.
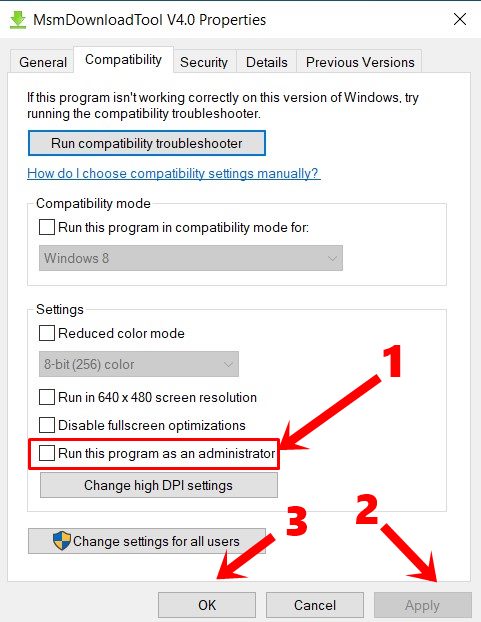
Fix 1: Start MS Download Tool as an Administrator
To begin with, you should always launch the MSM Download Tool with administrative privileges. The tool is known to face a lot of issues when you run it in a restrictive environment. Hence running it as an admin should be on top of your priority list.
- Right-click on the tool’s EXE file and select Properties.
- Then go to the Compatibility section.

- Enable Run this program as an administrator option. Finally, hit Apply > OK.
- Now launch the tool and see if it fixes the Stuck in Param Preload, Sahara communication failed, etc MSM Download Tool errors or not.
Fix 2: Change Ports (use USB 2.0)
While it may sound like a simple fix on paper, but trust in most cases, simply switching over to the USB 2.0 Port from USB 3.0 is able to fix most of the issues. Infact, many users have been able to fix the Sahara communication failed error as well just with a USB port switch. Hence remove the USB cable from the USB 3.0 port and insert it into the USB 2.0 Port. Then try using the MSM Download Tool and see if the Stuck in Param Preload, Sahara communication failed, etc errors have been fixed or not.
- How to Update Magisk ZIP and Magisk Manager (without TWRP)
- Disable DM-Verity or Android Verified Boot without TWRP
- Fix Magisk Module Bootloop without TWRP Recovery
- How to Root Android Devices Without TWRP Recovery
Fix 3: Use the Official USB Cable
Furthermore, if you are using a third-party cable, then it might conflict with the Fastboot Mode on your OnePlus device. In this regard, it is recommended that you only use the official USB cable that came with your device.
Fix 4: Try using an Intel-based PC
For some strange reason, many users faced the Stuck in Param Preload, Sahara communication failed, and other MSM Download Tool error when they used this tool on their Ryzen based PC. It is highly recommended that you only try out the unbrick process on an Intel-based PC only.
Fix 5: Use Windows 10 PC
Users have also reported failure while carrying out the unbrick steps on their Windows 7 PC. This OnePlus forum example is just one of the many that I managed to get a hold of. So combining Fix 4 and 5 and it spells out that you should use a Windows 10 PC with an Intel chipset.
Fix 6: Use the Tool for your OnePlus device only
Make sure you are using the tool that is built for your specific OnePlus model only. For the unawares, the MSM download Tool might be different for different OnePlus devices. Therefore it is recommended that you download the right tool corresponding to your device only. You wouldn’t find it as a standalone tool. Rather the tool will be packed in with the decrypted firmware that you have downloaded for your device. We have compiled a list of the latest Decrypted Firmware+MSM Download Tool at the end of this guide. Please refer to it.
Fix 7: Try another OxygenOS decrypted firmware
In some instances, there might be issues with the decrypted firmware that you have downloaded for your device. This usually happens if you download an older build of the firmware. So to be on the safer side, it is recommended that you download and flash the latest decrypted firmware. Again, you could get hold of the latest OxygenOS decrypted firmware file for your OnePlus device at the end of this guide.
- Detailed Steps to Fix adb is not recognized Error
- How to Fix Unauthorized Device with ADB Commands [3 methods]
- Fix Android stuck in Recovery Mode: No Command screen
- How to Install Split APKs (APKM) on any Android Device
Fix 8: Device Should be detected as Qualcomm HS-USB QDLoader
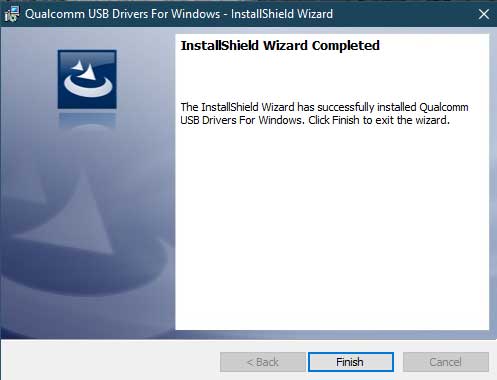
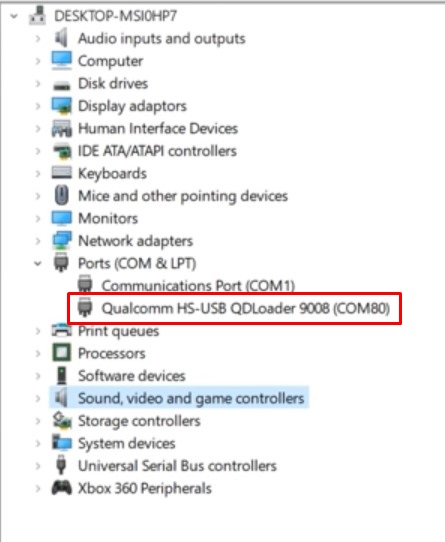
Since the steps are executed once your device is booted to EDL Mode, hence the Qualcomm USB Drivers is a necessity. These drivers need to be installed on your PC before beginning with the steps. The best way to make sure if they are installed or not is to use the Windows+X shortcut keys and select Device Manager.
Now if your device is shown as “Qualcomm HS-USB QDLoader” then you have the necessary Qualcomm Drivers installed. On the other hand, if your device is recognized as QUSB_BULK_CID:random_numbers, then it signifies that the drivers aren’t installed properly. So go ahead, download and install the Qualcomm drivers from the below links:
32-bit version: QDLoader_HS-USB_Driver_32bit_Setup.exe
64-bit version: QDLoader_HS-USB_Driver_64bit_Setup.exe
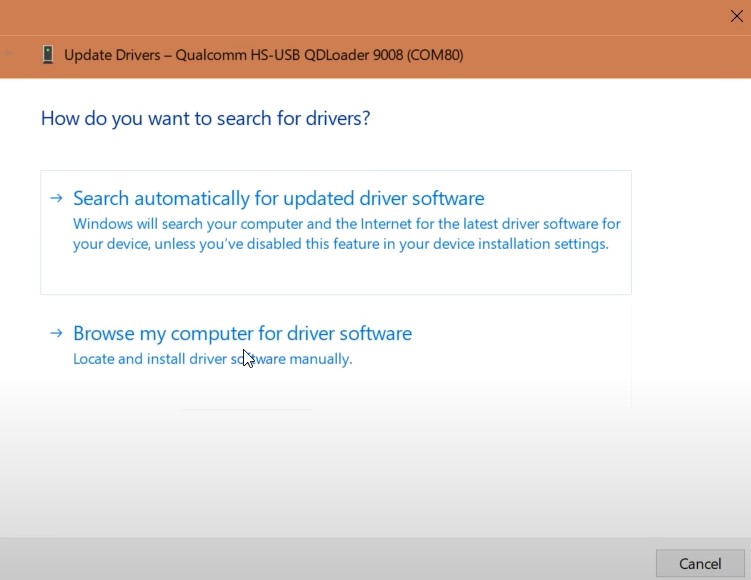
If the above automatic method didn’t give out desirable results, then you may also try out the manual method. For that, follow the below steps:
- Download and extract the Qualcomm-Driver.zip file.
- Then go to Device Manager, right-click on QUSB_BULK_CID:0404 SN:45569D84 or a similar name, and select Update Drivers.
- Next up, select “Browse my computer for Driver Software” and browse to the location where you have extracted the Qualcomm Drivers ZIP file.
- Once it is installed, reboot your PC. When your PC boots up, try out the unbrick process and check if the Stuck in Param Preload, Sahara communication failed, and other MSM Download Tool errors have been fixed or not.
Fix 9: Make sure OnePlus is properly booted to EDL Mode
Well, the entire process is dependent on your device being booted to EDL Mode. Since booting to EDL is a slightly different process than booting to Fastboot or Recovery, hence some users might face an issue or two. In that case, we would suggest that you re-check that your device is booted to EDL. There are three different methods through which you could boot your OnePlus to EDL.
The first method involves powering off your device. You could also press and hold the Volume Up and Power keys together for around 15 seconds to force-shutdown your OnePlus device. Then connect it to the PC while pressing the Volume Up and Volume Down keys together. Your device will now show a black screen indicating that it has been booted to EDL. At the same time, head over to Device Manager on your PC, and your device should be recognized as ‘Qualcomm HS-USB QDLoader 9008.
In the second method, in general cases, you could install the Android SDK on your PC, connect your device to the PC, and execute the adb reboot edl command to boot your device to EDL Mode. However, to execute any ADB command, you will have to enable USB Debugging. Since your device is bricked, you may not be able to do so and hence use this method.
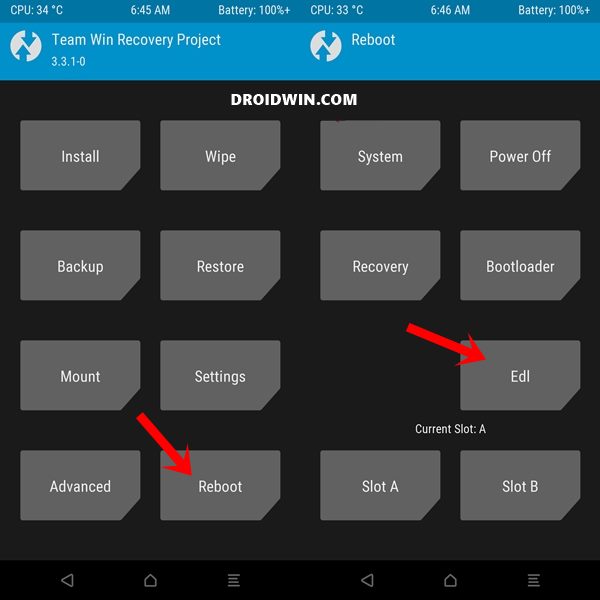
The third method involves using the TWRP method. Again, in a bricked device, it is a nearly impossible task to boot your device to TWRP. But if you wish to try it out, then here are the required steps:
- Install the Android SDK on your PC. Likewise, download the TWRP Recovery for your OnePlus device. As of now, we will only be booting to TWRP (temporary installation). Hence you should only download the recovery IMG file. Once downloaded, rename it to twrp, hence the complete name becomes twrp.img
- Head over to the platform-tools folder, type in CMD in the address bar, and hit Enter. This will launch the Command Prompt.
- Now power off your device. Then press and hold the Volume Up, Volume Down, and Power keys together. Your device will boot to Fastboot Mode.
- Connect your device to PC via USB cable. At the same time, transfer the twrp.img file to the platform-tools.
- Now execute the below command in the opened CMD window:
fastboot boot twrp.img
- If your device gets booted to TWRP, then go to Reboot and select EDL.
- This will boot your device to EDL Mode. Now try flashing the decrypted firmware and see if it fixes the Stuck in Param Preload, Sahara communication failed, and other MSM Download Tool errors.

- How to Permanently Install TWRP without TWRP ZIP File (only using TWRP.img file)
- How to Fix TWRP Error 7 (While Flashing Custom ROM via TWRP)
- Patch Stock Boot Image via Magisk and Flash it using Fastboot
- How to Install OTA Updates in Rooted Android Device
Fix 10: Fix OnePlus Crash Dump Mode
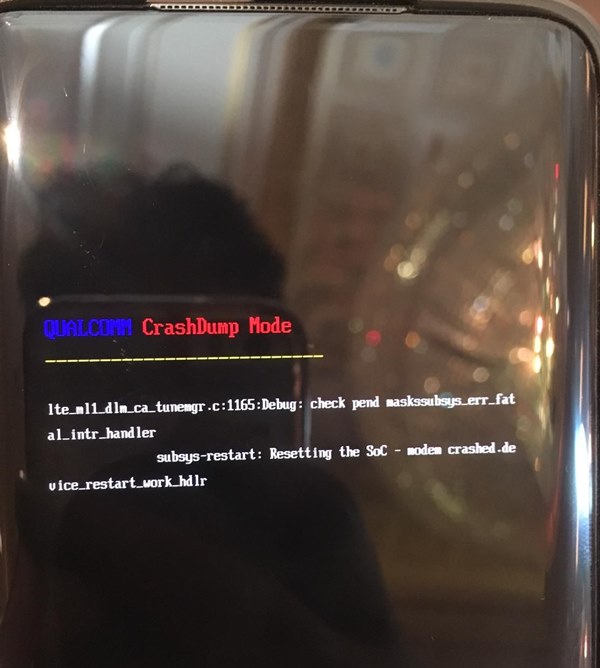
There have been numerous incidents where users seem to be stuck in the Crash Dump Mode. Well, it isn’t that much a scary situation as the name suggests. If ever you end up in a Qualcomm CrashDump Mode, then press and hold the Volume Up and Power keys for around 10 seconds. Doing so will exit the Crash Dump Mode and would power off your device. Once that is done, you may now easily boot up your device to EDL Mode using the instructions given in the above method [FIX 9] and then try flashing the decrypted firmware. Check whether it fixes the Stuck in Param Preload, Sahara communication failed, and other MSM Download Tool errors.
Fix 11: Fix for EDL Session Breaks after x Seconds
Some users have also reported facing this issue that their EDL session breaks up after 10 seconds or so. If you are facing this issue as well, then I have managed to find out a handy workaround. Here’s what you need to do:
- To begin with, disable all network connections on your PC. This is required so that the drivers don’t automatically reinstall themselves.
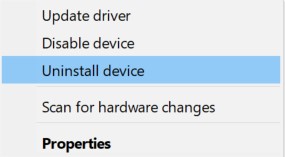
- Use the Windows+X shortcut keys to bring up the menu and select Device Manager.
- Now look out for the Qualcomm HS-USB QDLoader, right-click on it, and select Uninstall device. This will delete the driver software associated with your OnePlus device.
- Now press the Volume Down and Volume UP keys together and connect your device to the PC via USB cable.
- The Device Manager should detect your device as QSB_BULK_CID:
- You should now manually update the drivers via the steps given in Fix 8. In short, right-click on QSB_BULK_CID and select Update Driver> Browse my computer for Driver Software > Select the Qualcomm Drivers. This will fix the EDL Session Breaks after x Seconds.
FIX 12: Using Fastboot Mode [if accessible]
If your device hasn’t been hard bricked and you could access the Fastboot Mode, then there exists one more nifty method to rectify this issue. Here’s what you need to do:
- To begin with, unplug your device from the PC.
- Then launch MSM Download Tool, load the firmware into it, and click Start.
- Now boot your device into Fastboot mode via adb reboot bootloader [if you could access the OS].
- Or press and hold the Volume Up, Down, and Power keys for a few seconds [from the EDL Mode].
- Once you reach the Fastboot Mode, power your device.
- Then wait 15 seconds and get back in Qualcomm EDL mode.
- Now connect your device to your PC via a USB cable and the flashing should now start.
OnePlus Unbrick Articles
You could also make use of our unbrick article collections for your OnePlus devices:
- Unbrick OnePlus 7/7 Pro/7T/ 7T Pro using MSM Download Tool
- How to Unbrick OnePlus 8/8 Pro/8T using MSM Download Tool
- How to Unbrick OnePlus 9/9 Pro/9R using MSM Download Tool
- Bypass Login MSM Download Tool OnePlus 10 Pro
Download OnePlus Decrypted Firmwares | MSM Download Tools
From this section, you could download the OnePlus decrypted firmware for various OnePlus devices. Likewise, you could also find the device-specific MSM Download Tool inside the firmware package itself.
OnePlus 3: DECRYPTED OOS 9.0.6 (Android 9)
OnePlus 3T: DECRYPTED OOS 9.0.6 (ANdroid 9)
OnePlus 5: DECRYPTED OOS 9.0.11 (Android 9)
OnePlus 5T: DECRYPTED OOS 9.0.11 (Android 9)
OnePlus 6: DECRYPTED OOS 10.3.2 (Android 10)
OnePlus 6T: DECRYPTED OOS 10.3.2 (Android 10) | 6T MsmDownloadTool v4.0.59 (OOS v9.0.13)
OnePlus 7: GM57BA tools (European firmware) 10.0.5 GM57BA (Android 10) |
GM57AA tools (International firmware): 10.3.2 GM57AA(Android 10)
OnePlus 7 Pro: GM21BA tools (european firmware): OOS 10.0.5 (Android 10)
GM21AA tools (international firmware): OOS 10.3.2 (Android 10)
OnePlus 7T: HD65BA tools (European firmware): 10.0.7 HD65BA |
HD65AA tools (International and Indian firmware): 10.0.7 HD65AA
OnePlus 7T Pro: HD01BA tools (European firmware): 10.0.8 HD01BA |
HD01AA tools (International and Indian firmware): 10.0.8 HD01AA
OnePlus 8: Global variant : Decrypted OxygenOS 11.0.0 IN21AA |
European variant: Decrypted OxygenOS 11.0.0 IN21BA |
Indian variant: Decrypted OxygenOS 11.0.0 IN21DA
OnePlus 8 Pro Global Variant: Decrypted OxgenOS 11.0.0 IN11AA
European Variant: Decrypted OxygenOS 11.0.0 IN11BA
Indian Variant: Decrypted OxygenOS 11.0.0 IN11DA
So with this, we conclude the guide on how to fix the Sahara communication failed and other related MSM Download Tool errors. We have shared around 10 different fixes that will help you rectify these issues. However, if your error isn’t part of this list or if you have any queries concerning the aforementioned steps, do let us know in the comments section below. We will definitely get back to you with a solution at the earliest.


Nuno IN Portugal
I dead-bricked my N10 5G like a stupid kid (wiped partitions in TWRP just because).
I didn’t even have TWRP/recovery anymore.
But because I had USB debugging on when it was alive, somehow I managed to fastboot flash TWRP’s recovery.img from the PC command line /PowerShell.
Now I got TWRP: there I could reboot in EDL.
I eventually got to where my N10 5G wouldn’t keep disconnecting & reconnecting, then I got the handshake failure.
I stopped everything and tried again from TWRP to EDL, while the MSM .exe was already running, and I discovered that if you press the ‘Start’ button in the MSM WHEN THE DEVICE SAYS CONNECTED, it kind of hooks, I released the phone from my hand, and it never disconnected, and it didn’t fail, it was success.
HOPE THIS HELPS SOMEBODY! Love you guys!
Clifton
The option in using the TWRP method worked for me and to all those who are complaining, do proper research and try out all options and also follow the exact instructions mentioned and then this will surely work out for you.
Yash
FIX – PRESS (VOLUME+) + (VOLUME -) and connect the phone in EDL mode.
When you get the error, DONT DISCONNECT!!!!!!!!
Just PRess (VOLUME+) + Power Button and hold for few seconds.
IT DOES THE WORK!!!!!
András
Hi, I have just got the sahara error, and I unplugged the phone after some try. It wont start. I can see it on COM! in EDL mode but thats it.
I always get sahara error but the + button does nothing.
how can I start the phone. The flashing did not start, why isnt it booting up?
PB
Thank you so much, I was starting to lose hope after trying everything 😀
Vs
Tried the steps
Automatic detection of DDR failed
Leomir
I did everuthing I could…My dad tried this update and I now I cant russerct it at all
tom my
sometimes u just need to leave the device plugged in while u restart edl lol