In this guide, we will show you the steps to fix the root is not properly installed aka the missing Magisk root issue. The steps to gain administrative privileges have undergone quite a few changes in recent years. Earlier, you only need to flash the SuperSU ZIP via a custom recovery such as CWM or TWRP. However, there was one major glaring issue with that method.
SuperSU made changes to the system partition. This resulted in the tripping on SafetyNet and hence the inability of various apps to function properly. This is where Magisk entered the scene and completely changed the landscape of the custom development. It peromfred its activities in a systemlessly manner, i.e. without making any changes to the system partition.
Owing to this reason, it quicky became the go-to choice for everyone and understandably so. With that said, rooting isn’t exactly as easy as it used to be earlier. Extracting the stock boot.img from stock firmware, patching it via Magisk and flashing it via Fastboot, all this does require quite a few efforts.
Add to it the A/B partition scheme, and things might become all the more complicated for some. As a result, issues with rooting is all the more evident. If you are also getting bugged with such an issue, then fret not. This guide will show you how to fix the missing Magisk root issue that happened when the root is not properly installed. Without any further ado, let’s get started.
- How to Pass SafetyNet test after installing Xposed or EdXposed
- How to Pass Magisk SafetyNet on Rooted Android
- Fix Magisk Safetynet API Error: Detailed Guide
- How to Fix ctsProfile Mismatch Error on Rooted Android
Table of Contents
Reason for Missing Magisk Root
This issue mostly happens in A/B Partition devices, when a user is trying to flash the patched boot.img for root. Once that is done, they proceed to check for root via the Root Checker app. Instead of the success message, they are instead greeted with:
Root Access is not properly installed on this device

Double read this message- no where does it says that root has failed, what it instead indicates is the fact that the process hasn’t been totally completed. Rather the user had left in in between (unknowingly). What really happens is that when you proceed to flash the Magisk patched boot.img, you need to execute the below command:
fastboot flash boot magisk_patched.img
It is for those devices that doesn’t have the recovery partition so we are directly flashing it to the boot partition. But why aren’t we specifying the partition? Well, this is because the command will flash automatically flash it to both A and B Slots. So rather than manually specifying the partition, we only need to use the above command and it will do the rest. Except for the fact that it doesn’t always happen!
In some instances, the above command would only flash the magisk patched boot.img file to the current active slot. As a result, when the next time you reboot the device, the slot wold change and you would be taken to the unrooted slot. The Root Checker app automatically check for root in both the slots.
When it founds out that only one partition is rooted, it would display the aforementioned error. So with this, you might have got a decent idea regarding the missing Magisk root or the root is not properly installed issue, let’s now check out the steps to fix it. Follow along.
- How to Fix No WiFi, Calls, Network after Root or Custom ROM
- Fix Root not working after flashing Magisk patched boot.img
- How to Fix Magisk Bootloop using TWRP Recovery [2 Methods]
- Root Android 12 via Magisk patched boot.img (without TWRP)
How to Fix Root is not Properly Installed | Missing Magisk Root
The below instructions are listed under separate sections for ease of understanding. Make sure to follow in the exact same sequence as mentioned. Droidwin and its members wouldn’t be held responsible in case of a thermonuclear war, your alarm doesn’t wake you up, or if anything happens to your device and data by performing the below steps.
STEP 1: Get your Device’s Stock Boot.img
To begin with, you will need to get the stock boot.img for your device. This could be extracted from the device’s stock firmware. However, do keep in mind that you download the same firmware that is currently installed onto your device. If that is well and good, then you ,may take the help of our below guides to extract the boot.img from the firmware:
- How to Extract Stock Boot.img from OnePlus OxygenOS Stock ROM
- How to Extract Fastboot Images from Realme/Oppo OZIP Firmware
- Extract boot.img from boot.img.lz4 and Root Samsung
- Extract Sony Boot.sin and get the Stock Boot.img File
- How to Extract Boot.img from LG KDZ or DZ Firmware
- How to Extract Boot.img from HTC RUU Firmware
STEP 2: Install Android SDK

Next up, install the Android SDK Platform Tools on your PC. This is the official ADB and Fastboot binary provided by Google and is the only recommended one. So download it and then extract it to any convenient location on your PC. Doing so will give you the platform-tools folder, which will be used throughout this guide.
STEP 3: Enable USB Debugging and OEM Unlock
You will also have to enable USB Debugging and OEM Unlocking on your device. The former will make your device recognizable by the PC in ADB mode. This will then allow you to boot your device to Fastboot Mode. On the other hand, OEM Unlocking is required to carry out the bootloader unlocking process.
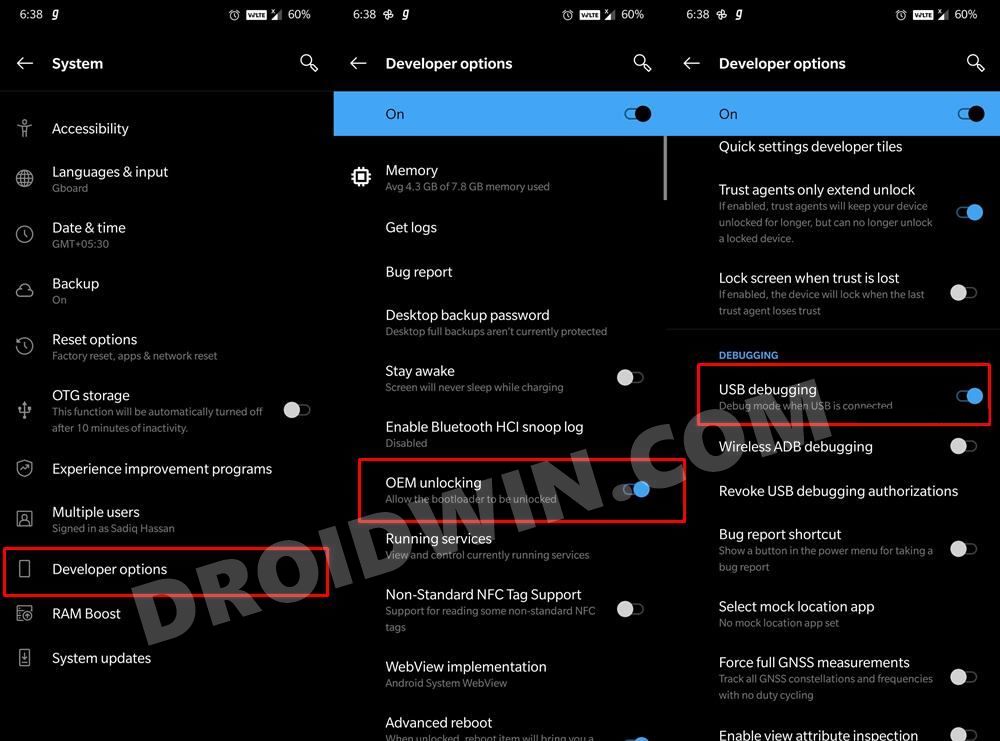
So head over to Settings > About Phone > Tap on Build Number 7 times > Go back to Settings > System > Advanced > Developer Options > Enable USB Debugging and OEM Unlocking.
STEP 4: Unlock the Bootloader
Rooting a device also requires you to unlock the device’s bootloader. If you avenn’t done so yet, then please refer to our guide to Unlock Bootloader of Any Android Device.
STEP 5: Patch Stock Boot.img
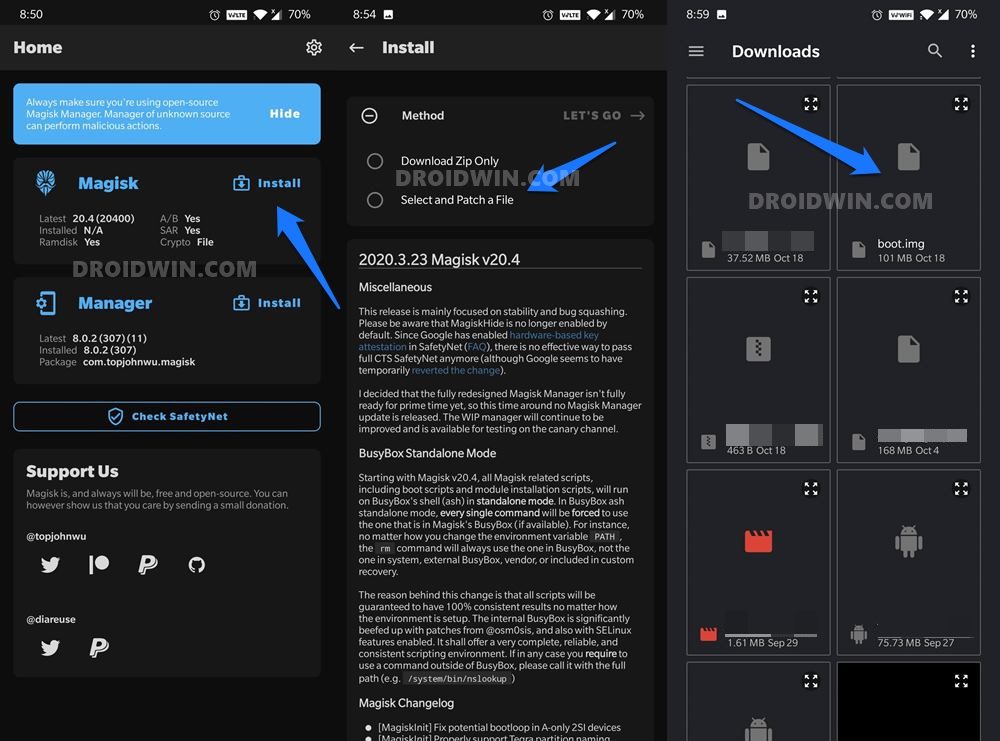
You will now have to patch the stock boot.img file via Magisk. For that, please refer to our guide to Patch Stock Boot Image via Magisk. Once you have got the patched boot.img file, transfer it from your device to the platform-tools folder on your PC.
STEP 6: Boot to Fastboot Mode
- Now connect your device to the PC via USB cable. Make sure USB Debugging is enabled.
- Then head over to the platform-tools folder, type in CMD in the address bar, and hit Enter. This will launch the Command Prompt.

- Type in the following command in the CMD window to boot your device to Fastboot Mode
adb reboot bootloader

STEP 7: Fix Root is not Properly Installed | Fix Missing Magisk Root
Make sure that you have placed patched boot.img inside the platform-tools folder. Likewise, the Command Prompt window should also be opened inside this platform-tools folder. If that is all well and good, then proceed with the below steps:
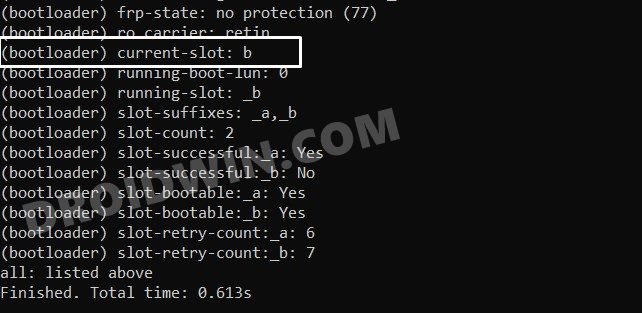
- To begin with, check for the current active slot using the below command:
fastboot getvar all
- From the output that appears, refer to the following line:
(bootloader) current-slot:
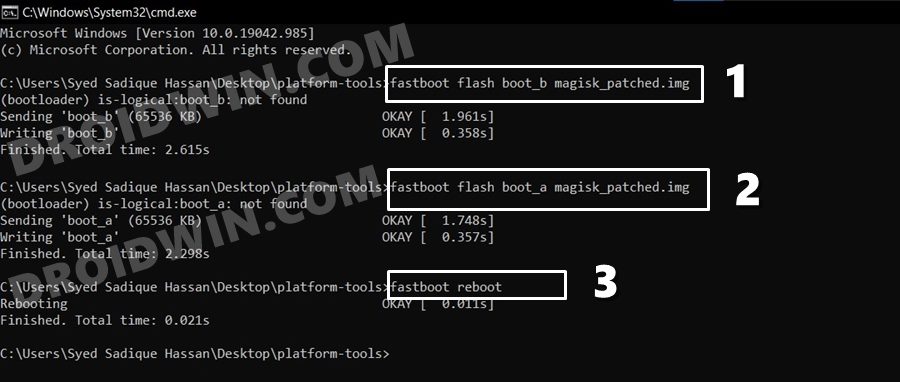
- Whatever value you get, you will first have to flash the Magisk patched boot.img to that slot. In my case, the the current slot came out to be B, so I will first flash the patched boot.img to the B slot. For that, the following command will be used:
fastboot flash boot_b magisk_patched.img
- After that, you will have to flash the Magisk patched boot.img to the inactive slot. Since B was my active slot, A will be my inactive slot. So I will flash the patched boot.img to Slot A as follows:
fastboot flash boot_a magisk_patched.img
- Once you have flashed the files to both the partitions, you may now reebot the device to the OS via the below command:
fastboot reboot
- That’s it. Your device shall now boot to the rooted OS with both the slots being patched with Magisk. You may now check with the Root Checker app as well and this time, it will spell out: Congratulations! Root Access is properly installed in this device.
So with this, you have fixed the missing Magisk root or the root is not properly installed issue. If you have any queries, do let us know in the comments section below. We will get back to you with a solution at the earliest.


Hervé
Bonjour j’ai rooté mon s10+.
Lorsque j allume mon mobile avec power+bixby+vol up + usb alors magisk trouve le root.
Si j allume le mobile avec power seul magisk perd le root.
J avais vu sur le site, une manipulation en mode de recuperation Mount system +….. mais je ne me souviens plus du reste. Et je ne retrouve pas cette manipulation. Pouvez-vous m’aider svp. Merci.
premkumar
But device not booting, restart again and again.
Clark
This article probably should be updated to clarify what to do for Pixel 7? Thanks.
Shay Zabari
amazing. thank you very much !!!!!!!!!!