In this guide, we will show you various methods to fix the Pixel Launcher not working issue on your Android device. When it comes to the customization domain, then trying out a custom launcher has always been at the top of the priority queue for many users. What only makes the matter better is the fact that you could find a plethora of launchers across the Play Store, each having its own set of perks and features set.
However, in spite of the tons of availability, it is the one from Google that has managed to create a rich fanbase for itself. The default launcher for the Pixel devices created quite a buzz with the Pixel 1 and the hype is yet to settle down. Many users have already switched from their default OEM launcher to this offering from the Silicon Valley giants. However, this adoption hasn’t been without its fair share of issues.
There have been a few instances wherein this launcher doesn’t seem to work along the expected lines (quite recently on OnePlus running OxyegnOS 12/ColorOS 12). If you are also getting bugged with this issue, then this guide shall help you out. In this tutorial, we will show you various methods to fix the Pixel Launcher not working on your Android device. So without any further ado, let’s get started.
Table of Contents
How to Fix Pixel Launcher Not Working on Android
![]()
If you are using a Pixel device, then the Pixel Launcher might be the only one installed. In that case, we would suggest you install an additional launcher (such as Nova or any other of your choice) and make it the default one for the time being. This is because when we disable or force-stop the Pixel Launcher, then your device will have the option to fall back to the second launcher. So refer to the below instructions to change the default launcher, as and when the need arises.
- Head over to the Settings menu on your device
- Then go to Apps > Default App > Home App
- Then select any other launcher app from the list.
It is recommended that you try out each of the below-mentioned workarounds and then see which one spells out success. So with that in mind, let’s get started.
FIX 1: Force Stop App
First and foremost, you should force stop and then manually restart the app. Doing so will refresh all its underlying processes and it will give it a fresh instance to work upon. And this in turn might rectify the underlying issue as well. So refer to the below steps to try it out:
- To begin with, temporarily change your default launcher.
- Then go to Apps > See All Apps and select Pixel Launcher.

- Now tap on Force Stop > OK in the confirmation prompt.
- Check if the Pixel Launcher is now working on your device.
FIX 2: Delete App Cache
Next up, consider deleting the app’s temporary data as well. If a lot of these cache files get accumulated over the due course of time, then it might conflict with the app’s proper functioning and could also slow down its usability. Therefore, let’s put these files in the bin right away and then check out the results.
- To begin with, head over to the Settings menu on your device.
- Then go to Apps > See All Apps and select Pixel Launcher from the list.

- After that, go to the Storage section and tap on Clear Cache.
- Now verify if it fixes the Pixel Launcher not working issue on your Android device.
FIX 4: Remove Battery Restrictions
If you have put any battery restrictive measures in place, then the games and apps might have a tough time working in this restrictive environment. Therefore, you should consider removing all these roadblocks and then check out the results. Here’s how it could be done:
- First off, head over to the Settings > Battery section.
- Then go to Battery Saver and disable it, if it is enabled.
- After that, go to Apps > All Apps and select Pixel Launcher from the list.

- Then go to its Battery section and select either Optimized or Unrestricted.
- Check if it fixes the Pixel Launcher not working issue on your Android device.
FIX 5: Toggle Default Launcher
Next up, you should consider temporarily switching over to another launcher for the time being before switching back to the Pixel Launcher. Toggling this functionality will refresh the home launcher settings which in turn could rectify the underlying issue as well. So let’s put this fix to the test and check out the results [make sure you have a temporary secondary launcher installed as well].
- Head over to the Settings menu on your device.
- Then go to Apps > Default Apps and select Home App.
- Now temporarily switch over to another launcher app.

- Wait for a few seconds then switch back to Pixel Launcher.
- Check if it fixes the Pixel Launcher not working issue on your Android device.
FIX 6: Disable and Re-Enable App [Via Settings and ADB]
Disabling and then re-enabling the app will refresh its underlying settings and will start off with a new instance. And this in turn might end up rectifying the underlying issue as well. So let’s put it to the test and check out the results. Non-Pixel devices might easily do so from the Settings menu itself, whereas Pixel devices need to take the help of ADB Commands. Follow along for the instructions:
For Non-Pixel Devices
- To begin with, temporarily change your default launcher app.
- Then go to Settings > Apps > See All Apps and select Pixel Launcher from the list.
- After that, tap on Disable followed by OK in the confirmation dialog box.
- Then wait for a few seconds and hit Re-Enable. After that, make Pixel Launcher the default launcher on your device.
- Now check if it fixes the Pixel Launcher not working issue on your Android device.
For Pixel Devices
For a detailed explanation, check out our guide on Disable/Uninstall Apps from Android via ADB. The shorter instructions are given below:
- Download and extract Android SDK Platform Tools on your PC.

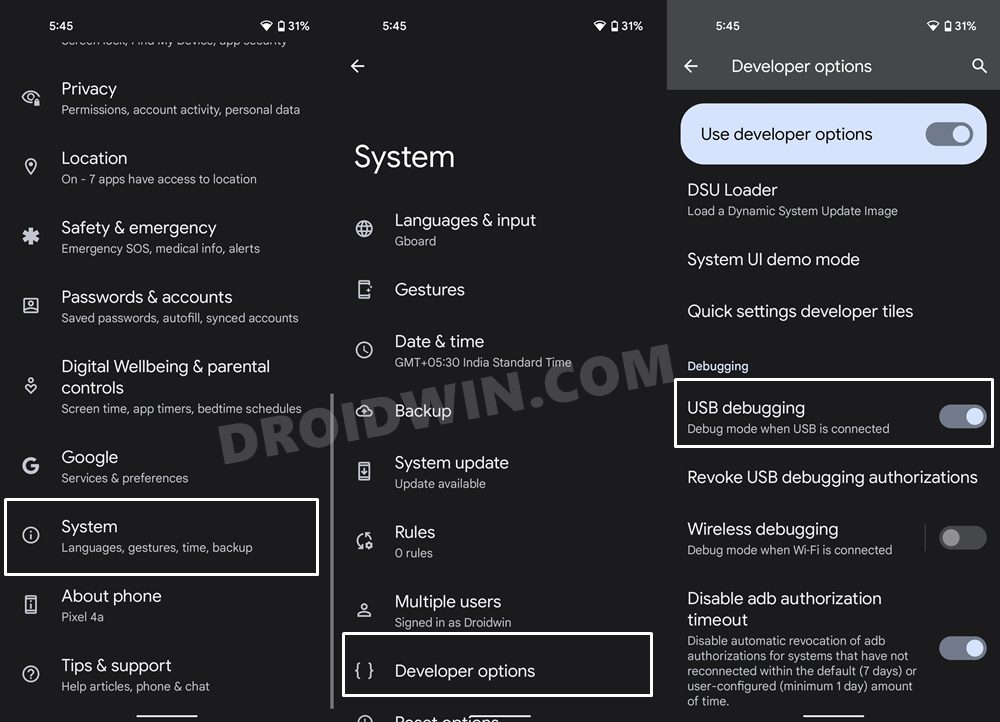
- Enable USB Debugging on your device and connect it to the PC via USB cable.


- Then head over to the platform-tools folder, type in CMD in the address bar, and hit Enter.


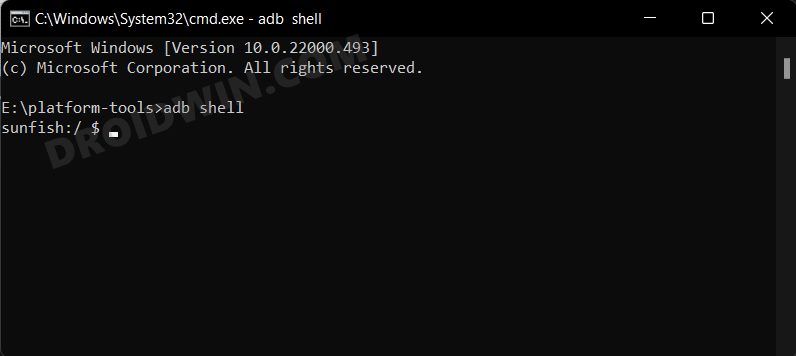
- This will launch the Command Prompt. Type in the below command to open the shell environment:
adb shell


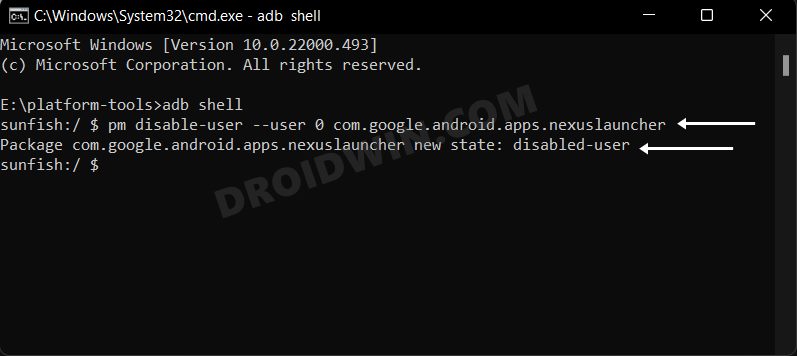
- Now execute the following command to disable Pixel Launcher:
pm disable-user --user 0 com.google.android.apps.nexuslauncher

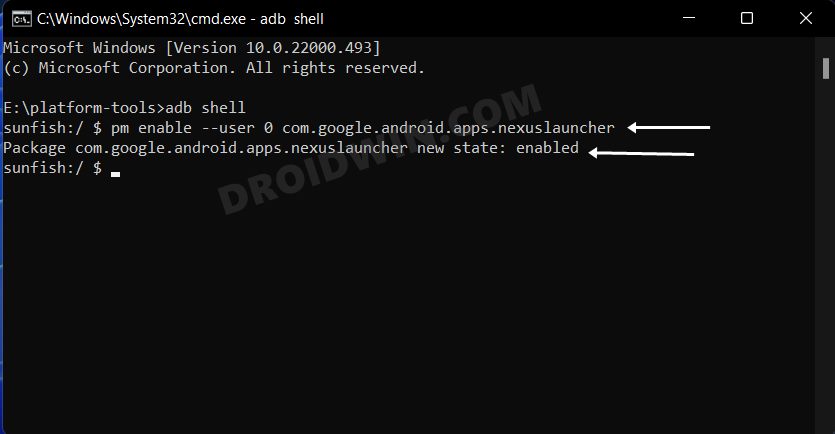
- After that, execute the below command to re-enable it:
pm enable -–user 0 com.google.android.apps.nexuslauncher

- Then hit Enable and check if it fixes the Pixel Launcher not working issue on your Android device.
FIX 6: Delete App Data
If the app’s data gets corrupted, then its negative consequences will be felt across the app as a whole. In such cases, you have no choice but to delete that app’s data and then let it repopulate the same from scratch. Here’s how it could be done:
- Head over to the Settings menu on your device.
- Then go to Apps > See All Apps and Pixel Launcher from the list.
- After that, go to the Storage section and tap on Clear Data.

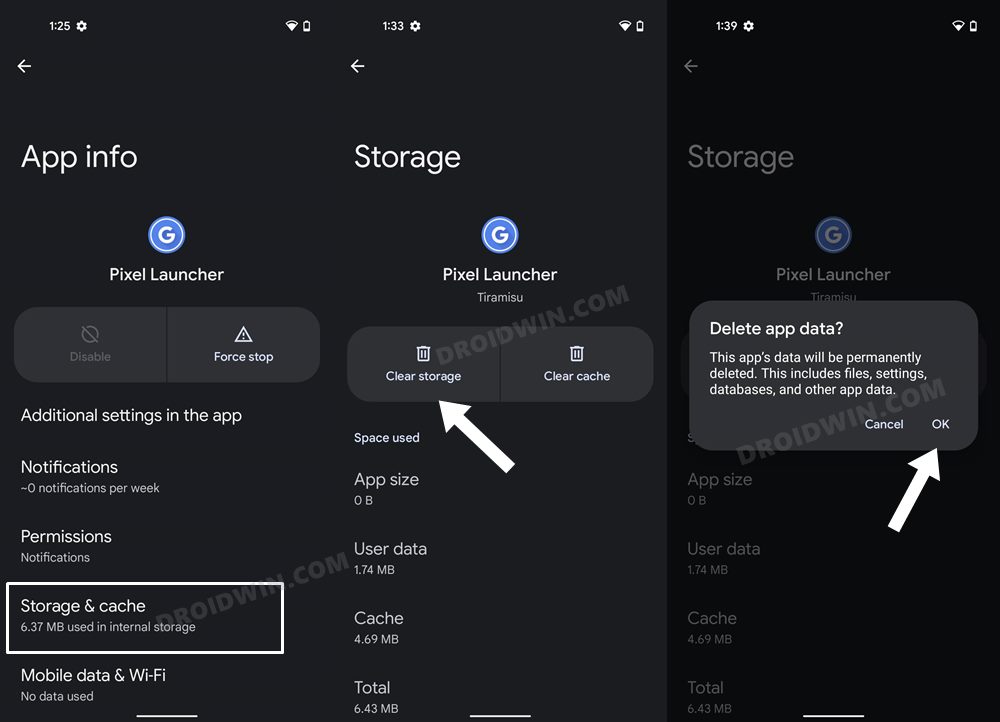
- Then tap OK in the confirmation dialog box that appears. Now launch the app and set it up.
- Verify if it fixes the Pixel Launcher not working issue on your Android device.
FIX 7: Downgrade App to Earlier Version
In some instances, the developer might roll out a buggy update, which could end up breaking the app’s entire functionality. Though they are usually quick to release a subsequent patch, but that rollout could still take around 3-4 days to arrive. And this is quite a long time frame. So it’s better to downgrade the app to the earlier table version and remain on that build until the issue has been resolved. Here’s how it could be done:
- Head over to Play Store and search Pixel Launcher.
- Then tap on the overflow icon situated at the top right and uncheck Enable Auto-updates.

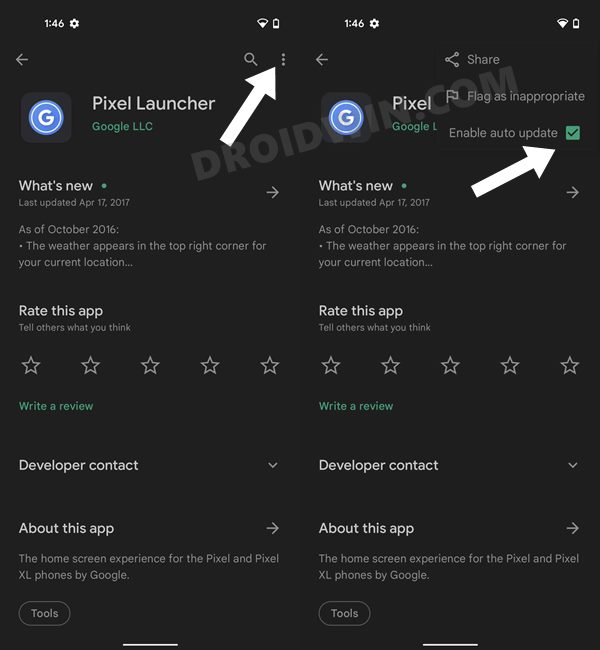
- Once that is done, go back to Apps > See All Apps and select Pixel Launcher.
- Now scroll to the end and note out its version number somewhere [Tiramisu means Android 13].

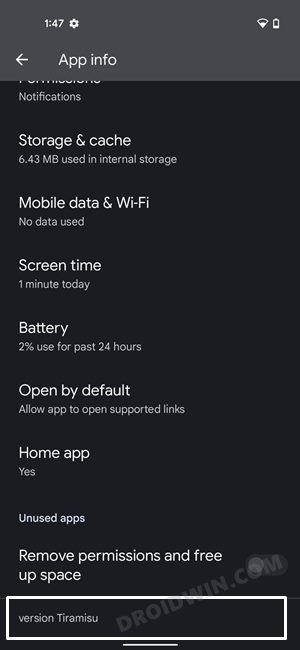
- Now head over to a trusted third-party site and download an older version of that app.
- Install that APK file (enable Installation from Unknown Sources, if asked). That’s it.
FIX 8: Reinstall App [Via Settings and ADB]
If the app’s configuration and settings file get corrupted, then simply deleting the app’s data and cache might not be enough. In such cases, you will have to uninstall the app from your device and reinstall its fresh build. However, if you have a Pixel device, then you wouldn’t be able to uninstall it the normal way and you would instead have to take the help of the ADB Commands. Whereas non-Pixel devices could easily take the normal approach via the Settings menu. All this has been explained below, follow along.
For Non-Pixel Devices
- To begin with, temporarily change your default launcher app.
- Then go to Settings > Apps > See All Apps and select Pixel Launcher from the list.
- After that, tap on Uninstall followed by OK in the confirmation dialog box.

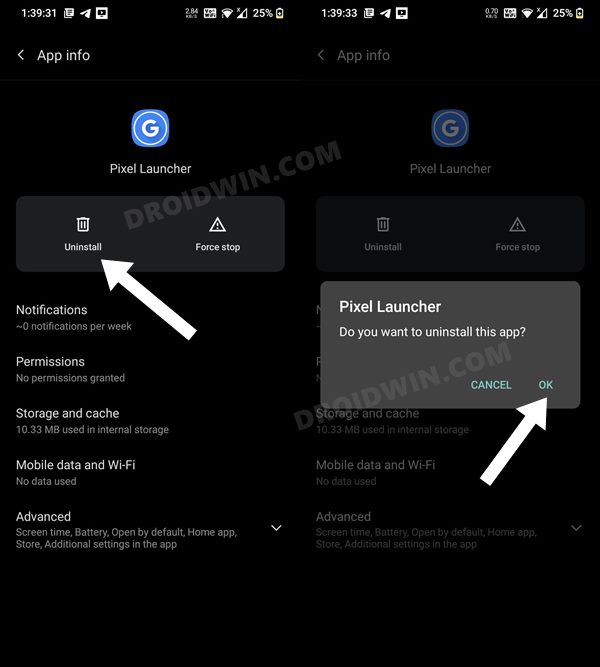
- Now download and install its latest version from Play Store or a third-party site.
- Check if it fixes the Pixel Launcher not working issue on your Android device.
For Pixel Devices
For a detailed explanation, check out our guide on Remove/Uninstall Apps from Android via ADB. The shorter instructions are given below:
- Download and extract Android SDK Platform Tools on your PC.


- Enable USB Debugging on your device and connect it to the PC via USB cable.


- Then head over to the platform-tools folder, type in CMD in the address bar, and hit Enter.


- This will launch the Command Prompt. Type in the below command to open the shell environment:
adb shell


- Now execute the following command to uninstall Pixel Launcher:
pm uninstall -k --user 0 com.google.android.apps.nexuslauncher

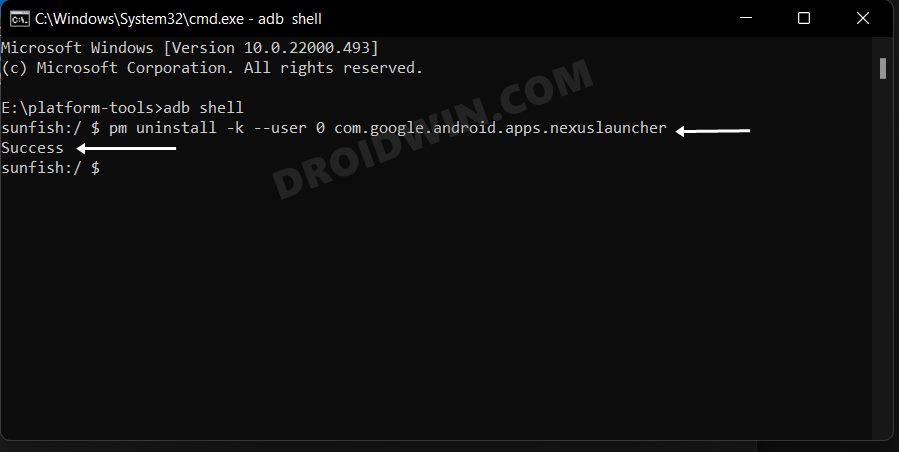
- Then execute the below command to reinstall Pixel Launcher:
cmd package install-existing com.google.android.apps.nexuslauncher

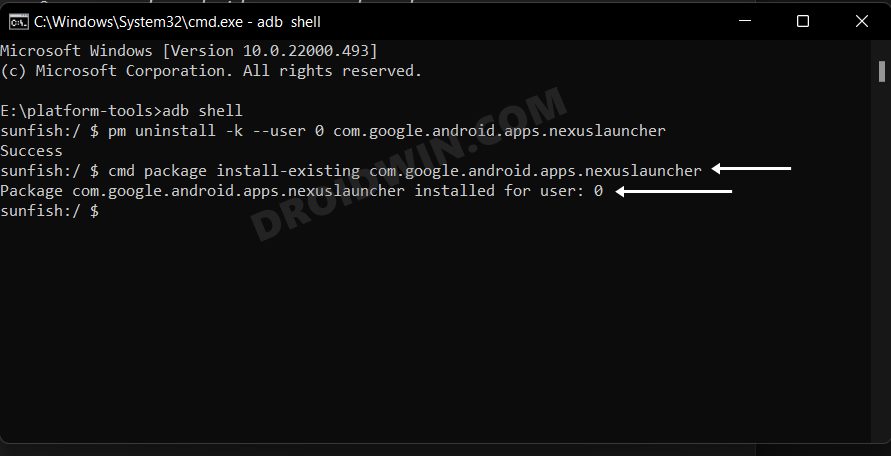
- Or download and install its latest version from Play Store or a third-party site.
- Check if it fixes the Pixel Launcher not working issue on your Android device.
With this, we round off the guide on how you could fix the Pixel Launcher not working issue on your Android device. We have listed eight different methods for the same. Do let us know which one spells out success for you. Likewise, all your queries are welcomed in the comments section below.


