In this guide, we will show you the steps to fix the issue of the mobile network not working on the OnePlus 9 after the OxygenOS 12 Android 12 update. It wouldn’t be harsh to say that in the past couple of years, the OEM has been going through a rough patch. “Nothing” seems to be going on the right track ever since its co-founder left the company. As if the slow and patchy upgrade rollouts weren’t enough, the company put the final nail in the coffin after ditching its USP- aka the OxygenOS skin.
Beginning with Android 12, you will now get a taste of Oppo’s own ColorOS, which frankly no one had asked for in the first place. In this regard, the OEM has already carried out two open beta tests. The tech enthusiasts did willingly signed up for the beta test and then gave out their feedback regarding all the underlying bugs and issues. So the company’s next course of action should have been to iron out all these bugs and then roll out the stable build for the general audiences.
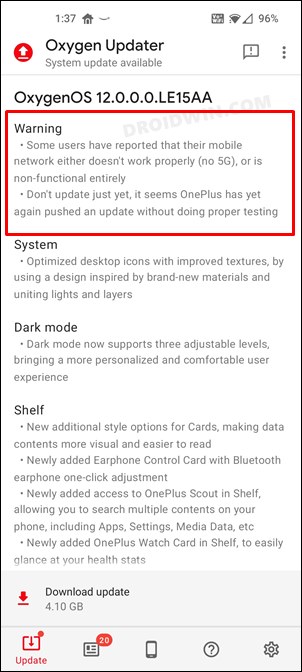
Well, that doesn’t seem to be the case. OnePlus has just rolled out the stable build for its ninth iteration of devices, and the issues are already starting to line up. Among them, the most concerning one is the loss of the mobile network. Many users who have installed this build have said that they aren’t getting any 4G/5G signals. As a result. they aren’t able to place or receive calls, send SMS, or use the internet (carrier data).
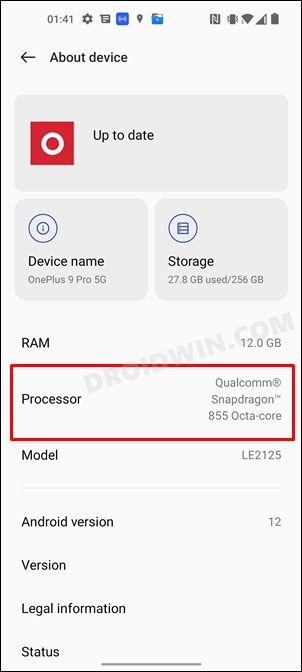
Even the Snapdragon chipset under the Settings menu is listed as 855 instead of 888. and this is perhaps the weirdest bug that I have come across to date. As a reminder, all these bugs are part of the stable update! So if you have installed this update and are now lamenting this decision, well fret not. In this guide, we will show you the steps to fix the issue of the mobile network not working on the OnePlus 9 after the OxygenOS 12 Android 12 update. So without any further ado, let’s get started.
Table of Contents
Mobile Network not working on OnePlus 9 after OxygenOS 12 Android 12

Do note that there’s no universal fix as such. You will have to try out each of the below-mentioned workarounds and then check which one spells out success for you.
FIX 1: Add New VPNs
If you are facing this issue on the Visible (a Verizon MVNO) carrier, then you will have to add four new APN profiles. Apart from that, you will also need a SIM from another carrier (activated or not doesn’t matter). This SIM will only be used for around 5 minutes. Is there any downside to this workaround? Well, your carrier will now be identified as Verizon and not Visible (though it wouldn’t conflict with calls/messages or usage of carrier data). So if that’s well and good, then let’s get started with the steps:
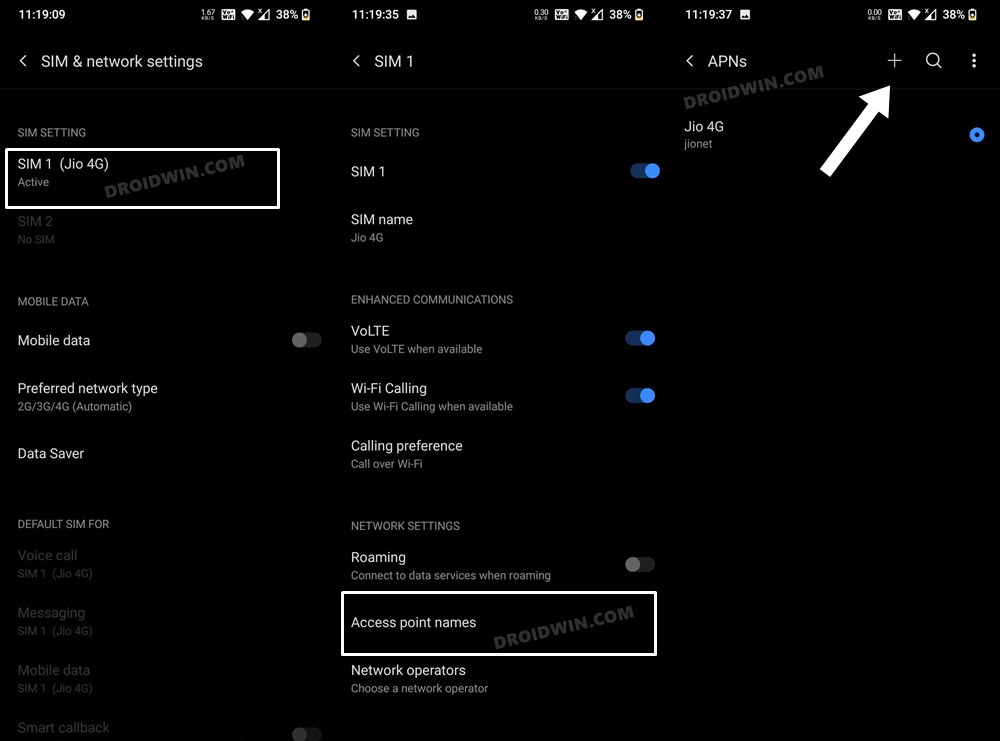
- To begin with, head over to Settings > WiFi & Network.
- Then go to SIM & Network and select your SIM from the list.

- After that, go to Access Point Names and tap on the Plus icon.
- Now create the following four APNs:
Name: Visible FOTA
APN: VSBLADMIN
MCC: 311
MNC: 480
APN Type: fota
APN Protocol: IPV4V6
Mobile Virtual Network Operator Type: GID
Mobile Virtual Network Operator Value: BAE100000000000

Name: Visible CBS
APN: VSBLAPP
MMSC: http://mms.vtext.com/servlets/mms
MCC: 311
MNC: 480
APN Type: cbs,mms
APN Protocol: IPV4V6
Mobile Virtual Network Operator Type: GID
Mobile Virtual Network Operator Value: BAE1000000000000

Name: Visible IMS
APN: VSBLIMS
MCC: 311
MNC: 480
APN Type: ims,ia
APN Protocol: IPV4V6
APN Roaming Protocol: IPV6
Mobile Virtual Network Operator Type: GID
Mobile Virtual Network Operator Value: BAE1000000000000

Name: Visible Internet
APN: VSBLINTERNET
MMSC: http://mms.vtext.com/servlets/mms
MCC: 311
MNC: 480
APN Type: default,dun,supl
APN Protocol: IPV4V6
Mobile Virtual Network Operator Type: GID
Mobile Virtual Network Operator Value: BAE1000000000000
- Once all the four APNs have been created, select the Visibile Internet APN.
- After that. remove your Visible SIM card from your device and enter a SIM card of any other carrier.
- Once the network bar appears, remove that SIM card and re-insert your Visible SIM card.
- Finally, it is recommended to toggle the Smart 5G switch a couple of times to refresh it.
- Check if it fixes the issue of the mobile network not working on the OnePlus 9 after the OxygenOS 12 Android 12 update.
FIX 2: Reset APN
Next up, you could also reset the APN Settings and then manually select your network operator. Here’s how it could be done:
- To begin with, head over to the Settings menu on your device.
- Then go to WiFi & Network > SIM & Network
- Now select your SIM Card from the list.
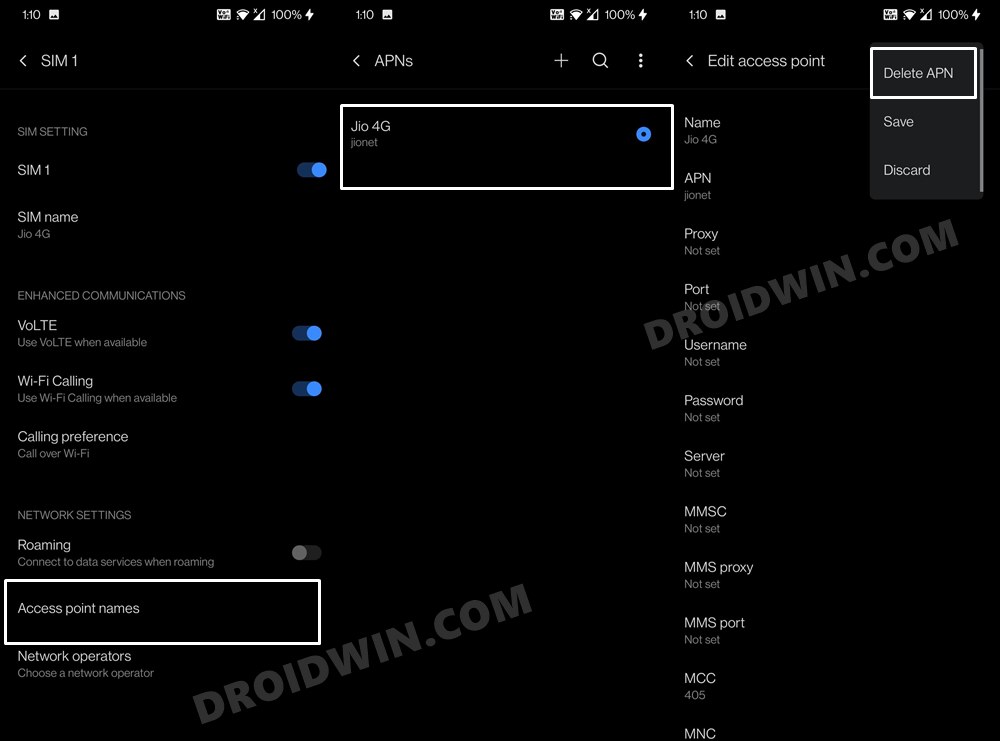
- After that, go to the Access Point Names and select your APN.
- Then tap on the overflow icon situated at the top right and select Delete APN.
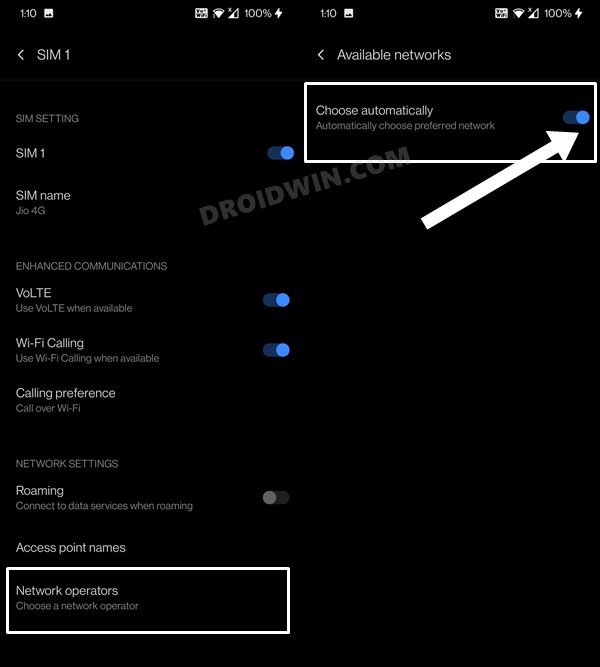
- Once that is done, go back and head over to the Network Operator section.
- Then disable the toggle next to Choose automatically.
- It will now bring up a list of all the available networks. Select the one from the list.
- Finally, restart your device and you shall get back the APN settings.
- If that doesn’t happen, then remove and re-insert the SIM card, the APN settings should be re-populated.
- Now verify if the issue of the mobile network not working on the OnePlus 9 after the OxygenOS 12 Android 12 update has been fixed or not.
FIX 3: Delete Cache from Recovery
In some instances, the update might leave behind a few traces of the files from the previous OS build. And this might end up conflicting with some of the device’s functionality. And the issue is all the more imminent for users who have directly updated to Android 12 stable from the Open Beta 2/3 without a factory reset. Therefore, your best bet should be to delete the cache files from the stock recovery, which could be done as follows.
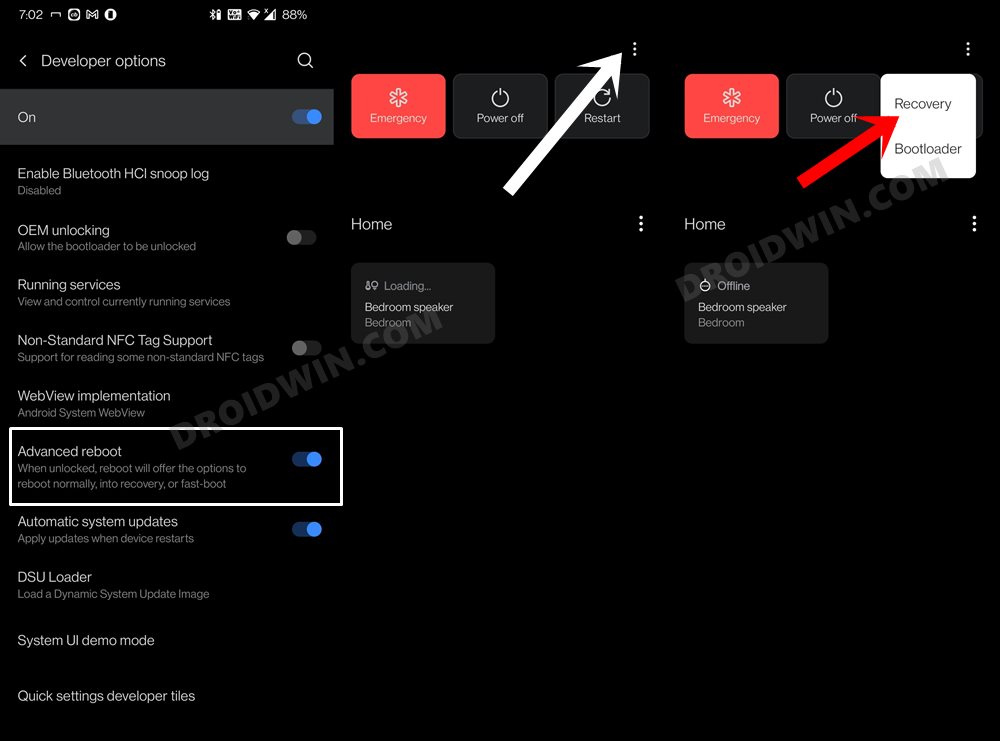
UPDATE 1: Users have reported that the Advanced Reboot option has been removed. If that is the case, then you will have to use the ADB Commands to boot your device to stock recovery. So start off from the third point below.
To begin with, enable the Advanced Reboot option. For that, go to Settings > About Phone > tap on Build Number 7 times > Then go back to Settings > System > Developer Options > Enable Advanced Reboot.Now long-press the Power key, tap on the overflow icon situated at the top right, and select Recovery. Your device will now reboot to Recovery.
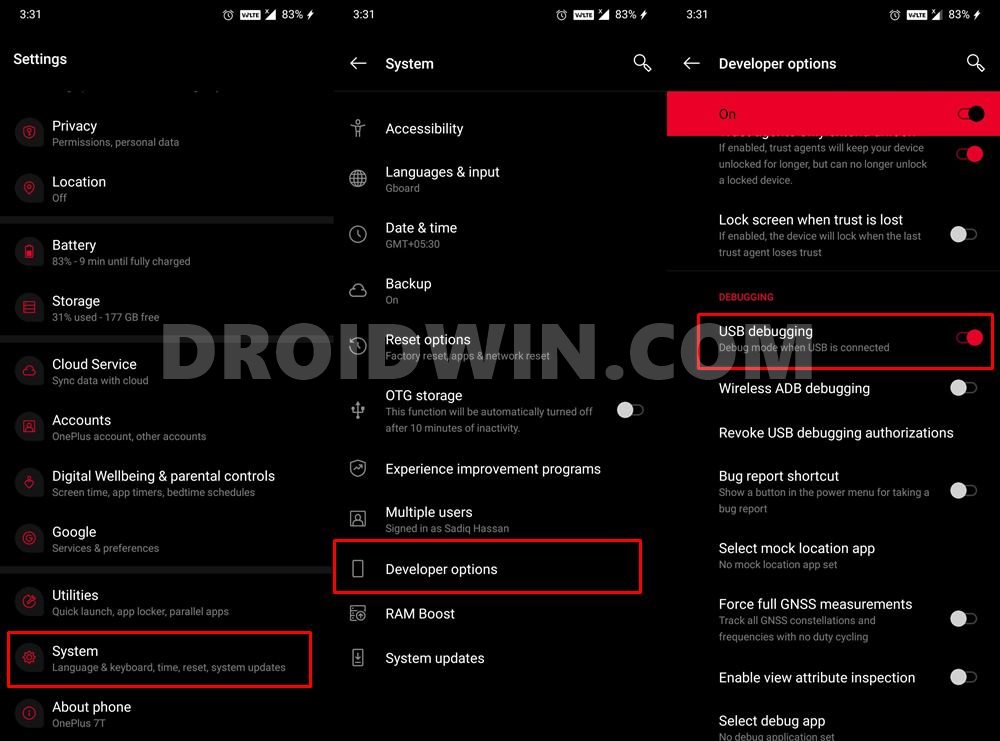
- To begin with, enable USB Debugging on your device. For that, go to Settings > About Phone > tap on Build Number 7 times > Then go back to Settings > System > Developer Options > Enable USB Debugging.
- Then download the Android SDK Platform Tools and extract it to any convenient location on your PC. This shall give you the platform-tools folder.
- Now connect your device to the PC via USB cable. After that, head over to the platform-tools folder address bar, type in CMD and hit Enter. This shall launch the Command Prompt window.
- Now type in the below command in this CMD window to boot your device to stock recovery:
adb reboot recovery
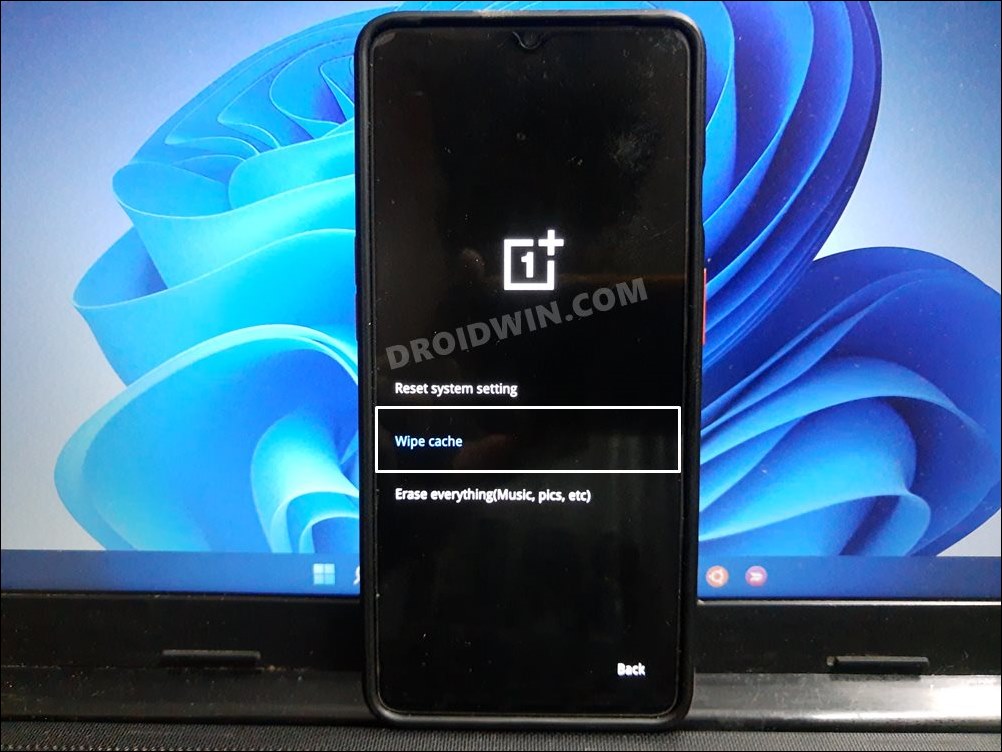
- Type in your PIN > Select Language > Wipe Data and Cache > Wipe Cache > YES.
- Once the cache has been wiped, exit that screen and select Reboot to boot your device to the OS. Verify if it resolved the issue or not.


FIX 4: Downgrade OnePlus 9/Pro from Android 12 to Android 11
If none of the aforementioned methods managed to spell out success for you, then you will have to opt for the nuclear approach of downgrading the OS to the earlier version. In other words, you will have to roll back to OxygenOS 11 (Android 11) from the current OxyegnOS 12 (Android 12).

While doing so will definitely fix this issue, but it would come at a cost- your device will undergo a factory reset. So make sure to take a backup beforehand and then refer to our guide on How to Downgrade OnePlus 9/Pro from Android 12 to Android 11. The download link for the downgrade firmware as well as the installation steps are all listed in that linked guide.
Concluding Remarks
So with this, we round off the guide on how you could fix the issue of the mobile network not working on the OnePlus 9 after the OxygenOS 12 Android 12 update. If none of the aforementioned workarounds worked out in your favor, then you might have no choice but to wait for the OEM to release a patch via an OTA Update that rectifies this issue.
But still, it is quite a sad state of affairs that we have to go through such a plethora of bugs and issues after installing the stable update. Well, it all speaks volumes for the current state of affairs of this OEM. On that note, we conclude this guide. If you have any queries concerning the aforementioned steps, do let us know in the comments. We will get back to you with a solution at the earliest. <More updates to follow>


Hakan
Good afternoon oneplus 9 le2115 tel android 12 de mobile data problem because I went back to android 11 by installing global 11.2.4.4. My mobile datam came, but this time I can’t update android from either mobile data or wifi. Finds the update. When it comes to curing, it says update error. Could you please
Rob D
By the way there is no cache partition to wipe in android 12, the option is not there anymore. (Since Google introduced the A/B partition)
Rob D
Just wanted to let you know you wrote VPN instead of APN for the instructions. I just got the OOS 12 update for my OnePlus 7 Pro and am having the same issue. So far none of the steps are working for me. If you have any other suggestions please let me know.
Merily
Hello, I updated to Android 12 last night and after that the mobile network is not working. I can make calls and use wifi but no network. It also didnt show any VPNs nor did it save them when I tried the first fix.
What fixed my phone and gave back mobile network was network reset.
Not sure what the exact term would be in your english menu but go to SETTINGS- SYSTEM- RESET- NETWORK SETTINGS RESET(or similar) it says in small text that it resets wi-fi, bluetooth, mobile network. and immediately my network turned on. 🙂
David Cohen
Does someone tried to completely wipe data cache ?
Umer Shabib
adb reboot recovery redirects to the same menu as wipe data , reboot and poweroff.. no wipe cache option
YM
Same here..
Serajus Salekin
method 2 for wipe cache failed. can you help please.
Just me
The ADB do the same thing as power off>>Power button AND Vol Minus button.
Nothing new in the menu.
Dave
What are you talking about? they removed the option to clear cache in oxygenos 12 are you high ?
Sadique Hassan
Hi Dave, could you double-check the same. Maybe they might have re-ordered the settings and moved the option to some other location? But if they have really done so, then it really makes no sense to remove such an important option for no reason at all.
PGrey
It’s been removed from the A12 ROM, just chatted with OP-support
Also, I’m unable to delete my APN, and resetting doesn’t help, it just reprovisions the LTE APN, every time.
Mobile data is basically unusable, with my provider (T-MOBILE) until OnePlus does something here, or I “take the big hit”, find the right ROM, and revert/restore to A11.
I’m really disappointed in OP now, after almost 5 years, they “pull this”, and apparently have no way to recover (per support, wait 24-48 for them to ping me, via a ticket, yeah…).
AA
not working my friend.. the option to wipe cache is not there..
Ashwin
In my oneplus 9 in method 2 the advanced reboot option is not showing?
Sadique Hassan
Hi Ashwin, I have added the ADB Command method to boot to Stock Recovery. Do try it out.
Sreyes
Hi mate, you are a savior! Finally, managed to fix this issue after resetting the APN. Although I had to remove and reinsert the SIM and then wait for ages for my carrier to send the APN settings, but it was worth the wait!
Sadique Hassan
Hi Sreyes, glad that it worked out for you. Just to reconfirm, did you perform any other tweak from your end which you would like to share with us? As there are still some users for whom this trick didn’t work out yet.
SIJO
HI
IT DIDINT WORK FOR ME .. HAVE AY OTHER OPTIONS ?
Sadique Hassan
Hi Sijo, sorry for that. I have updated with Method 2: Delete Cache via Recovery… Could you please try and let me know the results.
Praveen
Hi Bro,
After doing above changes still I have the same issue. Kindly guide.
Thank you
Sadique Hassan
Hi Praveen, sorry for that. I have updated with Method 2: Delete Cache via Recovery… Could you please try and let me know the results.
Praveen
Hi
Thank you for your support, suprisingly I couldn’t find any advanced reboot options. By chance if you find any other option I can try.
Thank you
Sadique Hassan
Hi Praveen, I have added the ADB Command method to boot to Stock Recovery. Do try it out.
Salekin
Hi there, thanks for your help. However following your steps didn’t resolve my issue of network disabling following Android 12 update on OnePlus 9 pro
Can you please help me further
Thanks again
Sadique Hassan
Hi Salekin, sorry for that. I have updated with Method 2: Delete Cache via Recovery… Could you please try and let me know the results.
Salekin
Unfortunately method 2 also failed
I feel helpless
Do you have any other options
Sorry to bother you
Please help
Ahmed Kashif
i did the exact same steps on oneplus 9 pro , still getting no 4g signal and it shows in the bar at the top as if its not connected.
Also in the settings it shows that the processor is a 855 octacore instead of the 888 , Please help
Sadique Hassan
Hi Ahmed, sorry for that. I have updated with Method 2: Delete Cache via Recovery… Could you please try and let me know the results. And regarding the processor thing, that is really an intriguing issue! let me see if I could gather some more information about this
Merih Mesfin
Hi I tried everything I can .. still my phone is useless.. is there a way to downgrade from stable Oxygen 12 to 11 please help.. and one more thing is there a way to restore my launcher set as it was .. this update is disaster.
Ahmed Kashif
I did a another install , and it now shows as 888 , however for the network the wipe cache option is now removed from android 12 however I found a work around that worked for me, When manually searching for a network I found the same carrier network with a different name which connects to it and doesn’t register , however afterwards when switched to automatic selection it works correctly.