In this guide, we will show you various methods to fix the keyboard not working in Windows 11. When it comes to peripheral devices, there’s no denying the fact keyboard is perhaps the last thing that you would want to be on the list of devices not performing. But one cannot neglect the fact that the chances of happening this is always there. In this regard, there could be quite a few plausible reasons why your keyboard might not perform along the expected lines.
From basic issues related to the USB Port or Hub to outdated keyboard drivers or even the i8042prt and kbdhid keyboard registry values, any one of them could prove to be the culprit. Fortunately, each of these issues has an associated fix as well. And upon carrying them out, there’s every chance of fixing the keyboard not working issue on your Windows 11 PC. So without any further ado.
Table of Contents
How to Fix Keyboard Not Working in Windows 11

Do keep in mind that there’s no universal fix as such. You will have to try out each of the below-mentioned workarounds and then see which one spells out success for you. So keeping that in mind, let’s get started.
FIX 1/The Prerequisite: Enable On-Screen Keyboard on Windows 11
Before trying out any of the fixes mentioned in this guide, the first prerequisite calls for the need to have the on-screen keyboard enabled. Though we will try out best to not incorporate any steps that require the use of the keyboard, in rare instances [such as when entering values in Registry Editor], it might become an absolute necessity. So at that point in time, the on-screen keyboard will be our only fallback choice. So proceed with the below steps to enable the on-screen keyboard on your Windows 11 PC:
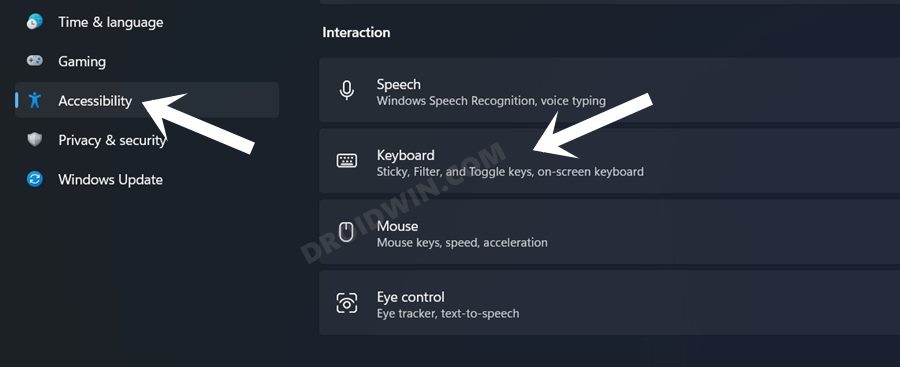
- To begin with, right-click on the Start Menu and select Settings.
- Then select Accessibility from the left menu bar and go to the Keyboard section.

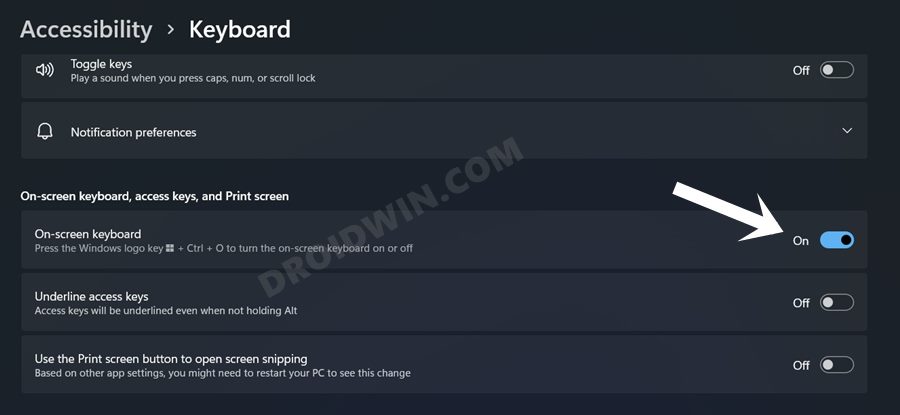
- Now enable the toggle next to On-Screen Keyboard.
- That’s it, let’s now start off with the methods to fix the keyboard not working issue in Windows 11.
FIX 2: Basic Troubleshooting
Before moving on to any of the advanced fixes, here are a few basic troubleshooting tips that you should try out.
- To begin with, reboot your PC once and check out if it is sufficient enough to rectify the keyboard issue.
- Next up, if you are using a USB keyboard, then try disconnecting and reconnecting it back in. Moreover, we will recommend you to connect the keyboard to a USB 2.0 Port and not 3.0.
- Furthermore, some keyboards come with a key lock feature. Upon enabling it, it disables the functionality of all the keys on your keyboard. Usually, this feature is assigned to one of the Function Keys and has a small lock icon next to it. Likewise, the Ctrl+Alt+L shortcut might also lock your keyboard. So make sure that you haven’t unintentionally activated that feature.
FIX 3: Tweak USB Root Hub Properties
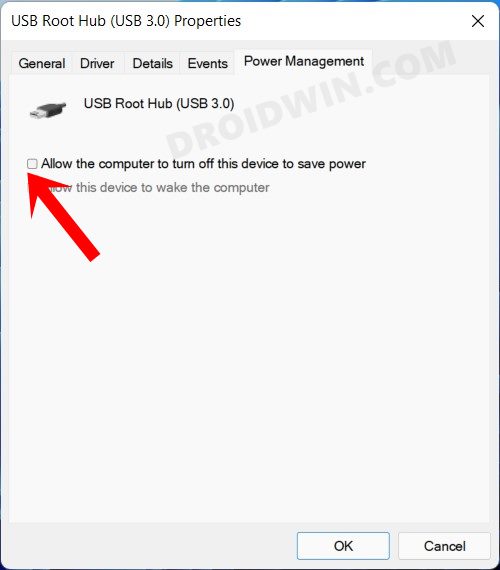
In order to preserve the battery life, your PC might implement some restrictive measures on the USB Root Hub ports. When that happens, the port might not be able to identify the connected device. Therefore, as of now, we would advise you to disable that feature, which could be done as follows:
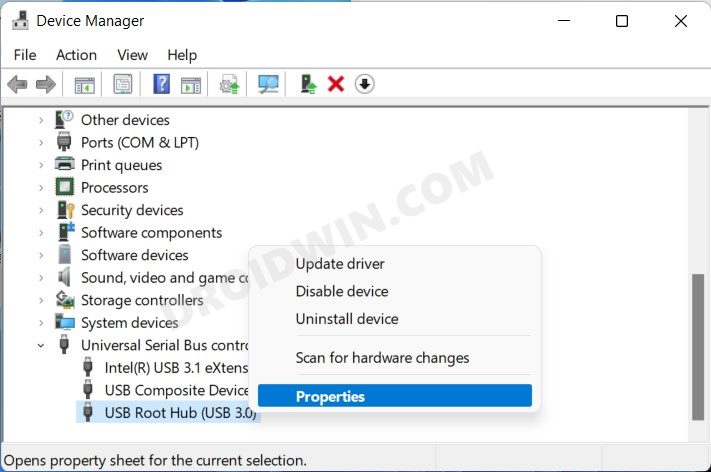
- Right-click on the Start Menu and select Device Manager.
- Then expand the Universal Serial Bus controllers section.
- Now right-click on USB Root Hub and select Properties.
- After that, go to the Power Management tab.
- Now uncheck “Allow the computer to turn off this device to save power”.
- Finally, click OK to save the changes.
Now verify if it is able to fix the keyboard not working issue in Windows 11. If it didn’t work out for you, then don’t close the Device Manager as there are a couple of other fixes that we need to carry out inside this environment.
FIX 4: Update Keyboard Drivers
If you are using old or outdated keyboard drivers, then it could lead to quite a few issues with the associated device. Therefore, you should consider updating these drivers to the latest build, which could be done as follows:
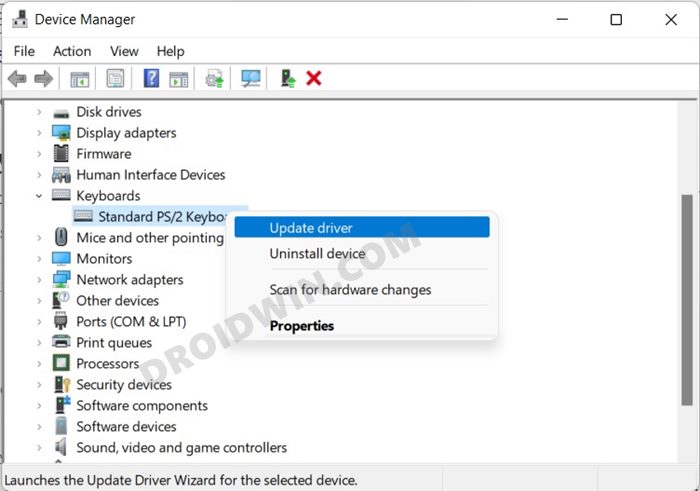
- Open Device Manager and expand the Keyboards section.
- Now right-click on your keyboard and select Update Drivers.
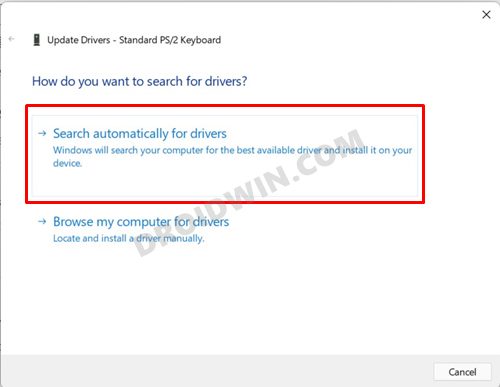
- Then choose Search automatically for drivers.
- Windows will now search for the latest drivers online, and would then install them as well.
- Once done, restart your PC and then check if the issue of the keyboard not working in Windows 11 has been fixed or not.
FIX 5: Use Hardware and Device Troubleshooter
Windows OS comes with quite a few troubleshooting apps pertaining to different domains. And one of them focuses specifically on hardware devices. However, you cannot access this troubleshooter from the Settings menu where all the others are present. This is because Windows, for some reason, has hidden this troubleshooter and you would have to carry out a couple of additional steps to re-enable it.
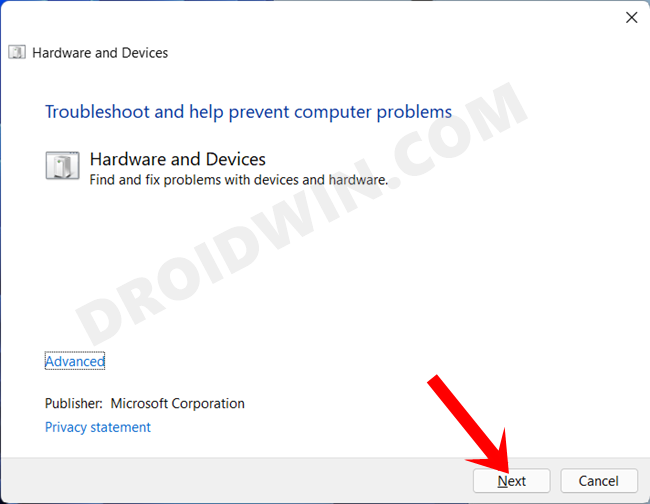
So please refer to our guide on Enable and Use Hardware and Devices Troubleshooter in Windows 11. Once you have enabled it, make sure to connect your USB keyboard before starting off with the scan. Then apply the fix that it recommends and verify if it fixes the keyboard not working in Windows 11 issue.
FIX 6: Use the SFC and DISM Commands
System File Checker and Deployment Image Servicing and Management are two command-line utility tools that scan for the corrupt Windows files and then replace them with their working counterpart. The major difference between the two is whereas the SFC replaces the corrupt files with the working ones from the cached directory on your PC, DISM does so by downloading the working files from the online Microsoft servers. And as of now, we would be making use of both these tools to fix the underlying issue. Follow along.
- To begin with, right-click on the Start Menu and select Windows Terminal (Admin).
- Then click on the down arrow present next to the new tab icon and select Command Prompt from the list.
- Once the CMD window is opened, copy-paste the below command to open the SFC Tool:
sfc /scannow
- Once the SFC Scanning is complete, it’s time to use the DISM Tool. So copy-paste the below command:
DISM /Online /Cleanup-Image /RestoreHealth

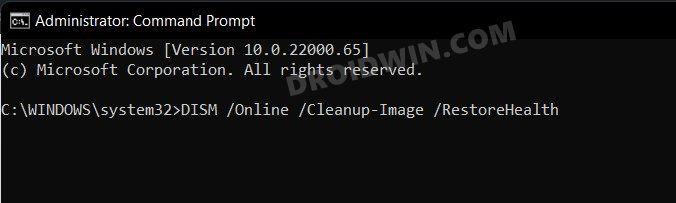
Once DISM finishes the scanning, it is recommended to reboot your PC. Once it boots up, check if the keyboard not working issue in Windows 11 has been fixed or not.
FIX 7: Disable Fast Startup in Windows 11
Windows comes with a Fast Startup functionality whose main purpose is to speed up your PC’s boot-up time after a shutdown. However, in some instances, this feature has been known to conflict with USB devices and their associated drivers. Therefore, it is recommended to disable this feature as of now, which could be done as follows:
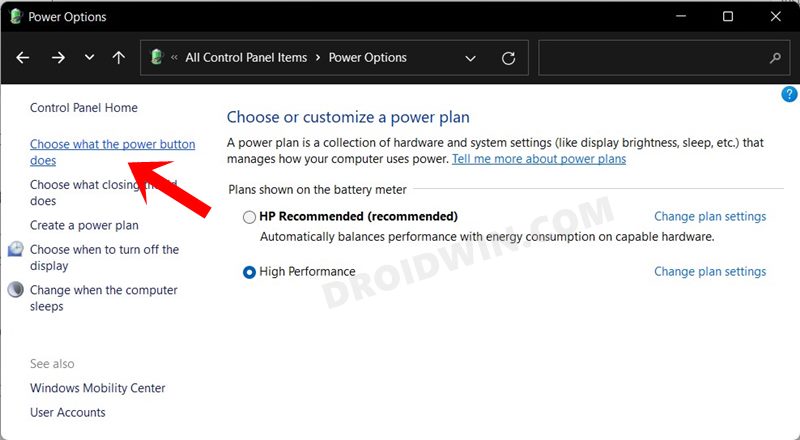
- To do so, open Control Panel from the Start Menu and go to the “Power Options” section.
- Then click on “Choose what the power button does from the left menu bar.”
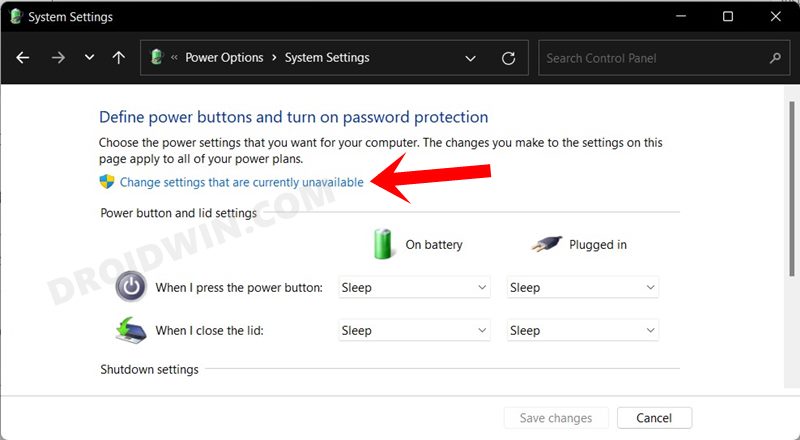
- After that, click on “Change settings that are currently unavailable”.
- Now uncheck “Turn on fast startup” and hit the “Save changes” button.
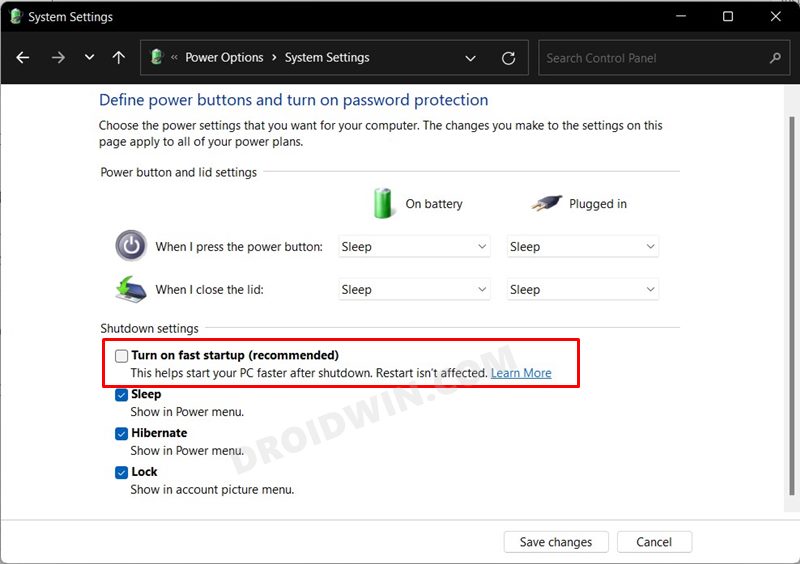
Finally, restart your PC and then check if it fixes the keyboard not working issue on your Windows 11 PC. If your answer is in a negative tone, then re-enable Fast Startup and then proceed ahead with the other fixes listed below.
FIX 8: Re-Install Keyboard Drivers
In case the keyboard drivers or its configuration files are corrupted, then just updating them wouldn’t do any good. In that case, you will have to uninstall the currently installed one and then let Windows install the fresh ones. Here’s how:
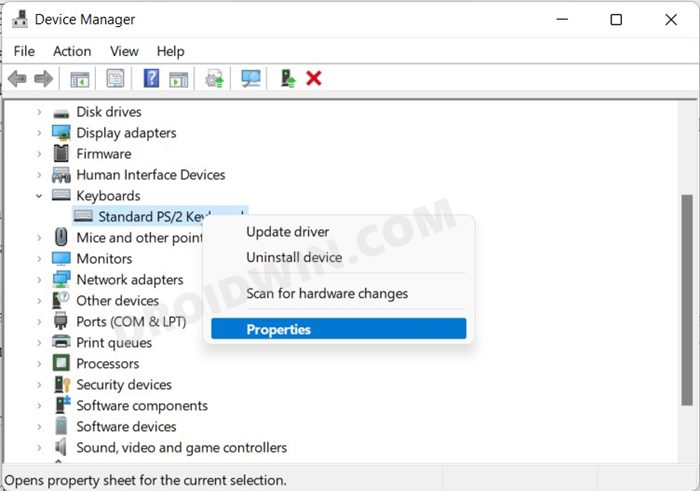
- Start off by right-clicking on the Windows menu and selecting Device Manager.
- Then expand the Keyboard section, right-click on your keyboard, and select Properties.
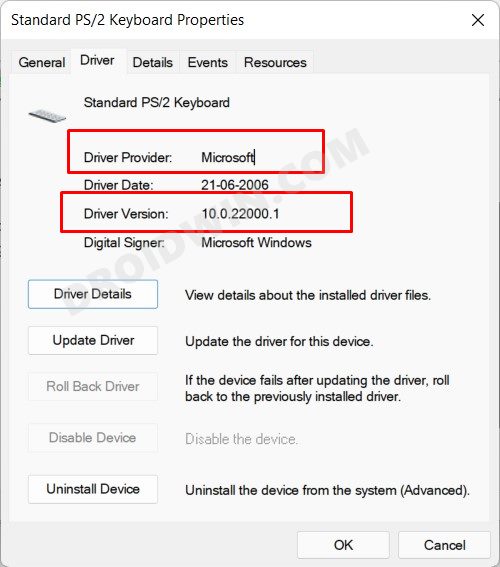
- Now go to the Drivers tab and note down the Driver Provider and Driver Version. We are doing this just to be on the safer side. If Windows does not automatically install these drivers, then we could do so manually using the details that we have in our hands.
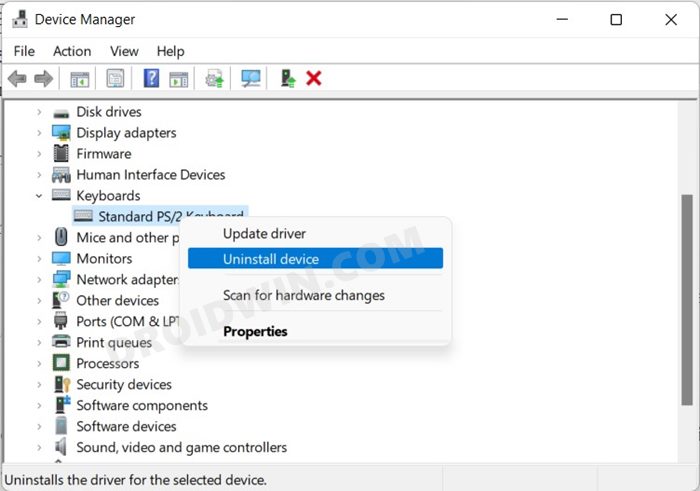
- Once you have copied the values, right-click on your keyboard and select Uninstall Device.
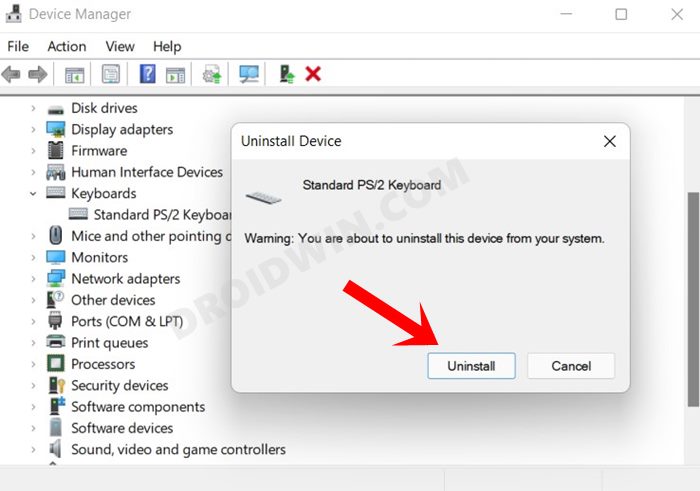
- Then click Uninstall in the confirmation dialog box that appears. Once the drivers are removed, restart your PC.
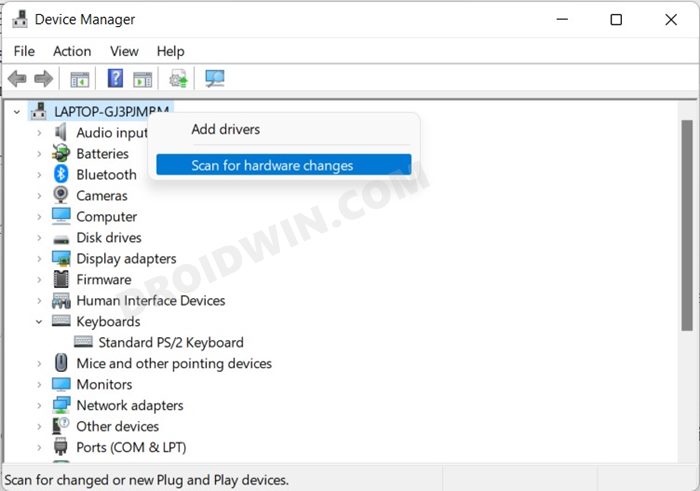
- As soon as the PC boots to the OS, it should install the keyboard drivers. If that doesn’t happen, then open the Device Manager, right-click on your PC name situated at the top, and select Scan for hardware changes.
- Windows will now scan your PC for all the missing drivers (which in this case is the keyboard driver) and install them as well.
- However, if that also doesn’t work out for you, then head over to Google, copy-paste the keyboard driver details that you had earlier noted, and then download and install the said drivers.
- Once done, restart your PC and it should fix the keyboard not working issue on your Windows 11 PC.
FIX 9: Change i8042prt and kbdhid Values via Registry Editor
i8042prt is the function driver for PS/2-style keyboard and mouse devices for Microsoft Windows OS. On the other hand, HID is a device class that is used to replace PS/2-style connectors with a generic USB driver so that it could support various HID devices, with kbdhid focusing specifically on keyboards.
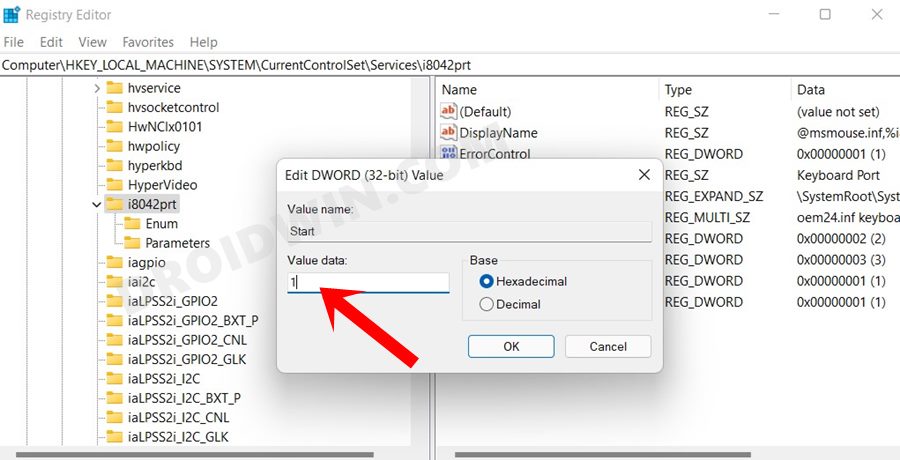
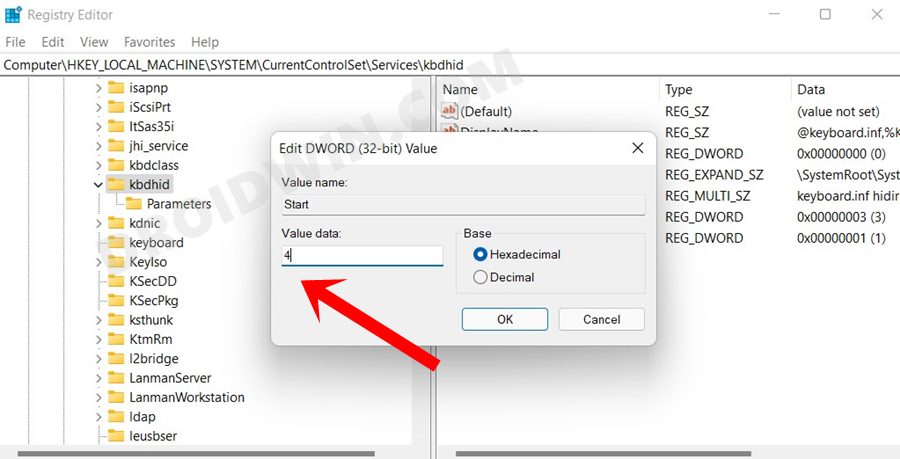
By default, the value of both i8042prt and kbdhid is set to 3. But as of now, we need to change these values and assign the value 1 to i8042prt and 4 to HID. Upon doing so, it has managed to rectify most of the keyboard-related issues, and there’s every chance it might fix the underlying issue as well. So without further ado, let’s give it a try.
- To begin with, open the On-Screen Keyboard (Settings > Accessibility > Keyboard > On-Screen Keyboard).
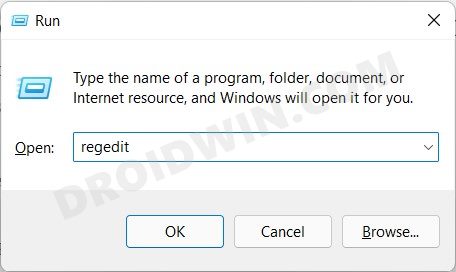
- Then press the Windows key followed by the R key. This shall bring up the Run dialog box.
- Now type in the below keyword in the Run box and hit Enter. This shall open the Registry Editor.
regedit
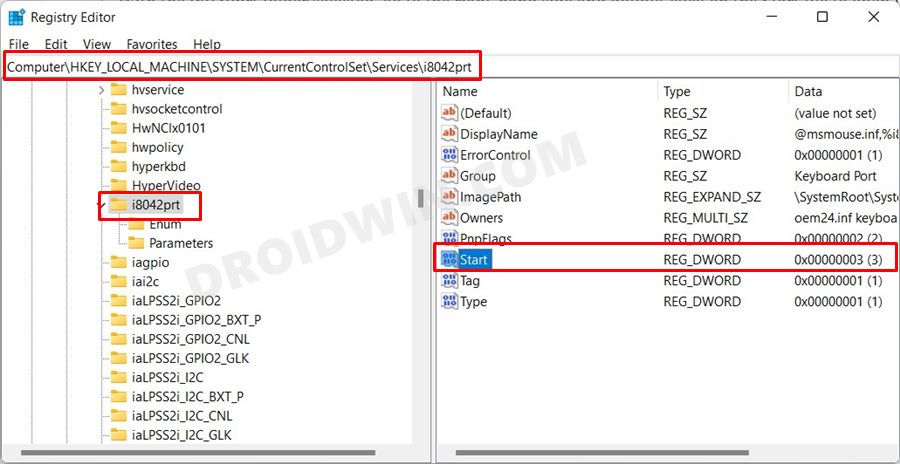
- Now copy-paste the below value in the Registry Editor address bar:
Computer\HKEY_LOCAL_MACHINE\SYSTEM\CurrentControlSet\Services\i8042prt
- With the i8042prt folder selected, go to the right-hand side and double-click on the Start file to open it.
- Now change its Value Data from 3 to 1 and hit OK to save the changes. Now restart your PC and see if the keyboard issue has been fixed or not.
- If you are still facing it, then again open the Registry Editor using On-Screen Keyboard.
- This time, copy-paste the following location in the address bar:
HKEY_LOCAL_MACHINE\SYSTEM\CurrentControlSet\Services\kbdhid
- With the kbdhid folder selected, go to the right-hand side and double-click on the Start file to open it.
- Now change its Value Data from 3 to 4 and hit OK to save it. When that is done, restart your PC.

Check if this registry tweak manages to fix the keyboard not working issue on your Windows 11 PC. If it does, well and good, revert the values of both i8042prt and kbdhid to 3 before moving ahead with our other fixes.
FIX 10: Toggle Keyboard Settings from Windows 11 BIOS
If none of the aforementioned methods managed to spell out success, then you should consider disabling and then re-enabling the keyboard from the BIOS screen. Here’s how it could be done:
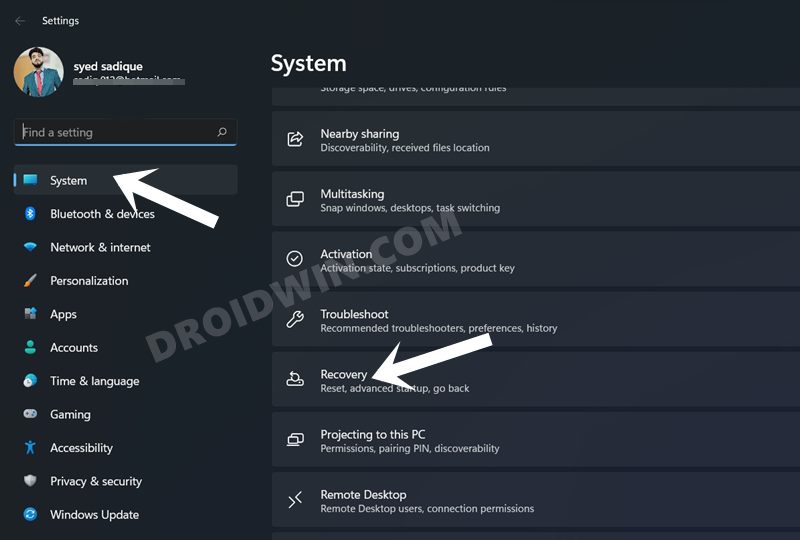
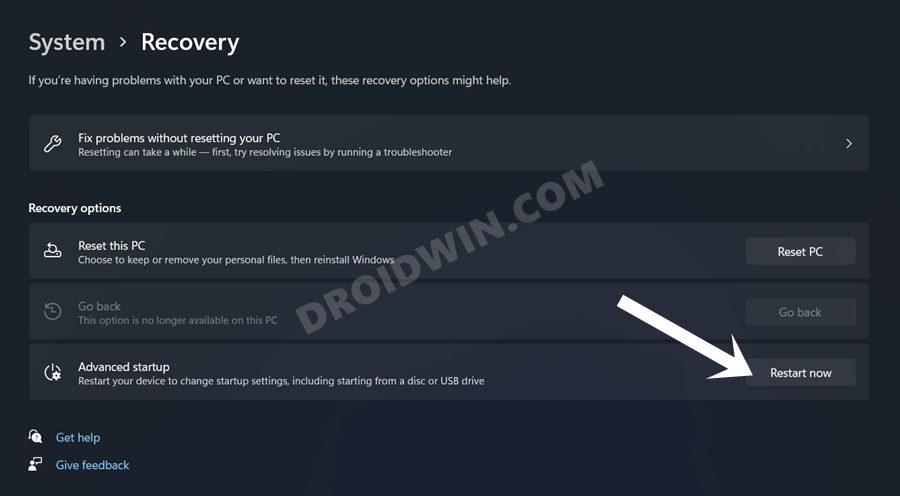
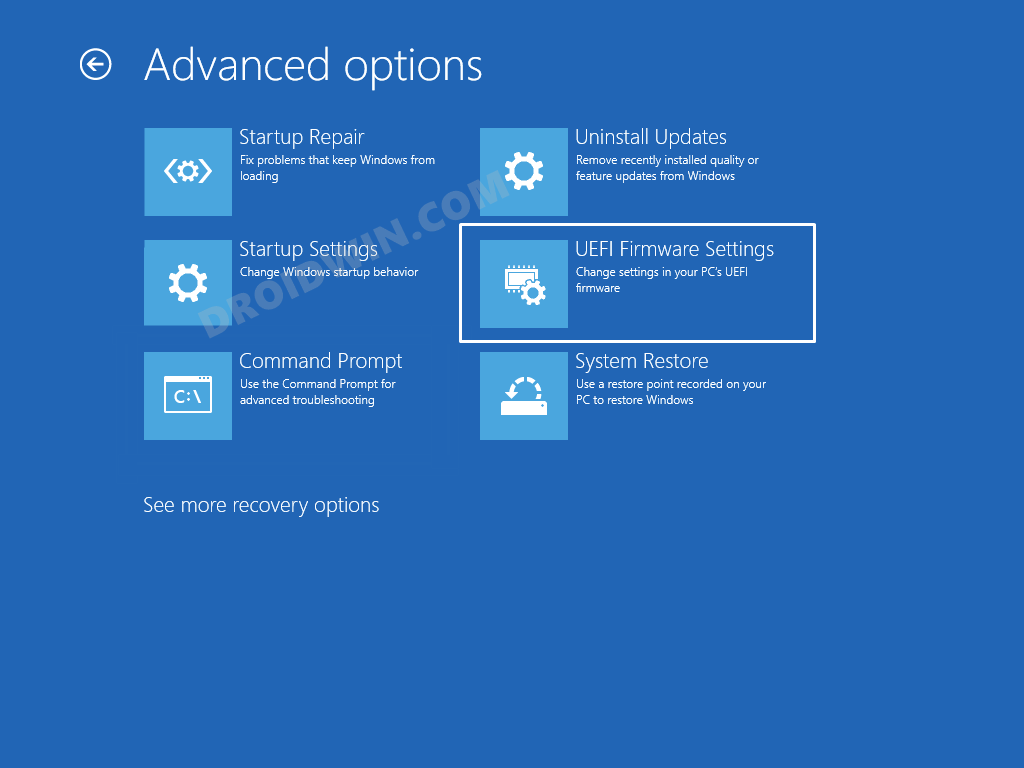
- To begin with, open the Settings menu and go to System > Recovery.
- Then click on the Restart Now button next to Advanced Startup.
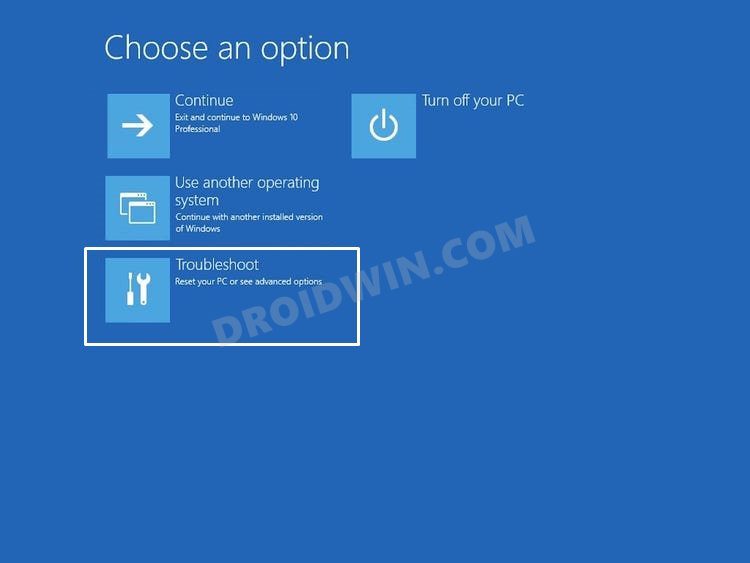
- Now, select Troubleshoot from the Choose an Option screen.
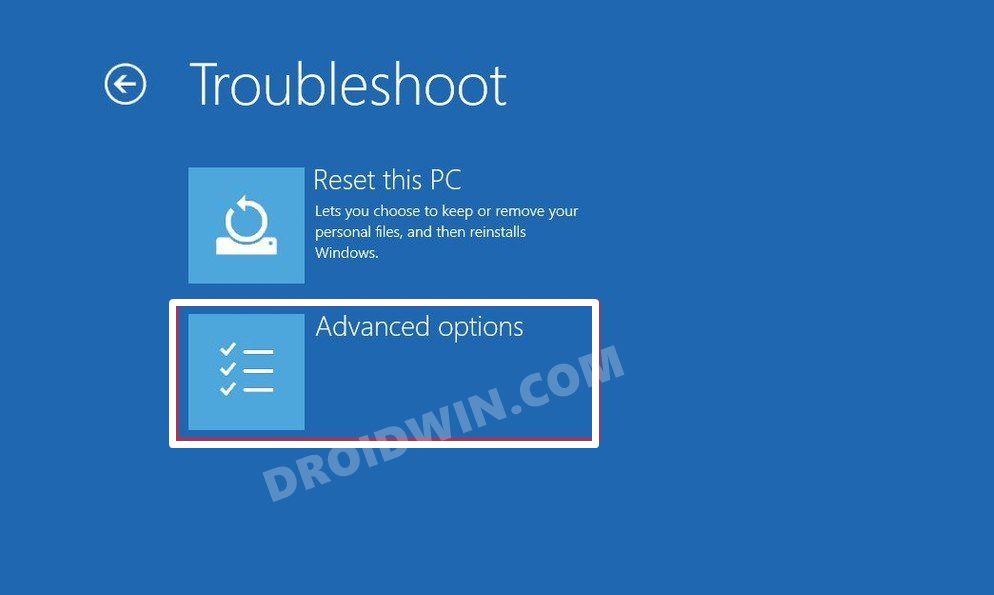
- After that, click on Advanced Options under Troubleshoot.
- Next up, click on UEFI Firmware Settings from the Advanced Options screen.
- Then hit the Restart button and press the F10 key to enter BIOS.
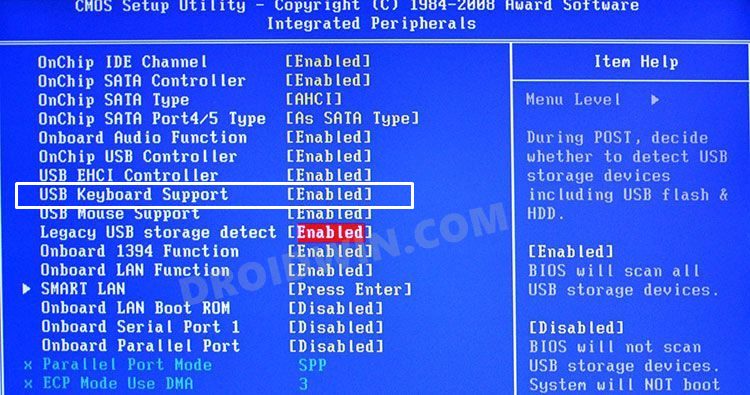
- Once your PC boots to BIOS, check out the option related to the keyboard. It will be something along the lines of Enable Keyboard Support or USB Keyboard Support.
- The said option will be enabled by default. So turn it off and then re-enable it.
- Once done, save the changes and reboot your PC to the OS. Once it boots up, the keyboard issue should have been resolved.

So with this, we round off the guide on how you could fix the keyboard not working issue on your Windows 11 PC. We have shared ten different methods for the same. Do let us know in the comments section which one worked out in your favor. Likewise, all your queries all welcomed in the comments.


