In this guide, we will show you the steps to fix the Fastboot Error- FAILED (command write failed (Success)). Along the same lines, we would also be discussing the Fastboot error FAILED (command write failed (No error)). Both these issues are under the same hood and have similar fixes as well. More often than not, these errors have been reported when users are trying to flash a custom recovery like TWRP.
Likewise, users have also reported this issue when they are flashing the boot.img file, either stock or the one that has been patched via Magisk. Well, no matter the reason why you are getting bugged with this issue, the fix for the same is fairly easy to execute. And this guide shall make you aware of just that. So without further ado, let’s get started with the guide to fix the Fastboot Error- FAILED (command write failed (Success)).
- How to Fix (FAILED (Write to device failed (Invalid argument))
- Fix writing ‘system’ FAILED (remote: ‘Partition not found)
- How to Fix FAILED (remote: Command not allowed)
- Fix FAILED (remote: Partition flashing is not allowed)
- How to Fix Fastboot Erase System Command Not Working
Table of Contents
Fix Fastboot Error: FAILED (command write failed (Success))
Do keep in mind that there isn’t any universal fix as such. You would have to try out each of the below-mentioned fixes until one of them spells out success for you. Follow along. Droidwin and its members wouldn’t be held responsible in case of a thermonuclear war, your alarm doesn’t wake you up, or if anything happens to your device and data by performing the below steps.
Fix 1: Use Official ADB Binaires
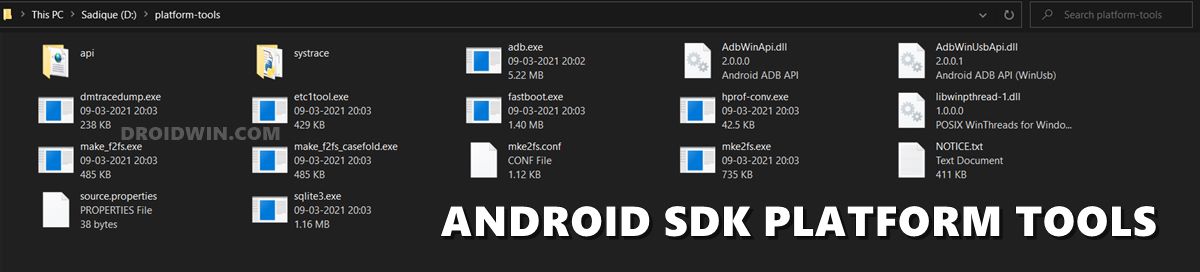
First and foremost, it is highly recommended that you use the latest and more importantly official ADB binaries provided by Google. There are already a plethora of ADB and Fastboot third-party tools, however, you should maintain social distancing from all of them and only stick with the offering from Google.
- So download the Android SDK Platform Tools from Google
- Then extract it to any convenient location on your PC.

- Doing so shall give you the platform-tools folder.
- Go to this folder, type in CMD in its address bar, and hit Enter.
- This shall launch the Command Prompt window within the ADB Directory.
- Now transfer the desired file that you are about to flash to this platform-tools folder.
- Finally, execute the desired command and see if the fastboot FAILED (command write failed (Success)) error has been fixed or not.

Fix 2: Install Android USB Drivers
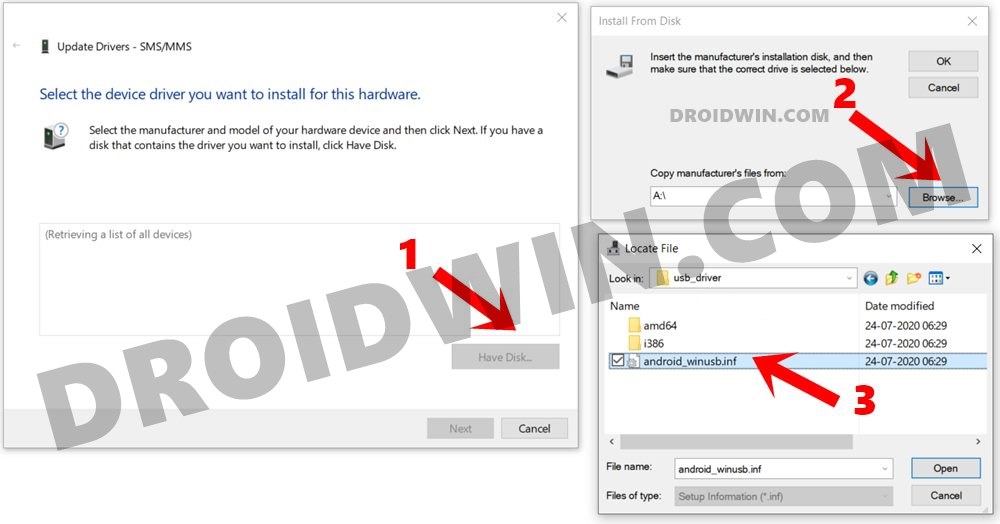
USB Drivers are an integral part of the smartphone ecosystem. They are needed so that your PC is able to recognize the connected device. So go ahead, download, and install the android_win.inf drivers onto your Windows PC. If that doesn’t work out, then also consider installing the Android Bootloader Interface Drivers. Install both of them and then verify if they fix the fastboot FAILED (command write failed (Success)) error.
Fix 3: Use Official USB cable | USB 2.0 Port
The next two fixes are evident from their names themselves. First off, it is recommended that you use the official USB cables that came shipped with your device. If that is not possible, then use a cable that supports MTP (file transfer).
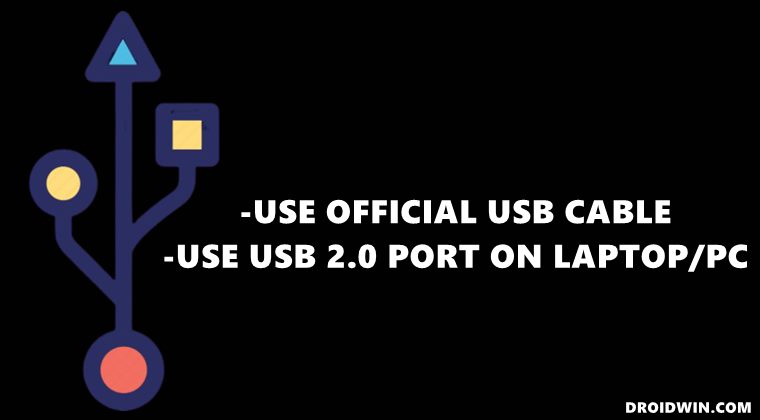
Along the same lines, you should only use the USB 2.0 Port on your PC. Using the faster 3.0 ones is known to cause quite a lot of issues, especially in the custom development domain. So try out both these tweaks and see if they fix the fastboot FAILED (command write failed (Success)) error.
Fix 4: While Flashing TWRP
If you are getting this issue when flashing the TWRP Recovery, then here are a few things that you need to try out. First off, make sure that there’s no issue with the custom recovery itself. XDA developers should be the best place for that. Refer to your device forum and read a few user’s comments, you would get a decent idea if the recovery is working or not.
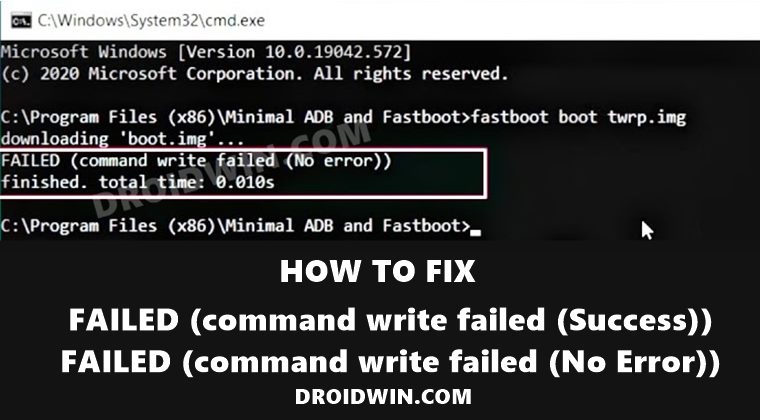
SAMPLE ERROR MESSAGE:
C:\adb>fastboot boot twrp-3.2.3-2-whyred.img
downloading 'boot.img'...
FAILED (command write failed (No error))
finished. total time: 0.002s
If it’s all well and good with the recovery, then there could be issues with your method of flashing the recovery. With the introduction of the A/B partition, flashing recovery is no longer a straightforward process. Users with devices having a recovery partition could easily flash it to that slot.
But most devices now come with a boot partition, so you would first have to boot your device to TWRP and then permanently flash it. Likewise, some might even require flashing to Ramdisk. All this has been explained in our comprehensive guide, please refer to this guide to fix fastboot FAILED (command write failed (Success)) TWRP error: How to Install TWRP Recovery on Android.
Fix 5: Fix For Ryzen PCs
Ryzen based PCs have always had a love-hate relationship with custom development. There has been a plentitude of well-documented cases where the ADB and Fastboot Commands weren’t executed successfully. So if you are also using a Ryzen chipset, then please refer to our guide on How to Fix Android ADB and Fastboot Issues on Ryzen based PCs. Try out all the fixes mentioned in the linked guide (especially the last two ones) and your issue would be fixed.
So this was all from this guide on how to fix the fastboot FAILED (command write failed (Success)) error. Along the same lines, this should also fix the Fastboot FAILED (Write to device failed (No Error)). We have shared around five different workarounds. Do let us know in the comments section which one spelled out success for you. Likewise, all the queries are welcomed in the comments.


Jose roberto
Your site is amazing, congratulations and thanks for teaching so many things, I have a request if you can help, I have a Samsung SM-825 platform qcomm Android 9 Kernel 3.18.115.17011592 # 2 SMT PREEMP Tue Nov 26 12:59:00 KST 20119 I can’t root or install custom rom, the data partition seems to be encrypted because I even installed a lineage custom rom, but at boot it stopped at the splash screen with a message “not possible to access data”, I tried root with magisk following your tutorial, but adb stops saying “waiting for any device” , followed the Kingo Root tutorial and installed with odin, odin stops and closes, I did without including the home_csc partition, it installed but it looped, as soon as you can could you teach a method? How I making me root? If you dont have time, don’t bother your, I’m grateful you , you site is magnificent! thanks so much!