In this guide, we will show you various methods to fix the issue of Adobe Lightroom Classic showing RAW files as a grey image. There are quite a few image visualization and editing software, however, none could compete with the offering from Adobe. And the reason for the same is hardly a secret either. Beholding a plethora of nifty features up its sleeves, it has completely streamlined the process of importing, saving, viewing, organizing, tagging, editing, and sharing large numbers of digital images. However, in spite of all the goodies attached, it isn’t free from its fair share of issues either.

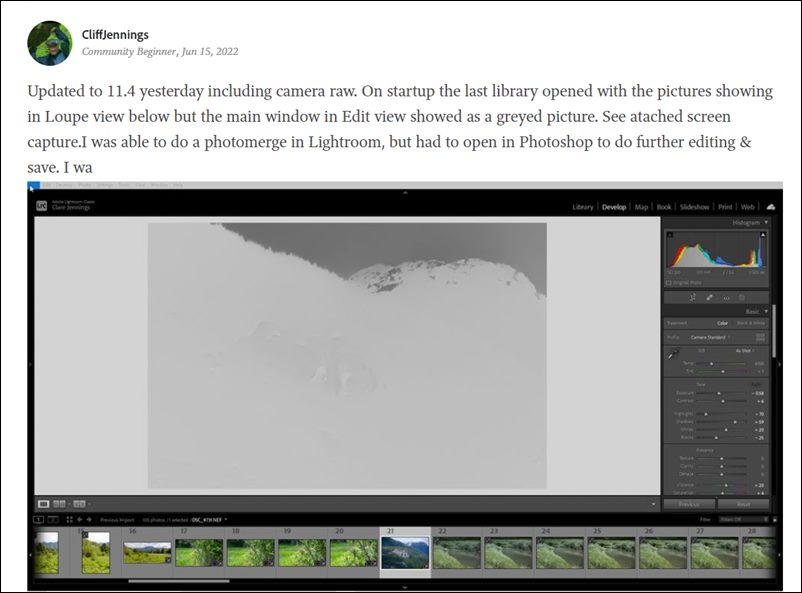
Recently, the app was blessed with an update version 11.4 and this paved the way for a few bugs to creep in. While the dust surrounding the slow export issues is yet to settle down, a new one has already made its way. As of now, various users have voiced their concern that Adobe Lightroom Classic is showing RAW files as gray images in the Develop Module. All the other modules work fine, the thumbnail display is good, and the histogram is consistent as well. If you are also getting bugged with this issue, then this guide shall make you aware of numerous methods to rectify it. Follow along.
Table of Contents
Fix Adobe Lightroom Classic is showing RAW files as Grey Image

It is recommended that you try out each of the below-mentioned workarounds and then see which one spells out success for you. So with that in mind, let’s get started.
FIX 1: Update GPU Drivers
Using old or outdated graphics drivers could result in quite a few issues, and it could well be the culprit behind the problem that we are currently dealing with. Therefore, you should update these drivers to the latest version, using the instructions given below-
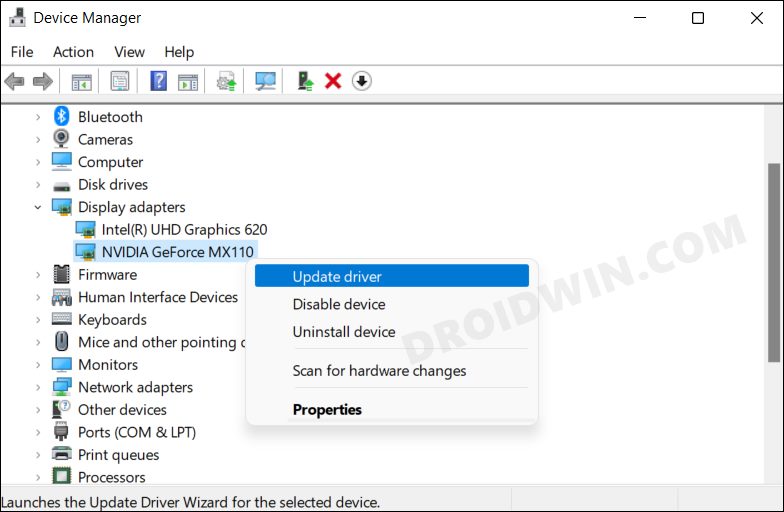
- Use the Windows+X shortcut and select Device Manager from the menu that appears.
- Then expand the Display Adapter, right-click on your graphics drivers, and select Update Drivers.

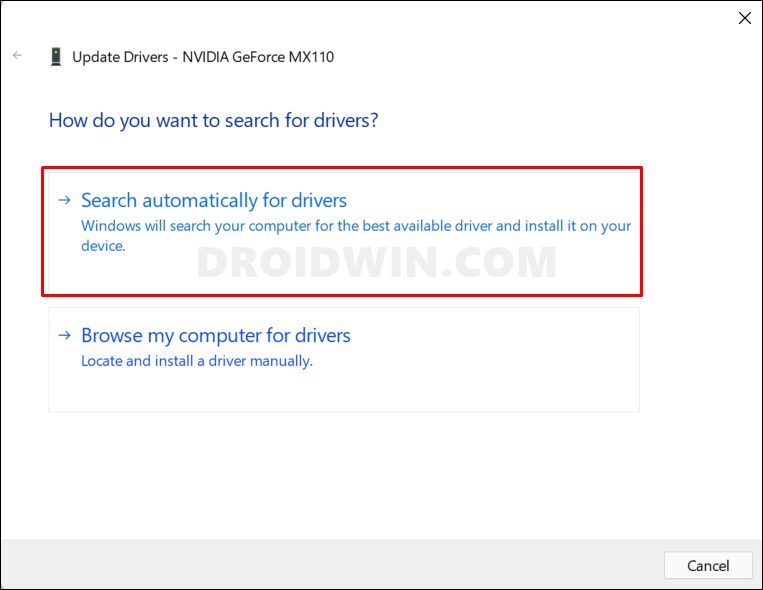
- After that, click on Search automatically for graphics drivers.

- Windows will now search online for the driver and will subsequently download and install them. Once done, restart your PC
- Now check if it fixes the issue of Adobe Lightroom Classic showing RAW files as gray images in the Develop Module.
FIX 2: Disable “Use Graphics Processor”
Your next course of action should be to disable the Use Graphics Processor option in the software and then test out the results. Here’s how it could be done:
- Launch Adobe Lightroom Classic and go to Preferences.
- Then head over to the Performance tab and click on the drop-down next to “Use Graphics Processor”.

- After that, select Off from the drop-down menu and then restart the software.
- Check if it fixes the issue of Adobe Lightroom Classic showing RAW files as gray images in the Develop Module.
FIX 3: Reset Lightroom Preferences
If both the aforementioned methods didn’t work out, then your last course of action should be to reset the Lightroom preferences. But before reverting to the default configuration, it is recommended to take a backup of your current preferences. Once done, you may then start with the below steps:
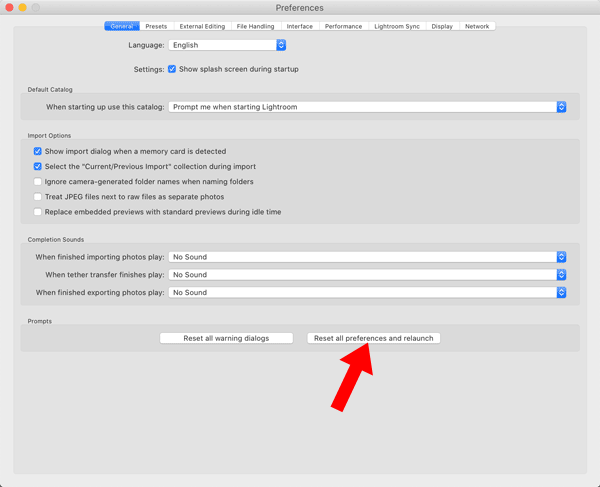
- Launch Adobe Lightroom Classic and go to Preferences > General.
- Now scroll to the end and click on Reset all preferences and relaunch.

- Once the software restarts, the underlying issue should be rectified.
So these were the three different methods to fix the issue of Adobe Lightroom Classic showing RAW files as a grey image. As far as the official stance on this matter is concerned, the developers are aware of this issue, but they haven’t given out any ETA for the rollout of a fix. As and when that happens, we will update this guide accordingly. In the meantime, the aforementioned workarounds are your best bet.


