In this guide, we will show you various methods to fix the File can’t be found error on Mac Ventura. The thirteenth iteration of the OS build has bought in a slew of noteworthy features and some massive UI overhauls. On the flip side though, it isn’t free from its fair share of issues either.
In this regard, numerous users have voiced their concern that when they try to open a file, which is situated in a folder, on their Mac running Ventura, then they are straightaway greeted with the File can’t be found error. What is even more surprising is the fact that when they open the same file again, it opens this time around without any issues. Some users have also said that the issue is mostly with those files whose original location has recently been changed.
For example, if they have transferred a file to their Mac from an external drive, moved the file from one location to another, or downloaded it from the internet. In all these cases, the mac Ventura straightaway gives out the File can’t be found error before ultimately opening it the second time around. If you are also currently getting bugged by this issue, then this guide will help you out. Follow along for the fixes.
Table of Contents
Fix File can’t be found error on Mac Ventura
It is recommended that you try out each of the below-mentioned workarounds and then see which one spells out success for you. So with that in mind, let’s get started.
FIX 1: Boot to Safe Mode
In most cases, the culprit behind this issue is usually a third-party app or service. To verify the same, you should boot your PC to safe Mode as doing so will disable all third-party apps. And if the issue gets resolved in this mode, then the culprit is definitely a third-party app that needs to be removed at the earliest. Here’s how all this could be carried out.
For Mac M1/M2 chipset:
Power off your Mac.
Then press and hold the power button until “Loading startup options” appear.
Now select your disk, press and hold the Shift key, and click Continue in Safe Mode.

For Mac with Intel chipset:
Restart your Mac.
Then press and hold the Shift key until the login window appears.
Now log into your Mac and it will boot to Safe Mode.
Once your Mac Ventura is in Safe Mode, check if it still shows the File can’t be found error. If it doesn’t, then restart your Mac to normal mode and uninstall all the recently installed apps, one at a time, until you are no longer able to reproduce the issue. Once that happens, the last removed app is the culprit and you should maintain a safe distance from it, at least for the time being.
FIX 2: Reset NVRAM
Both M1/M2 and Intel-based Macs come with NVRAM [Non-Volatile Random Access Memory) which holds information about the configuration of your Mac. They store information related to your desktop settings, mouse, keyboard, time zone, and display resolution, among others. So if this stored data gets corrupted, then its associated hardware or software component might not be able to perform as expected. Therefore, you will have to reset the NVRAM, using the steps given below:
- If you have an M1 or M2 Mac, then just a normal restart will reset the NVRAM.
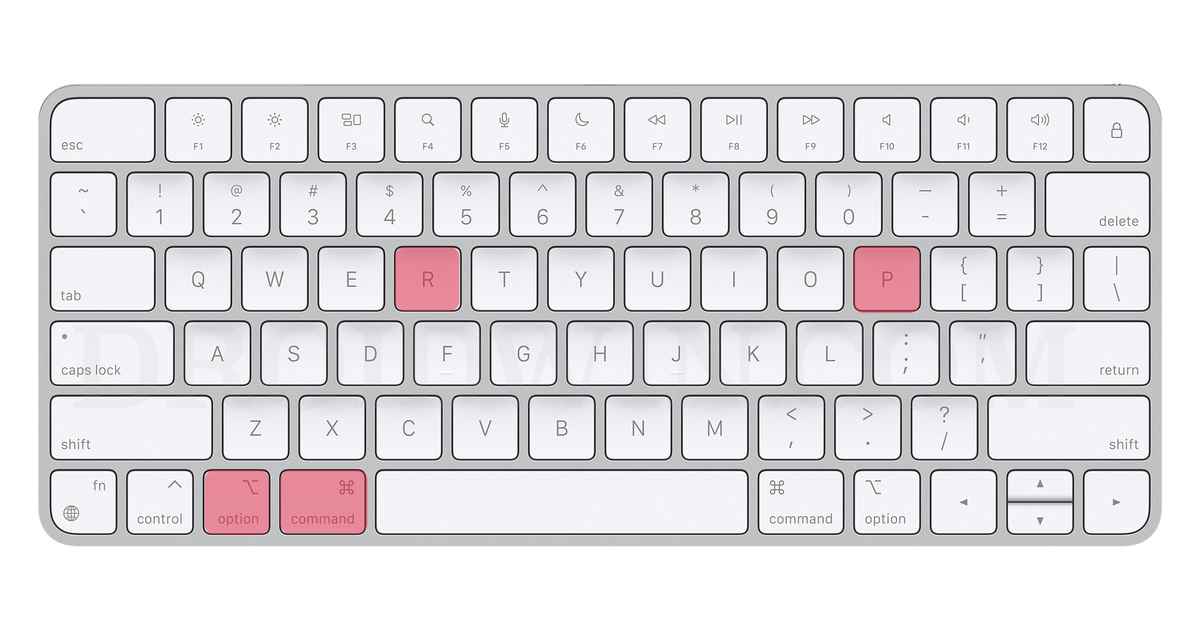
- For an Intel-based Mac, you should first turn off your PC.
- Then before the gray screen appears, press the CMD, Option, P, and R keys together.

- Keep on pressing these keys until your Mac restarts and you hear the startup sound.
- Once that happens, you may release the keys and the NVRAM reset is now complete.
- Now check if it fixes the issue of Mac not waking up from Deep Sleep on Ventura.
FIX 3: Reindex Spotlight
The issue could also occur if the indexing database gets corrupted or outdated. Therefore, you should consider deleting the indexing database and then let the OS repopulate a fresh instance of that data from scratch. Here’s how it could be done:
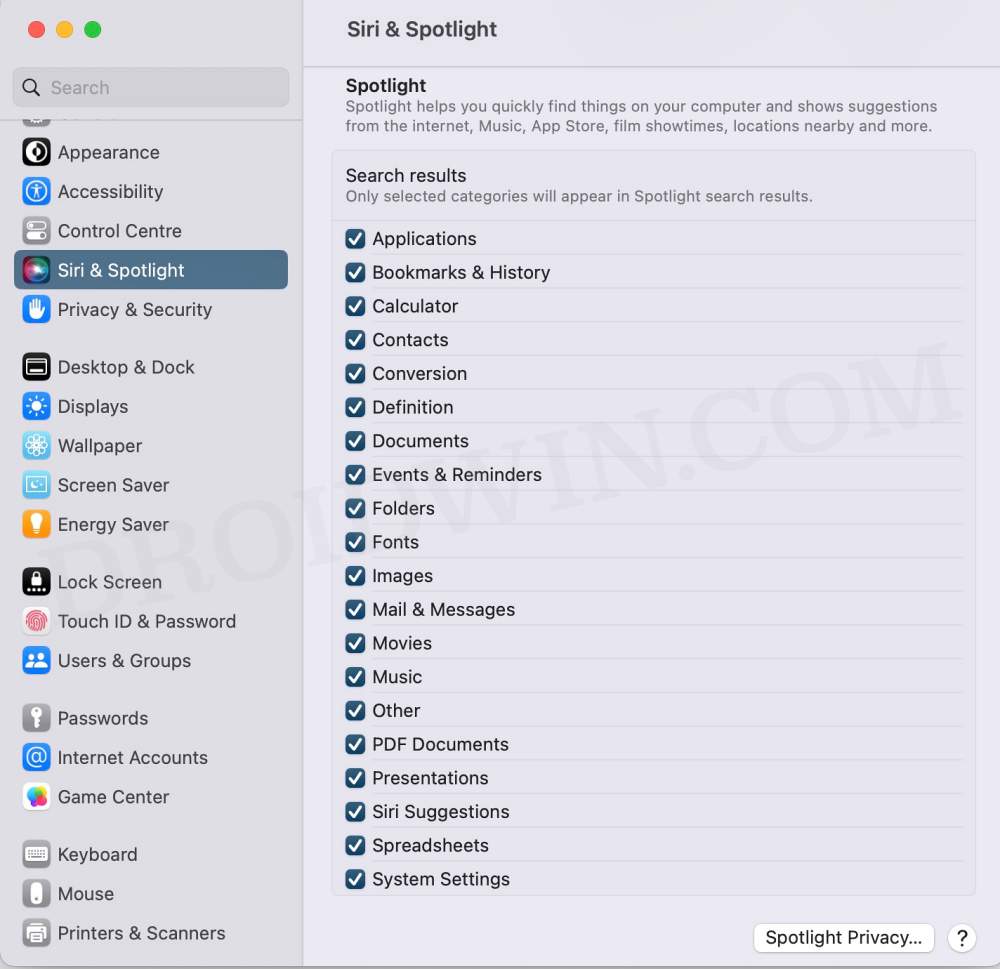
- Launch System Settings and select Siri & Spotlight from the left-hand side.
- Then scroll to the bottom and click on Spotlight Privacy.
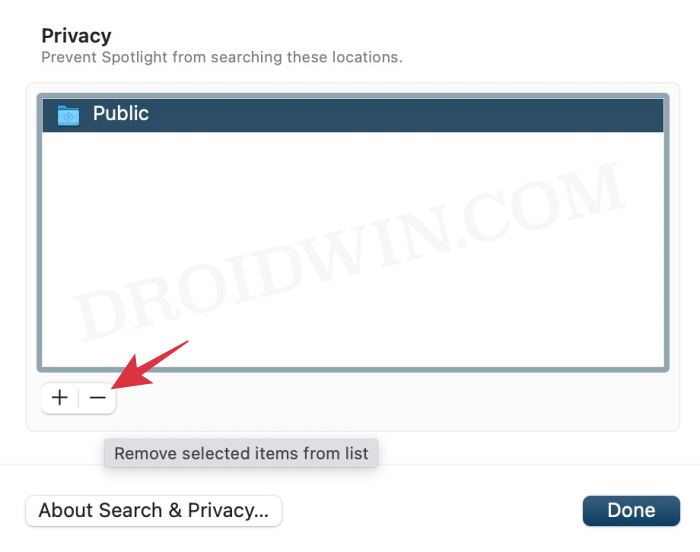
- Now select the folder from the list and hit the minus icon.
- Then hit the plus icon and re-add that folder. Spotlight will reindex that folder.
- Let it complete and then check if it fixes the r
That’s it. These were the three different methods that should help you fix the File can’t be found error on Mac Ventura. If you have any queries concerning the aforementioned steps, do let us know in the comments. We will get back to you with a solution at the earliest.


Colin
Hi
Some help required for reindexing Spotlight
FIX 3: Reindex Spotlight
3 Now select the folder from the list and hit the minus icon.
What folder are we to select