In this guide, we will show you the steps to extend the 10 day Windows 11 rollback/downgrade period. Microsoft recently unveiled its latest iteration of the OS. It is an Insider Preview and you might have to go through a few rough edges, but that hasn’t dented the curiosity of the tech enthusiasts from trying it out.
There are a plethora of new and noteworthy features this time around that has caught the attention of the masses. From changes to the user interface and icon sets to a truckload of modifications to the taskbar, there’s a lot to look forward to. However, it is still a developer build, and a few bugs and issues are anything but obvious.
Keeping this in mind, Microsoft has provided an option to downgrade to the earlier stable OS build (aka Windows 10). And there are quite a few ways through which this could be done, the easiest of which is directly from your PC’s Settings menu. However, there’s an asterisk involved. You could only perform this rollback if you are within the 10 day grace period.
In other words, it should have been 10 or fewer days since you have installed Windows 11. But why is that the case? Well, when you upgrade to a newer OS build, Windows keeps a copy of the older version in the Windows.old folder. However, it keeps the file only for 10 days, after which this backup is deleted.
For some, this 10-day period is not sufficient enough to test the new OS and they are looking to prolong this grace period. Well, turns out there does exist a handy way to carry out this task. And this guide shall make you aware of just that. So without further ado, let’s get started with the guide to extend the 10 day Windows 11 RollBack / Downgrade period.
How to Extend 10 Day Windows 11 RollBack/Downgrade Period
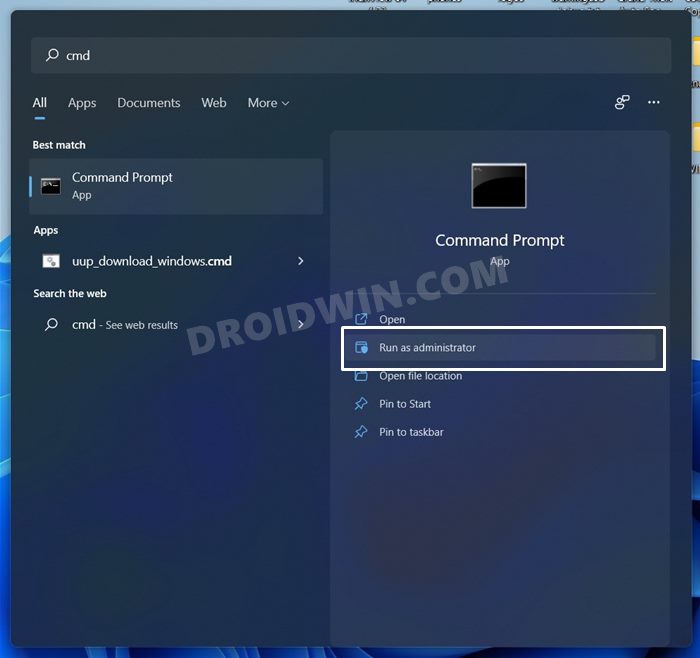
- Head over to the Start menu, search CMD, and launch Command Prompt as an administrator.

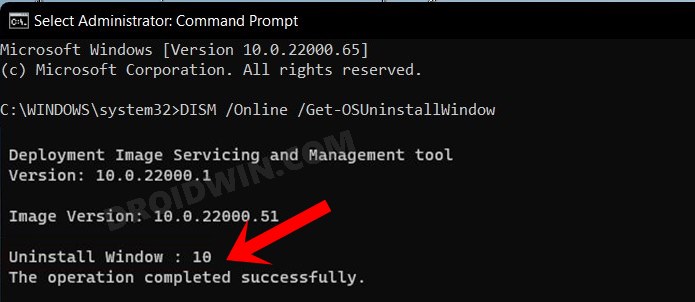
- Now type in the below command to check if your Windows 11 build falls in the downgrade period or not:
DISM /Online /Get-OSUninstallWindow
- If you get the result as Uninstall Window: 10, then it means that you are within the rollback phase.
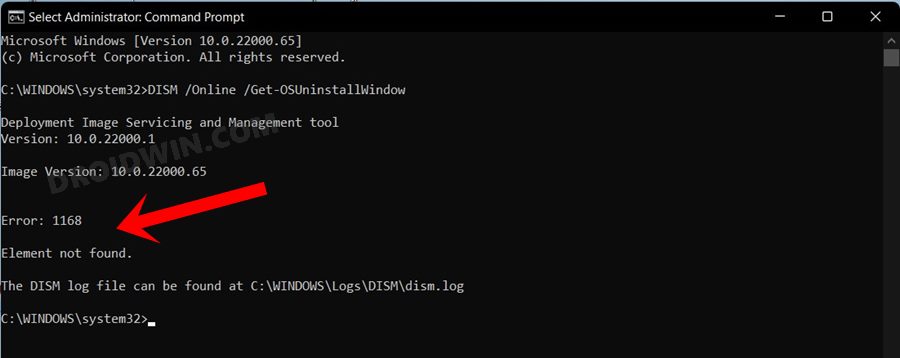
- On the other hand, if you get the No element found” error, then it means that you have exhausted that time frame.
- So if you are within that 10 day time period and have got the Uninstall Window: 10 results, then copy-paste the below command. The Value part is the number of days that you wish to have as the downgrade period. The maximum value is 60 days, and this is what we have used in the below command. If you want you may change this time frame accordingly, ranging within 10-60 days.
DISM /Online /Set-OSUninstallWindow /Value:60
That’s it. You have now successfully extended the 10 day Windows 11 RollBack/Downgrade period. As you might have noticed, there’s nothing you could do if you have passed the 10-day time limit. This tutorial will only come in handy for the users who are within this time frame. Anyways, that was all from this guide. If you have any queries, do let us know in the comments section below.


ErwinC
Thank you