In this guide, we will show you the steps to enable the Google Call Screening feature on any Android device. If there’s one thing that infuriates users across the globe is the plethora of spam calls that they receive. Well, the Silicon Valley giants have finally incorporated a nifty feature into its Pixel line of devices.
Named Call Screening, your call will be in the hands of Google Assistant who would start the conversation on your behalf, asking important questions like who is calling and, why. You don’t even have to touch your device during the entire process. What is even more interesting is the fact that you would be getting live transcripts of the entire conversation between the Assitant and the caller at the other end.
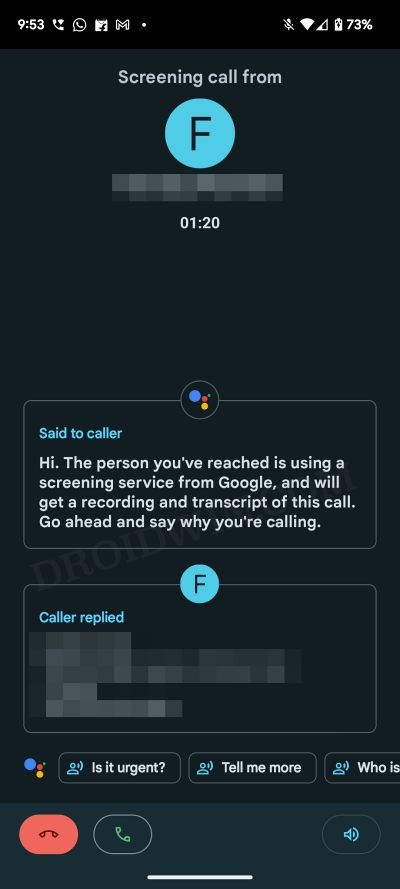
And if you think that the call is worth picking up, then you could take over the authority from Assistant into your own hands. However, this feature is Pixel exclusive and bound to Google Phone. While it is still somewhat possible to sideload the Dialer app onto your device, what about the other requirement- a Pixel device?
Well, if your device is rooted, then you shouldn’t worry. Today we will be sharing a couple of handy workarounds to change your device’s fingerprint ID to that of Pixel 4 or Pixel 5. This in turn will make your device into believing that it is a Pixel handset and hence you could then easily enable the required feature. So without further ado, let’s start off with the guide to enable the Google Call Screening feature on any Android device.
Table of Contents
How to Enable Google Call Screening on any Android
Droidwin and its members wouldn’t be held responsible in case of a thermonuclear war, your alarm doesn’t wake you up, or if anything happens to your device and data by performing the below steps.
METHOD 1: Using Google Dialer Mod [NEW]
- First of all, get enrolled as a beta tester for the Google Phone app from here.
- After that, root your device via Magisk.
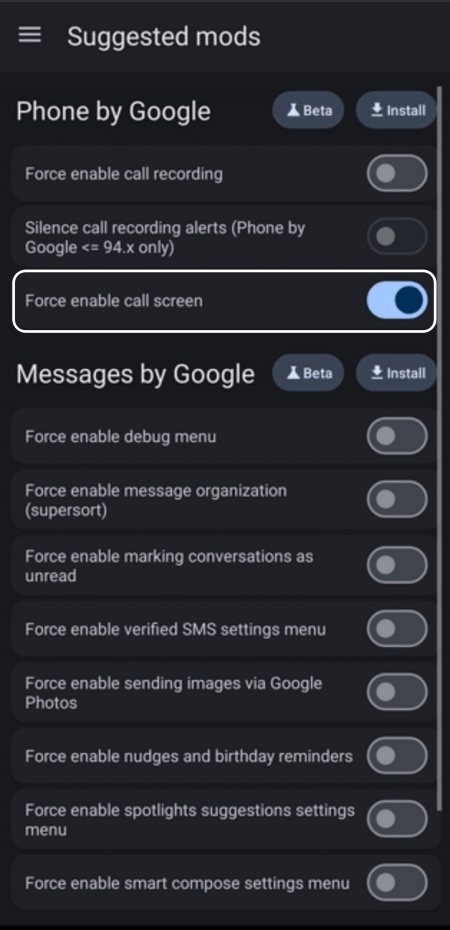
- Then download and install the Google Dialer Mod from GitHub.
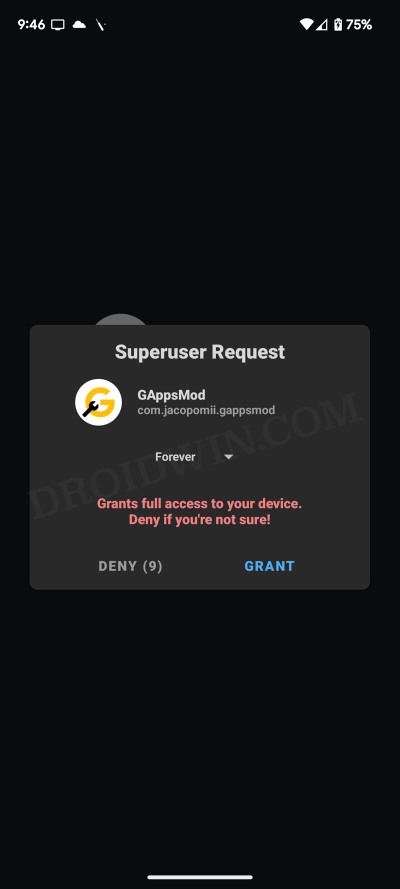
- Now launch it and give it Magisk access.

- Then enable the toggle next to Force Enable Call Screening.
- Now restart your device and check if Call Screening is working.
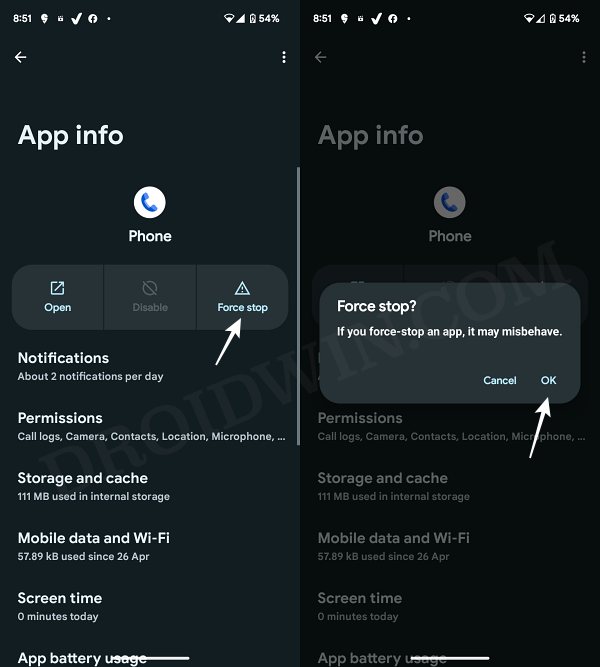
- If it isn’t, then do a force stop of the Phone App and check out the results.
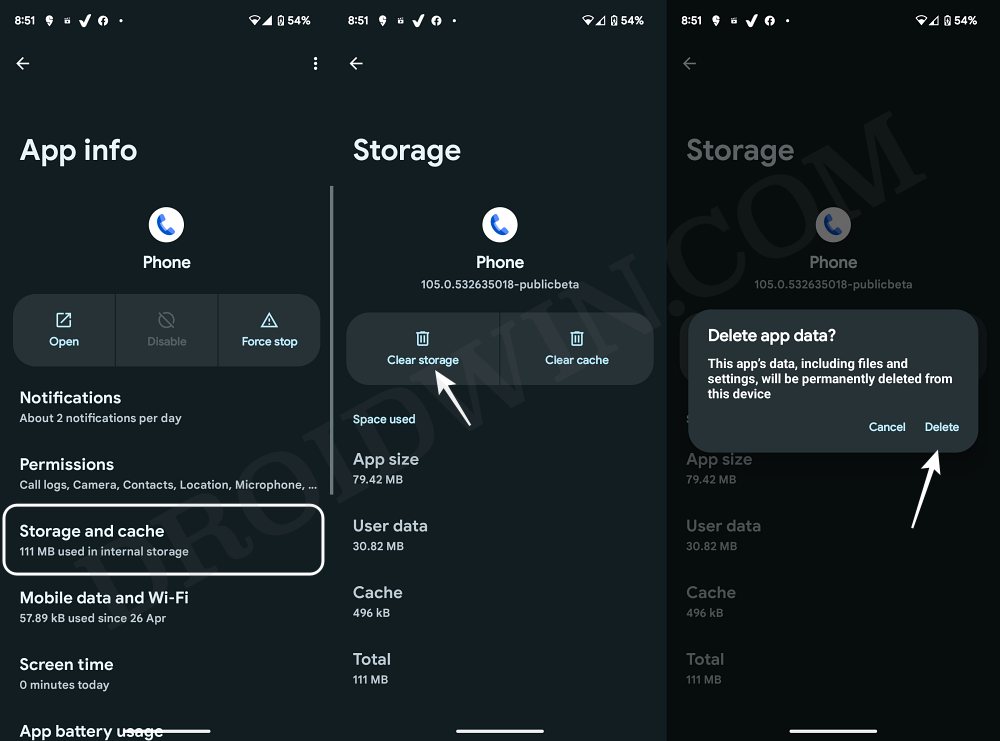
- If it’s still not working, then delete the data of the Phone app and again check out the result.
METHOD 2: By Spoofing the Fingerprint[OLD]
STEP 1: Install the Required Magisk Modules
Now here comes the important point that deserves your attention. If your device comes pre-installed with the Google Dialer App (or the Phones App), then you would only have to download a couple of modules. On the other hand, if your device didn’t come with stock Google Dialer, then you would have to download a couple of additional apps as well. All this has been mentioned below, refer to the section corresponding to your requirements.
For Devices Shipped with Google Dialer/Phone App
Some devices, including the one from OnePlus and Android One devices, come preinstalled with the Google Phone app. So for those set of devices, you only need these two modules:
- BusyBox for Android NDK- Will give us the required busybox binary corresponding to the device’s architecture.
- MagiskHide Props Config- For changing your device’s fingerprint to that of Pixel 4/5.
- Terminal Emulator (Play Store)- We will be needing this to run the MagiskHide Props Config. For the unaware, this is a command-based module without any front-end UI as such. So download and install any Terminal app from the Play Store. As for this guide, I am going ahead with the Termux app.
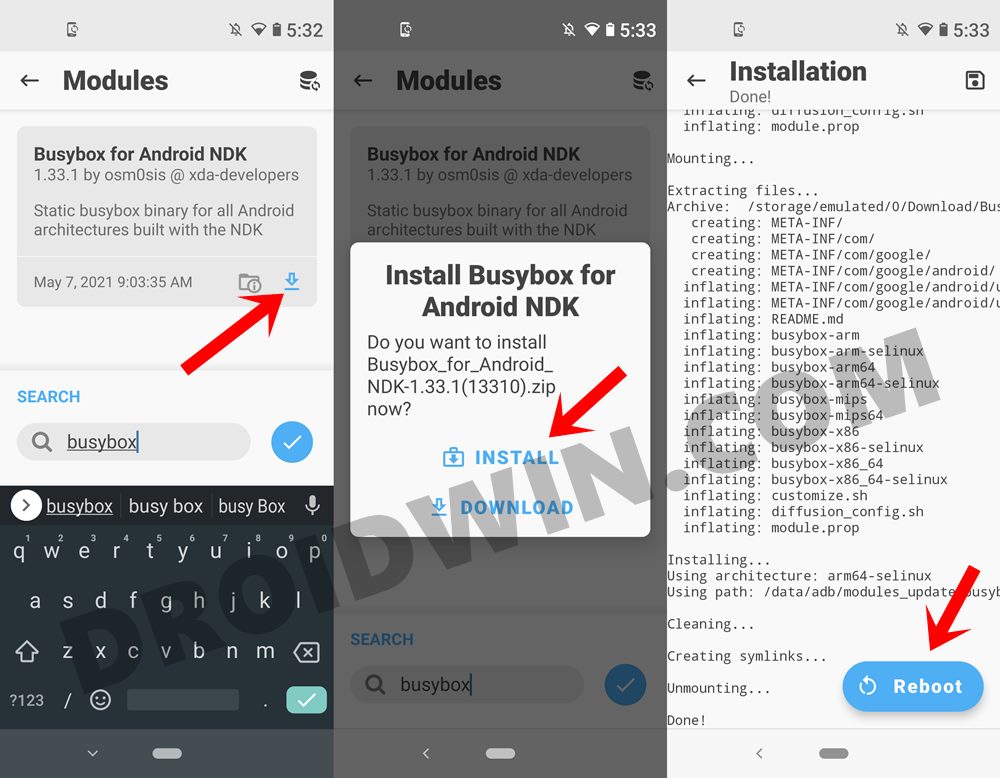
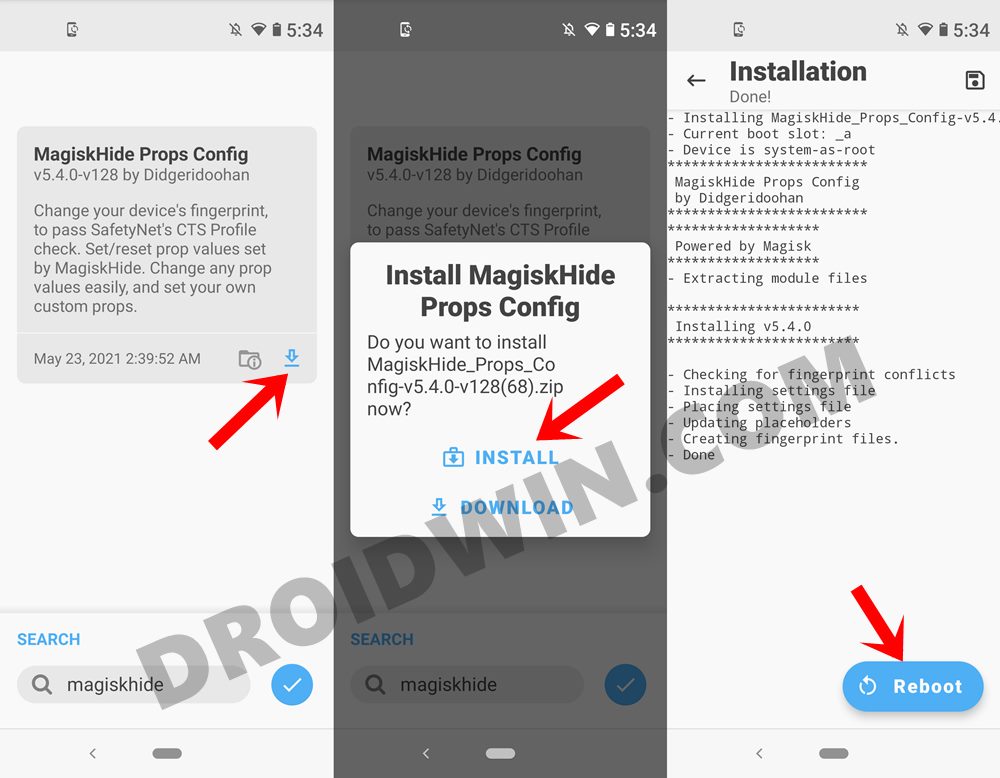
So launch the Magisk App, tap on the module’s icon situated at the bottom right, search for both these modules, download and install them onto your devices. Once both the modules have been installed, restart your device so that they become active. Then directly head over to STEP 2 and leave the rest written in this section.
For Devices without Google Phone/Dialer App
If your device doesn’t come pre-installed with the Google Dialer app, then you would need a few additional modules to enable the Google Call Screening feature on any Android device. They have been listed below, alongside their usage instructions:
- BusyBox for Android NDK- Will give us the required busybox binary corresponding to the device’s architecture.
- MagiskHide Props Config- For changing your device’s fingerprint to that of Pixel 4/5.
- Terminal Emulator (Play Store)- it will be used to run the MagiskHide Props Config. Props Config is a command-based module without any front-end UI as such. So we would need a Terminal app to carry out its functionality. As for this guide, I am going ahead with the Termux app.
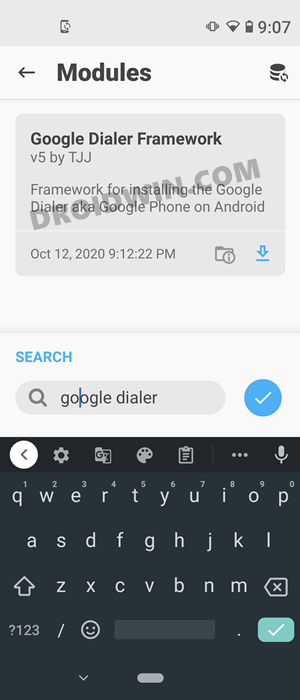
- Google Dialer Framework: it is needed to install the Google Phone app from Play Store. So flash this module, clear Play Store Data/Cache, and then install the Google Phone App from Play Store. Then set it as the default phone app. You should also consider disabling the stock phone app to avoid any conflicts.
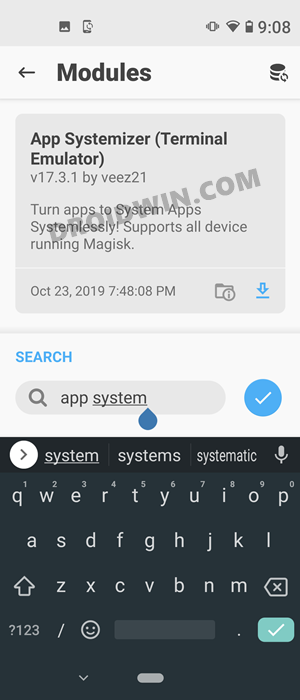
- App Systemizer Module: It is needed to convert Google Dialer Framework to a system app. So download and install it onto your device (along with the other modules mentioned above) via the Magisk App.
Once all the modules (BusyBox, MagiskHide, Google Dialer Framework, and App Systemizer as well as Termux from Play Store) have been installed, proceed with the below steps to convert the Google Phone app to a system app via the App Systemizer module.
Convert Google Phone App To System App
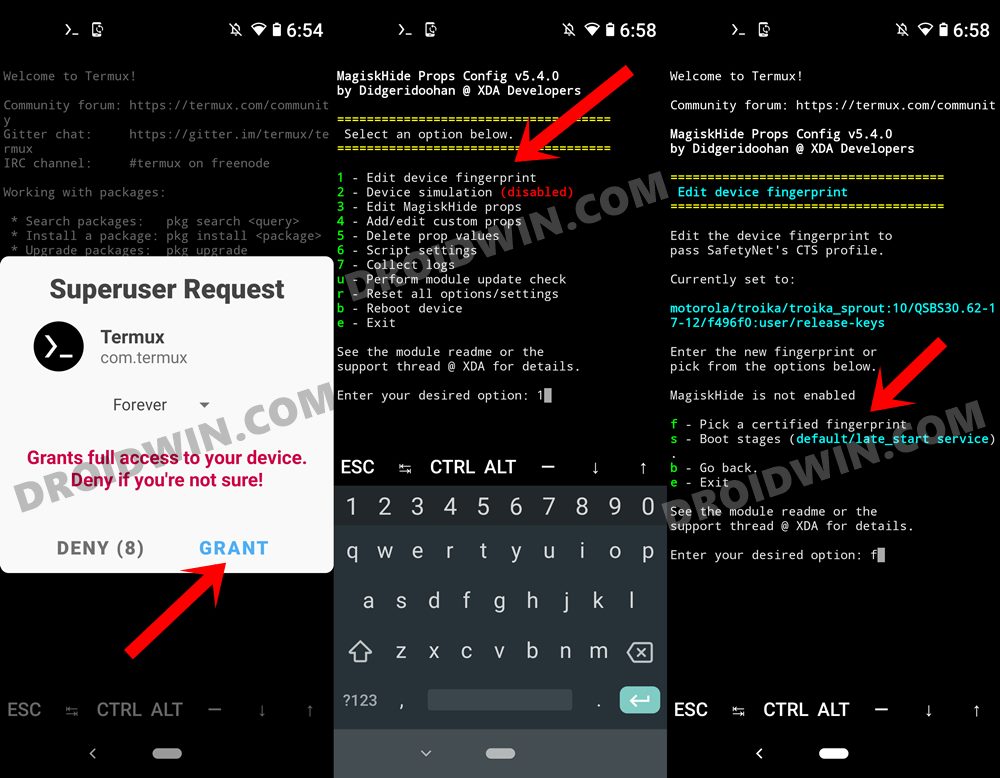
- Launch the Termux app, type su, and hit Enter.
- If you get a Magisk Prompt, grant it the required permission.
- Then type systemize and hit Enter. Select the Phone app from the list.
- In the “Where to install” prompt, type in 2 and hit enter.
- This shall send the app to the “/system/priv-app” directory. Once that is done, you may now close the app.
STEP 2: Change Device Fingerprint to Pixel 4/5
- Launch the Termux app, type in su, and hit Enter. You will now get a SuperUser Request, tap Grant.
- After that, type in 1 and hit Enter. We have selected the Edit Device Fingerprint option.
- Then type in f and hit Enter to choose the Pick a Certified fingerprint option.
- After that, select Google from the list. For that, type 7 and hit Enter.
- Then select your desired device from this list. Since my device is currently running Android 10, I have selected the 24th option, i.e. Pixel 4A (10& 11).
- If you are running Android 11, then it’s best to go with the 27th option- Google Pixel 5 (11). So type in the desired number and hit Enter.
- Based on your selection, you may now have to choose the Android version. Type in the number next to the Android version and hit Enter.
- It will now display the new fingerprint for your device. If you are fine with this selection, type in Y.
- Finally, again type in Y and hit Enter to reboot your device and for the changes to take place. Then move to the next step to enable the Google Call Screening feature on your Android device.
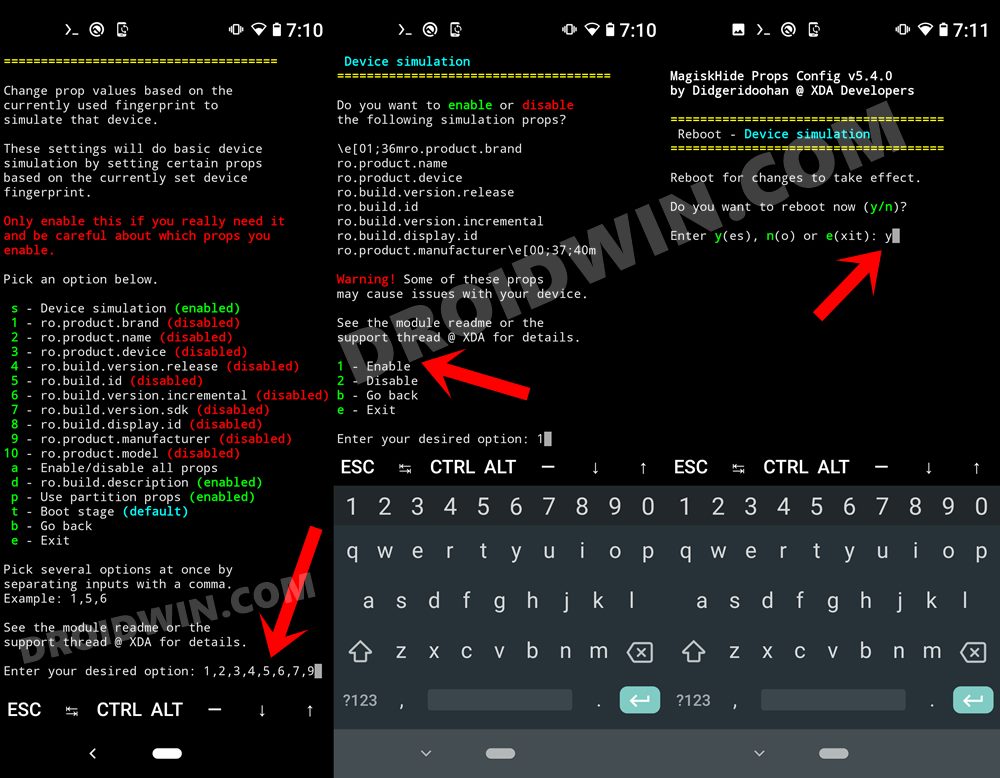
STEP 3: Enable Device Simulation
- Once your device boots up, relaunch the Termux app and type in su.
- Then type in s and hit Enter, this shall take you to Device Simulation.
- Type in Y and hit Enter to enable Device Simulation.
- Once that is done, you will have to enable its associated properties as well (beginning with ro.). Just don’t enable the ro.build.display.id.
- At the time of writing, ro.build.display.id occupies the eighth spot, so we would leave that and enable the rest by entering their positions, separated by commas. So in my case, I had to type 1, 2, 3, 4, 5, 6, 7, 9 and hit Enter.
- Then type in 1 and hit Enter to enable all these modules at once.
- After that, type in Y and hit Enter. Your device will now reboot and the changes will be applied. You may now start off with the final step to enable the Google Call Screening feature on your Android device.
STEP 4: Try out Google Call Screening on your Android
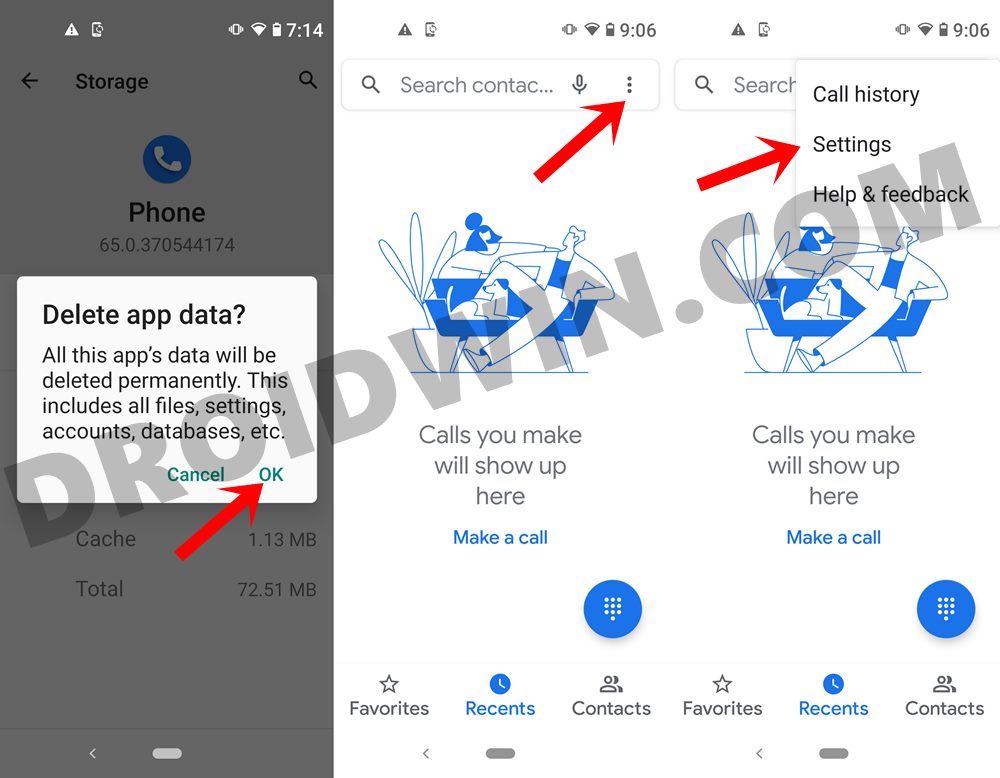
- To begin with, it is recommended to delete the Data and Cache of the Phone app.
- Then connect your device to WiFi or carrier data.
- Launch the Phone app and tap on the overflow icon situated at the top right.
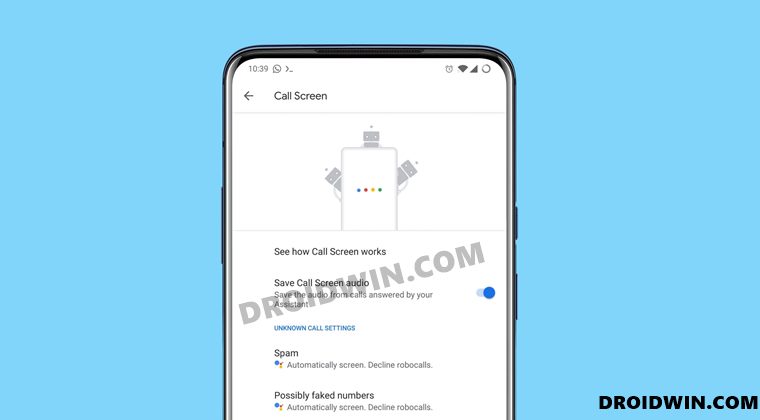
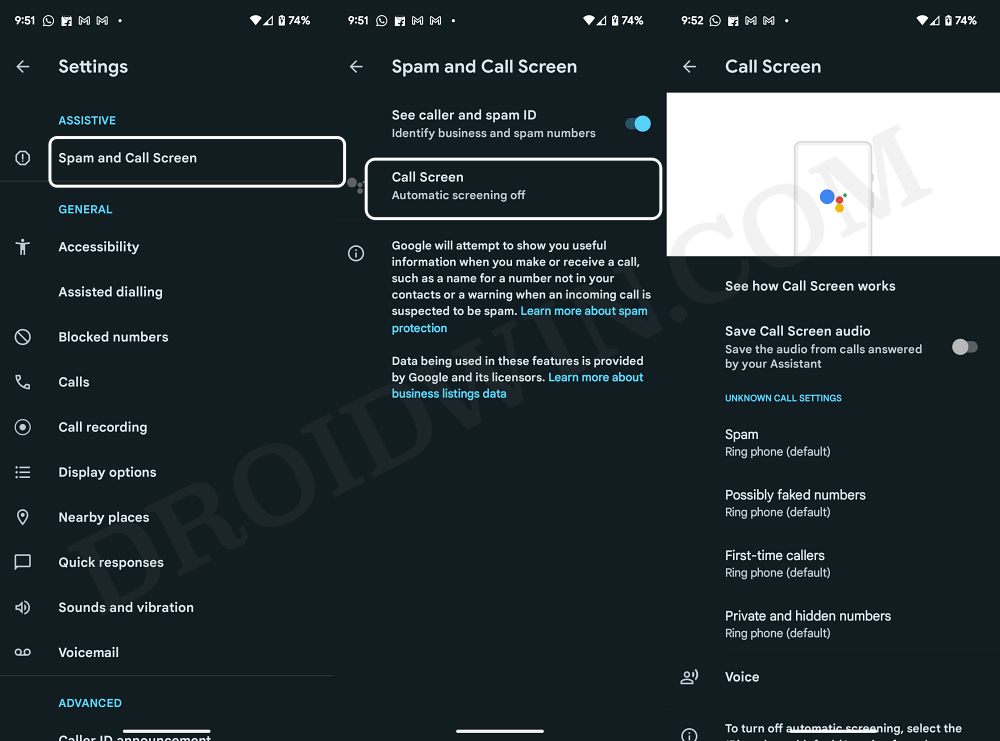
- Then select Settings from the menu and you shall now see the Call Screen feature.
- If you don’t see it, then wait for a few minutes, it should be activated in some time.
- Likewise, also make sure to remain connected to the internet. You may also try force-stopping the app and relaunching it.
That’s it. These were the steps to enable the Google Call Screening feature on your Android device. If you have any queries concerning the aforementioned steps, do let us know in the comments. We will get back to you with a solution at the earliest.


