In this guide, we will show you the steps to edit the build.prop file and enable camera2 API without root. Pixel devices behold among the best camera software that you are likely to find on any smartphone, Likewise, its stock camera app manages to outdo its competitor with ease. While porting the hardware component is no longer a possibility (after the death of Google’s Project Ara), there’s no stopping on the software side.
Some recognized developers have already released the Google Camera, popularly known as GCam, for a wide range of devices. You just need to install it as a normal APK and tweak the settings as per your requirement. However, to extract the maximum potentiality of this GCam, your device needs to have the Camera2 API enabled. Unfortunately, not every device has this enabled by default. So users have to manually do the same. For that, you need to enable the build.prop file for your device.
This file beholds all the configuration data and settings specific to your device and is placed inside the system partition. Hence, to edit this file (or any file inside the system partition for that matter), there are two different methods: Either have a rooted device and gain access to the system partition via Magisk. Or mount the system partition via TWRP and then use the ADB Pull command. In this guide, we will be using the second method, i.e. via TWRP. Here’s how the entire process will be carried out:
- To begin with, we will mount the system partition via TWRP.
- Then we will “pull” the build.prop file from the system partition of the device and transfer it to your PC.
- After that, we will edit the file, enable the Camera2API and save the changes.
- Next up, this file will then be pushed back to its original location, i.e. to the system partition on your device.
- Finally, it will be given the required system permission and the process stands complete.
So keeping all these points in mind, let’s get started with the guide to edit the build.prop file and enable camera2 API without root.
Table of Contents
How to Edit Build.Prop and Enable Camera2 API without Root
Before starting with the instructions, there’s another point that I thought worth sharing. In general instances, you don’t need root or TWRP for using the ADB Push or Pull Command. However, it is required in this guide since we are dealing with a file that is placed inside the system partition and hence requires administrative privileges.
If the build.prop file was placed just inside the Internal Memory then we wouldn’t have needed any of these two things. With that said, let’s turn our attention back to the tutorial to edit the build.prop file and enable camera2 API without root. Droidwin and its members wouldn’t be held responsible in case of a thermonuclear war, your alarm doesn’t wake you up, or if anything happens to your device and data by performing the below steps.
Install Android SDK
First and foremost, you will have to install the Android SDK Platform Tools on your PC. This is the official ADB and Fastboot binary provided by Google and is the only recommended one. So download it and then extract it to any convenient location on your PC. Doing so will give you the platform-tools folder, which will be used throughout this guide.
Enable USB Debugging
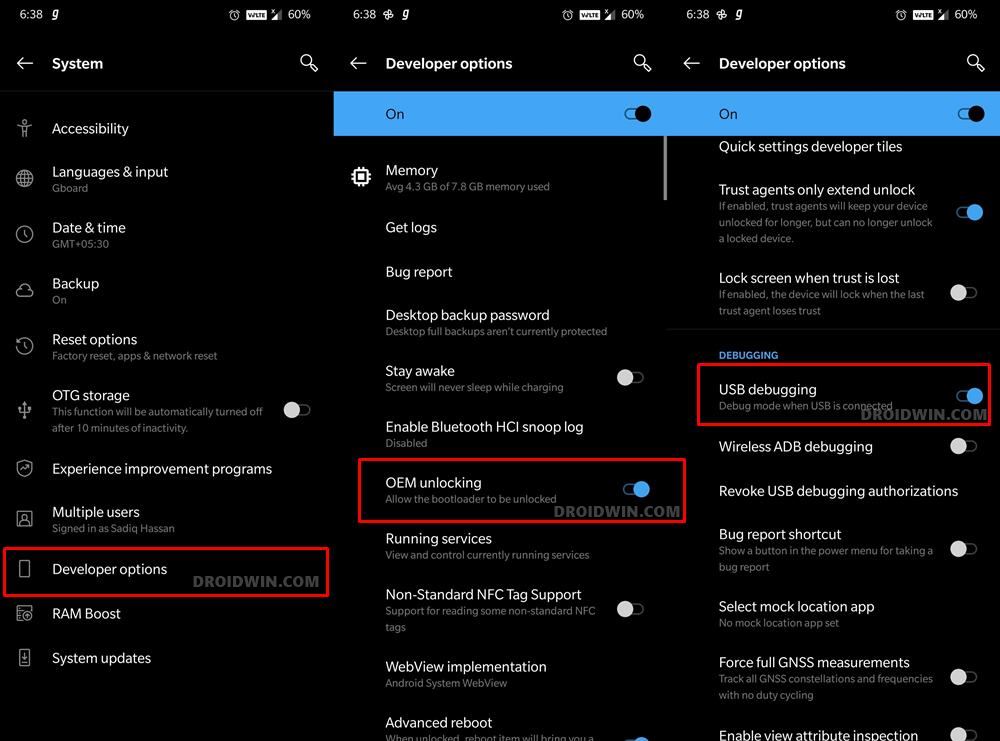
You will have to enable USB Debugging so that your device is recognizable by the PC in ADB mode. This will then allow you to boot your device to Fastboot Mode. So head over to Settings > About Phone > Tap on Build Number 7 times > Go back to Settings > System > Advanced > Developer Options > Enable USB Debugging. Once done, move over to the next step to edit the build.prop file and enable camera2 API without root.
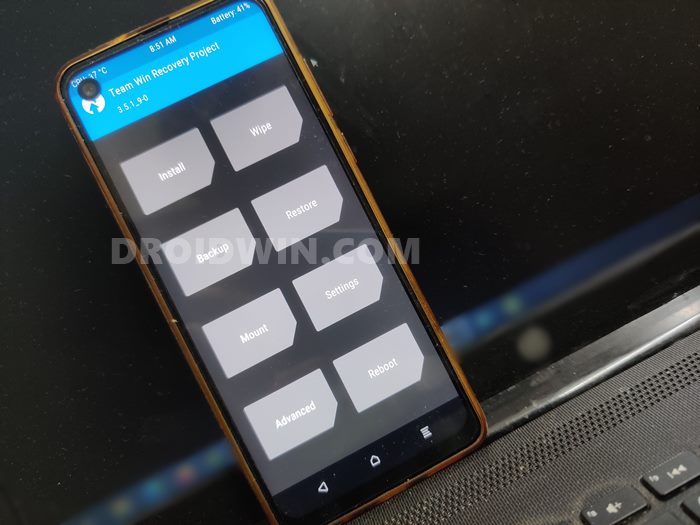
Boot to TWRP Recovery
Next up, you have to boot the device to TWRP Recovery. However, if you haven’t yet installed it, then please refer to our comprehensive guide on How to Install TWRP Recovery on Android. Once installed, proceed with the below steps to boot the device to TWRP:
- Connect your device to the PC via USB cable. You will have to keep it connected until the end of this guide.
- Then head over to the platform-tools folder, type in CMD in the address bar, and hit Enter. This will launch the Command Prompt.
- Now type in the following command in the CMD window to boot your device to TWRP
adb reboot recovery
Mount System Partition via TWRP
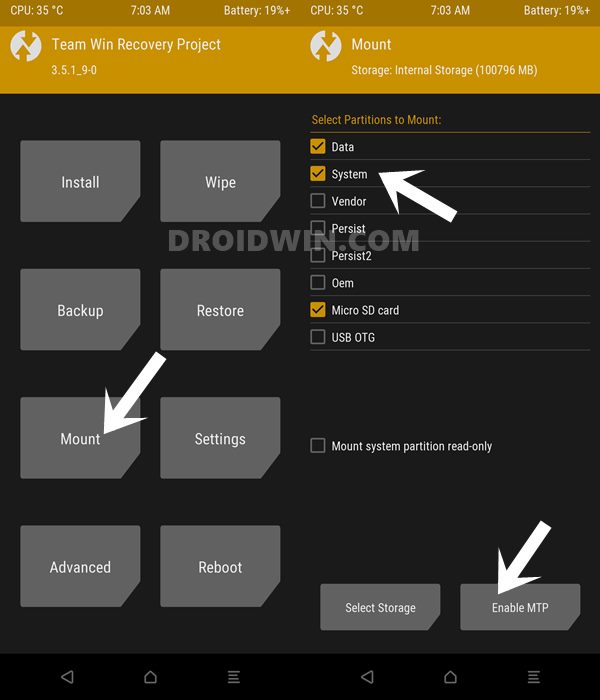
- You will now have to mount the system partition and enable MTP on your device.
- So from the TWRP home screen, go to Mount and check-mark the system partition.
- Likewise, also tap on the enable MTP button situated at the bottom.
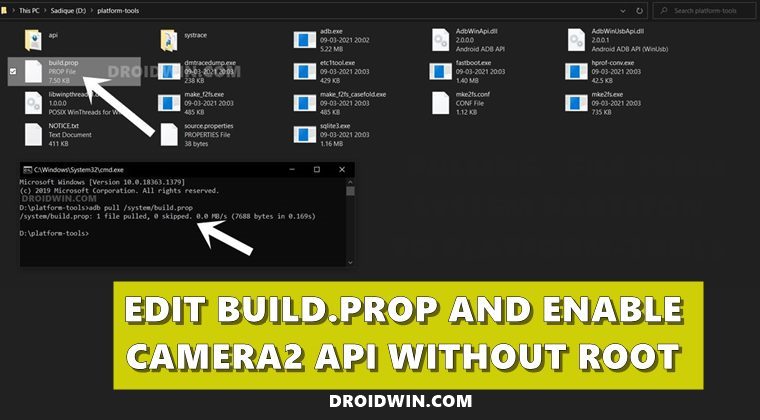
Pull the Build.Prop File
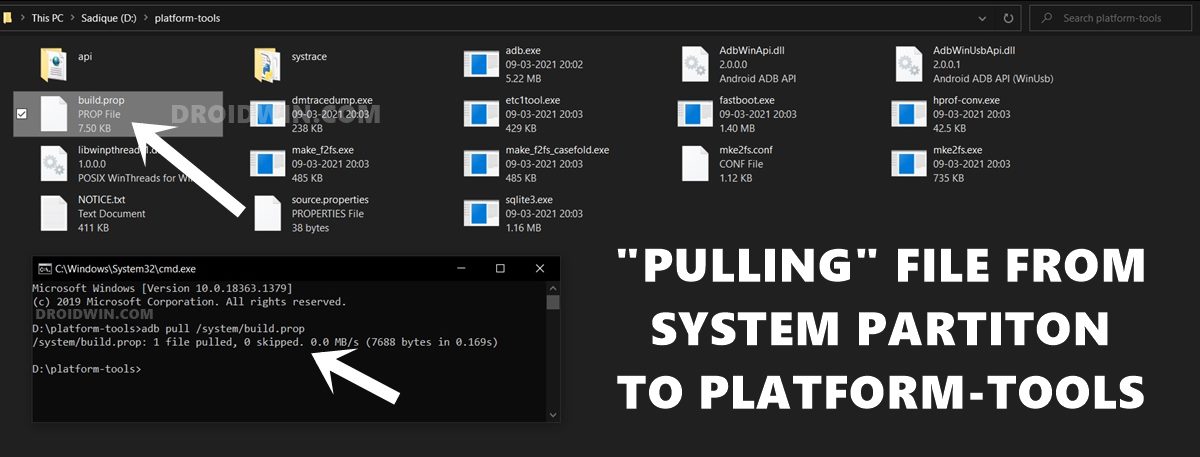
- Go to the Command Prompt that you have opened inside the platform-tools.
- Now type in the below command to pull the build.prop file from your device’s system partition to the platform-tools folder on your PC:
adb pull /system/build.prop
Edit Build.Prop and enable Camera2 API without Root
Now that we have got the build.prop file, it’s time to edit it. For that, you will have to download an advanced text editor such as Notepad++ (the stock Notepad app wouldn’t be able to open this file):
- Once downloaded, right-click on the build.prop file and select open with Notepad++.
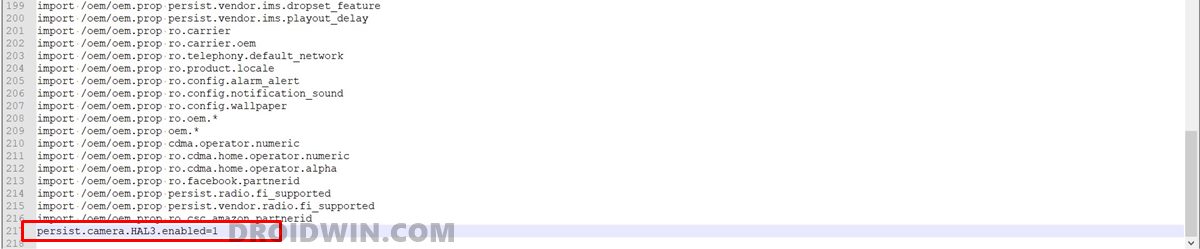
- This shall launch the file inside the Notepadd++. Hit the Ctrl+F shortcut and find the following line:
persist.camera.HAL3.enabled=0
- If you find it, then change the value from 0 to 1. So the line will be changed to:
persist.camera.HAL3.enabled=1
- But if that line isn’t present inside the build.prop, then manually add the below line at the end of the file:
persist.camera.HAL3.enabled=1
- Once you have made the changes, use the Ctrl+S to save it.
Push Build.Prop to Device
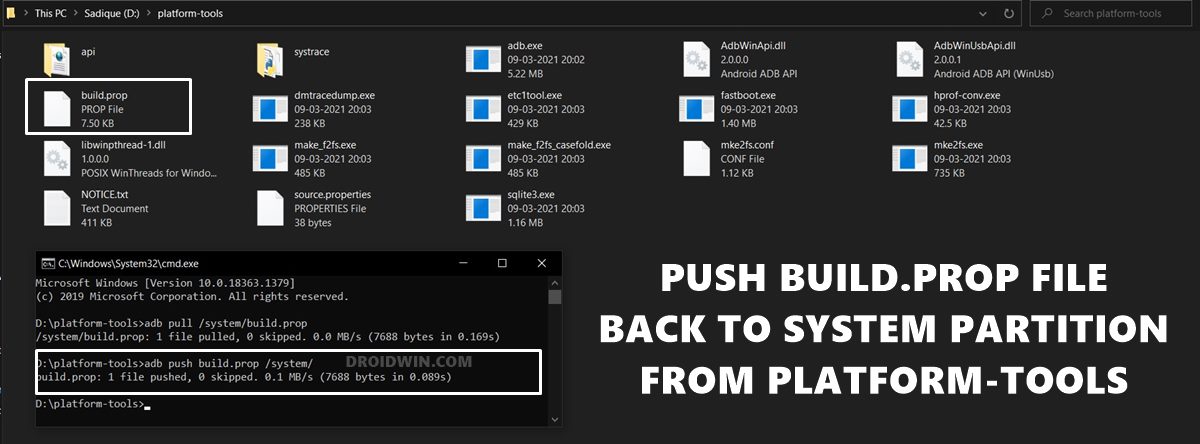
- Now that we have edited the build.prop and enabled the Camera2 API, it’s time to send the file back to the system partition on your device.
- So head over to the CMD window inside the platform-tools folder and type in the below command [if you are getting any error, then check out the update at the end]:
adb push build.prop /system/
Give Chmod 644 Permission
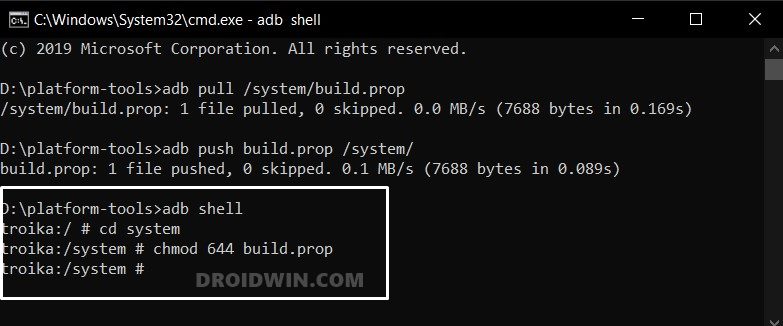
- Finally, we will now have to give it the required admin privileges.
- For that, you need to execute the below three commands, one at a time
adb shell
cd system
chmod 644 build.prop
- Once done, you may now reboot the device to the OS. So from TWRP, go to Reboot and select System.
That’s it. The process stands complete and with that, we conclude the guide on how to edit the build.prop file and enable camera2 API without root. If you have any queries concerning the aforementioned steps, do let us know in the comments. We will get back to you with a solution at the earliest.
UPDATE: Mount System Partition Read/Write
While this step wasn’t required earlier [at the time this article was published, maybe with Android 10], but now, if you are unable to push the file back to the system partition, then you’ll have to make that partition r/w. In other words, mount the system partition read/write.


Yukesh
I followed exact same steps, everything went without error but camera2api is still not enabled after reboot.
Device-MiA2 on latest July update
NN
Thanks for the guide. Could you help with the below?
1. Trust the device state would remain ‘certified’ post the above process? The other things would remain same?
2. Trust this process would be common for most devices? I wish to do this on my OnePlus 5 (Cheeseburger)