In this guide, we will show you the steps to downgrade your Pixel 6A/6/Pro from Android 13 to Android 12 by bypassing the Anti Rollback Protection. The thirteenth iteration of the OS has just been rolled out as a stable version for the eligible Pixel devices. While there aren’t any significant UI changes this time around, but there are a slew of under the hood changes and additions of some new features as well.

However, for some users, this update might not be in sync with their requirements. Moreover, there might still be some apps that would not be compatible with the latest OS. Likewise, the tech enthusiast might find a few custom binaries unsupported on Android 13. In all these scenarios, the best bet will be to downgrade your Pixel 6A/6/Pro from Android 13 to Android 12. However, it is easier said than done this time around.
![]()
Thanks to the introduction of Anti Rollback Protection, the Pixel 6 series users would no longer be able to perform a downgrade, well at least on paper. I dived deep into the technicality and found out that it was the Android 13’s bootloader that was proving to be the culprit [there is a bootloader update that increments the anti-rollback version to these devices].
So upon flashing the Android 12 firmware with the Android 13 bootloader.img, I was able to successfully perform the downgrade. Hence I decided to document these findings in the form of this guide to help out other users who are in the same boat as me. Follow along.
Table of Contents
Downgrade Pixel 6A/6/Pro from Android 13 to Android 12: Bypass Anti Rollback
![]()
The below process will wipe off all the data from your device, so take a complete device backup beforehand. Droidwin and its members wouldn’t be held responsible in case of a thermonuclear war, your alarm doesn’t wake you up, or if anything happens to your device and data by performing the below steps to downgrade your Pixel 6A/6/Pro from Android 13 to Android 12.
STEP 1: Modify Pixel 6A/6/Pro Bootloader.img File
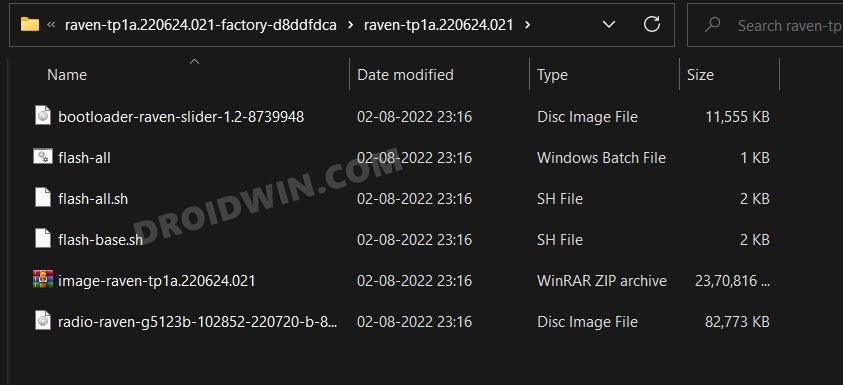
- To begin with, download and extract both the Android 12 and 13 firmware files.

Android 13 Firmware - Then delete the bootloader.img file from the Android 12 firmware folder. It will be named something like [codename and version might be different for your device]
bootloader-raven-slider-1.2-8318357.img

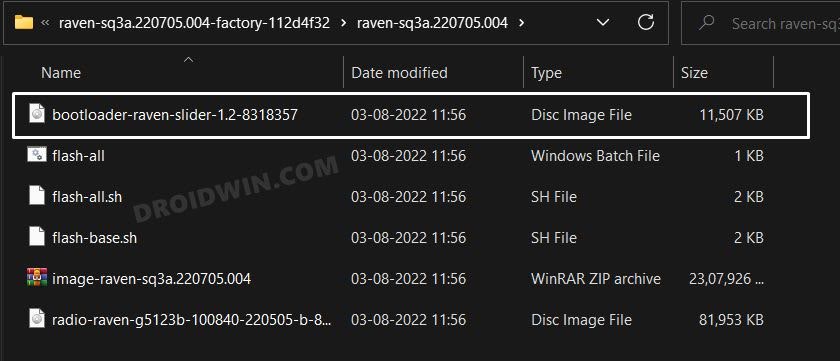
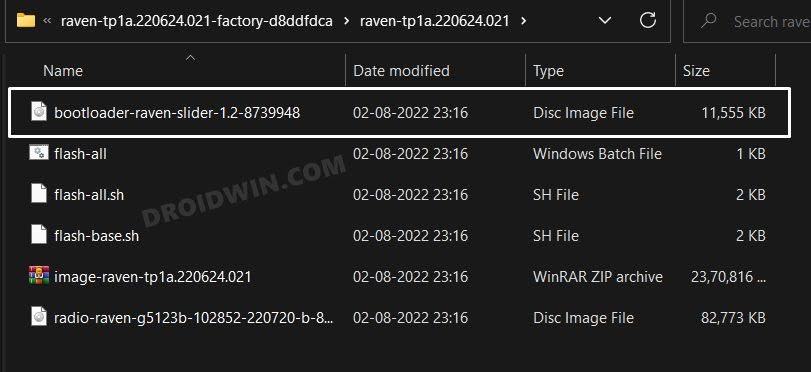
Delete this File - After that, go to the Android 13 firmware folder, copy the bootloader.img file, and transfer it to the Android 12 firmware folder:
bootloader-raven-slider-1.2-8739948.img
 Android 13 Bootloader file
 - After that, right-click on the Android 12 flash-all.bat file and select Edit. It will open in Notepad.

- Now replace the Android 12 bootloader file name in the bootloader flash command with the Android 13 bootloader file name.

- In my case, the rename will be as follows:
fastboot flash bootloader bootloader-raven-slider-1.2-8318357.img
will be renamed to
fastboot flash bootloader bootloader-raven-slider-1.2-8739948.img
- Once done, hit Ctrl+S to save the file.
STEP 2: Install Android SDK

Next up, install the Android SDK Platform Tools on your PC. This is the official ADB and Fastboot binary provided by Google and is the only recommended one. So download it and then extract it to any convenient location on your PC. Doing so will give you the platform-tools folder, which will be used throughout this guide.
STEP 3: Enable USB Debugging and OEM Unlocking
You will also have to enable USB Debugging and OEM Unlocking on your Pixel device. The former will make your device recognizable by the PC in ADB mode. This will then allow you to boot your device to Fastboot Mode. On the other hand, OEM Unlocking is required to carry out the bootloader unlocking process.
![]()
So head over to Settings > About Phone > Tap on Build Number 7 times > Go back to Settings > System > Advanced > Developer Options > Enable USB Debugging and OEM Unlocking.
STEP 4: Unlock Bootloader on Pixel 6A/6/Pro
Next up, you will also have to unlock the device’s bootloader. Do keep in mind that doing so will wipe off all the data from your device and could nullify its warranty as well. So if that’s all well and good, then please refer to our detailed guide on How to Unlock Bootloader on Google Pixel Devices.
![]()
STEP 5: Boot Pixel 6A/6/Pro Fastboot Mode
- Now connect your device to the PC via USB cable. Make sure USB Debugging is enabled.
- Then head over to the platform-tools folder, type in CMD in the address bar, and hit Enter. This will launch the Command Prompt.

- Type in the following command in the CMD window to boot your device to Fastboot Mode
adb reboot bootloader

- To verify the Fastboot connection, type in the below command and you should get back the device ID.
fastboot devices
Downgrade Pixel 6A/6/Pro from Android 13 to Android 12
- Head over to the Android 12 firmware extracted folder.
- Then double click on the flash-all.exe file to launch it.

- The flashing process will now start.
- Once done, your device will automatically boot to Android 12.
That’s it. These were the steps to downgrade your Pixel 6A/6/Pro from Android 13 to Android 12 by bypassing the Anti Rollback Protection. If you have any queries concerning the aforementioned steps, do let us know in the comments. We will get back to you with a solution at the earliest.


 Android 13 Bootloader file


Scott
There is an easier way to downgrade.
Use the android flash tool. This link is for the developer support build of android 12 – https://flash.android.com/welcome?continue=%2Frelease%2F12.0.0
The only hiccup I had was the flash tool not recognizing the phone once it was in fastboot. The fix is reinstalling the Google USB driver when the device is in fastboot mode (via device manager) and selecting the top level folder of the drivers you unzipped (you should see amd64 as a sub folder). Windows acts like it’s a different phone once it’s in the fast boot loader and forgets all previous driver installs (hence the driver reinstall).
https://developer.android.com/studio/run/win-usb
Downgrading fixed the issue for me. Thank you for this article, it was helpful to know I wasn’t alone in this issue and that a fix was possible. Google Fi support goes straight to blaming your hardware for this issue and won’t even consider it a software bug.
Matt
Yes you can flash the Android 12 *system* partitions back, but it will leave your phone in a barely usable state… you should NOT upgrade to Android 13 if you think you might want to go back to 12 and actually use that phone as your daily driver…
Plus, the anti-rollback part refers to the bootloader itself, you still cannot flash an older bootloader, but you can flash whatever you want to all other partitions.
Search XDA Forums for more information about this.
Sadique Hassan
Thanks for this useful information, Matt.