In this guide, we will show you the steps to debloat/remove bloatware from the OnePlus 9 Pro. Even though the merger between ColorOS and OxygenOS has been canceled, but the real picture is right in front of us. With the twelfth iteration of the OS build, the entire ecosystem had been taken over by Oppo’s ColorOS and you would be lucky enough to find any elements of the in-house OxygenOS. Then came the OxygenOS 13 update and with that, our devices were completely “Oppodified”.
Apart from the sub-par UI experience, the device is now filled with tons of unnecessary bloatware apps that were would hardly ever interact with. To make matter worse, these apps are treated as system apps and hence you wouldn’t be able to remove them the native way. Fortunately, you could still debloat and remove bloatware from your OnePlus 9 Pro using ADB Commands. And in this guide, we will show you how to do just that.
Table of Contents
Debloat/Remove Bloatware OnePlus 9 Pro via ADB [Android 13]
The below instructions are listed under separate sections for ease of understanding. Make sure to follow the same sequence as mentioned. Droidwin and its members wouldn’t be held responsible in case of a thermonuclear war, your alarm doesn’t wake you up, or if anything happens to your device and data by performing the below steps.
STEP 1: Install Android SDK
First and foremost, you will have to install the Android SDK Platform Tools on your PC. This is the official ADB and Fastboot binary provided by Google and is the only recommended one. So download it and then extract it to any convenient location on your PC. Doing so will give you the platform-tools folder, which will be used throughout this guide.

STEP 2: Enable USB Debugging
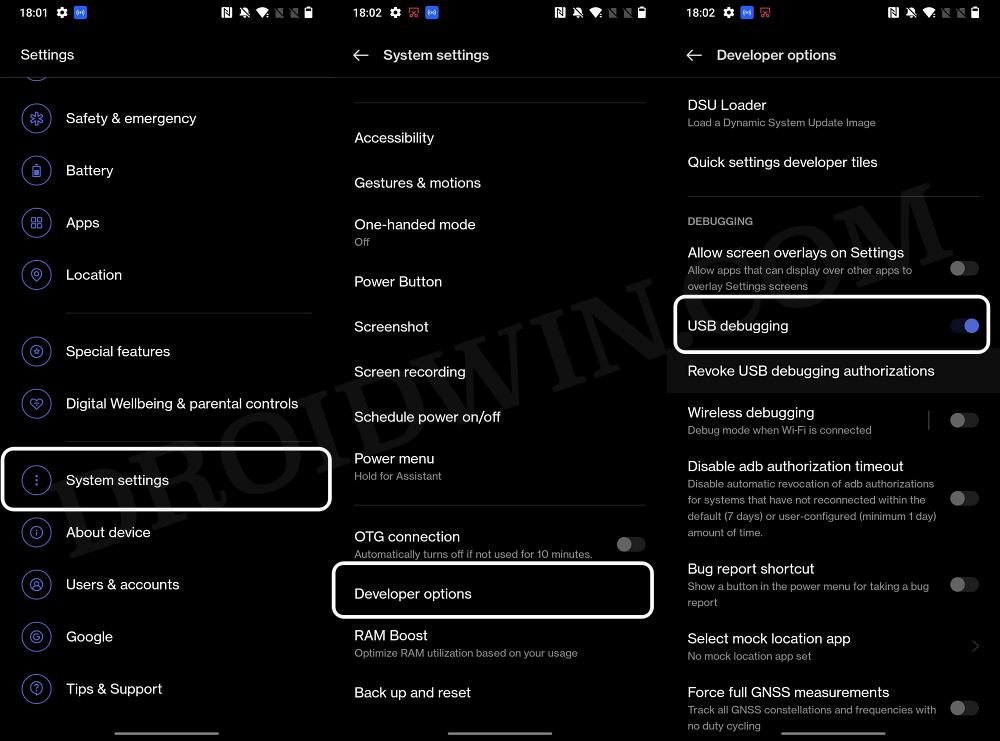
Next up, you will have to enable USB Debugging on your device so that it is recognizable by the PC in ADB mode. So head over to Settings > About Phone > Tap on Build Number 7 times > Go back to Settings > System Settings > Developer Options > Enable USB Debugging.
STEP 3: Establish ADB Shell Connection
- To begin with, connect your device to the PC via USB cable. Make sure USB Debugging is enabled.
- Then head over to the platform-tools folder, type in CMD in the address bar, and hit Enter. This will launch the Command Prompt.

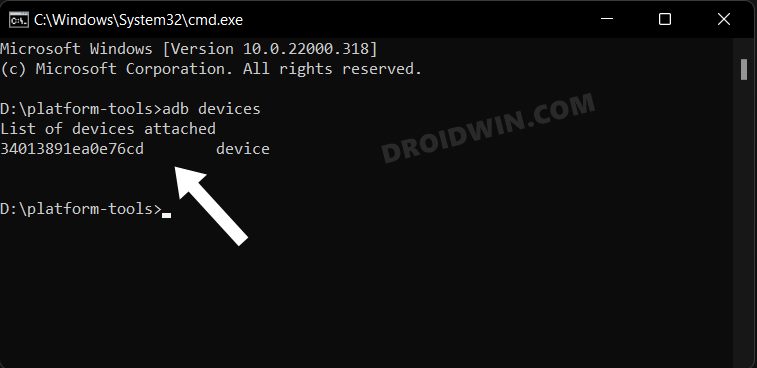
- Now in the following command in the CMD window to verify the ADB connection. If you get the device ID, then the connection stands successful.
adb devices

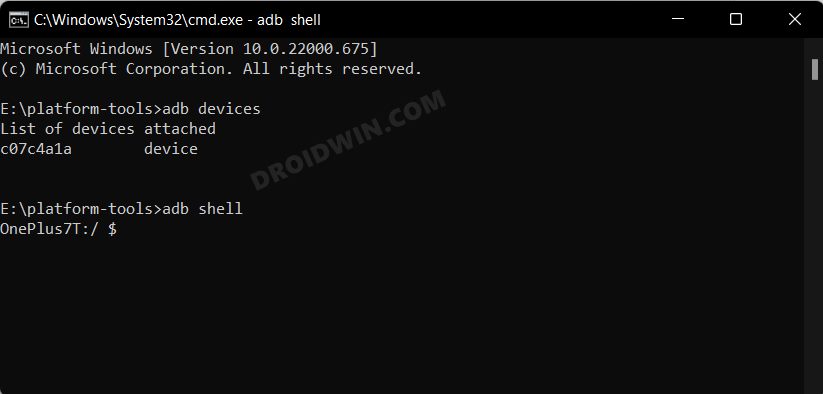
- Now type in the below command to open the Shell environment:
adb shell

- It will now list out your device codename, which means that the shell connection has been successfully established as well, and you are good to go ahead to debloat or remove bloatware from your OnePlus 9 Pro.
STEP 4: Debloat/Remove Bloatware from OnePlus 9 Pro
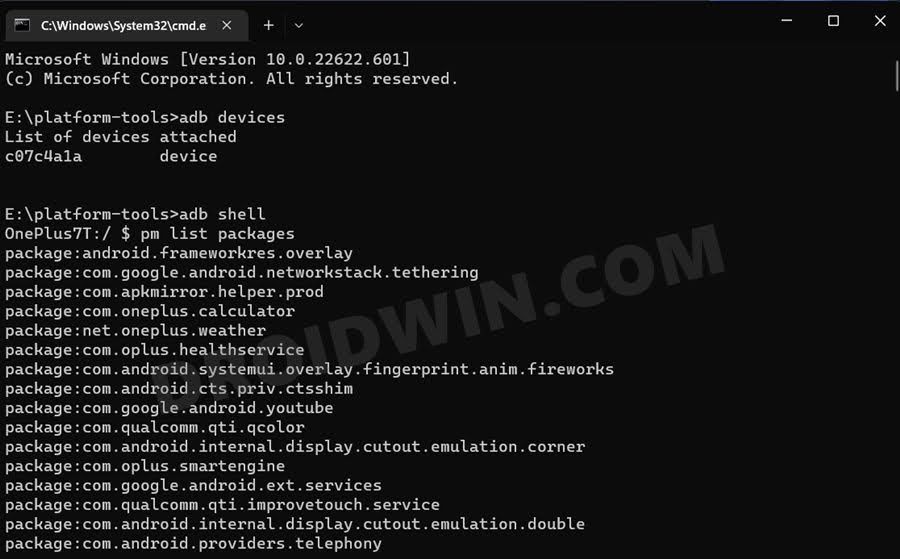
- First and foremost, execute the below command to get the list of all the apps installed and their package names [the bloatware output list has been shared below as well]:
pm list packages

- Now, the generic command to uninstall any bloatware from a device is:
pm uninstall -k --user 0 PackageName
- For example, if I want to remove the Heytap Accessory with package name com.heytap.cloud, then its removal command will be:
pm uninstall -k --user 0 com.heytap.cloud

- In the same manner, you may now remove the desired bloatware apps from your OnePlus 9 Pro.
OnePlus 9 Pro: List of Installed Apps
Given here are the list of the pre-installed apps on your OnePlus 9 Pro. Go through them once and only use the commands corresponding to the app that you want to remove from your device. If you mistakenly end up removing an app, then you could easily reinstall it as well using the instructions given in the next section.
pm uninstall -k --user 0 com.android.exchange
pm uninstall -k --user 0 com.android.protips
pm uninstall -k --user 0 com.android.dynsystems
pm uninstall -k --user 0 com.android.inputmethod.latin
pm uninstall -k --user 0 com.android.camera2
pm uninstall -k --user 0 com.android.providers.partnerbo
pm uninstall -k --user 0 com.android.emergencye
pm uninstall -k --user 0 com.android.printspooler
pm uninstall -k --user 0 com.android.apps.tag
pm uninstall -k --user 0 com.android.dreams.basic
pm uninstall -k --user 0 com.android.dreams.phototable
pm uninstall -k --user 0 com.android.magicsmoke
pm uninstall -k --user 0 com.android.managedprovisioning
pm uninstall -k --user 0 com.android.noisefield
pm uninstall -k --user 0 com.android.phasebeam
pm uninstall -k --user 0 com.android.wallpaper.holospira
pm uninstall -k --user 0 com.android.stk
pm uninstall -k --user 0 com.android.bluetoothmidiservic
pm uninstall -k --user 0 com.android.browser
pm uninstall -k --user 0 com.android.cellbroadcastreciev
pm uninstall -k --user 0 com.android.hotwordenrollment.oui
pm uninstall -k --user 0 com.android.printservice.recomm
pm uninstall -k --user 0 com.android.quicksearchbox
pm uninstall -k --user 0 com.android.email
pm uninstall -k --user 0 com.android.bips
pm uninstall -k --user 0 com.android.hotwordenrollment.x
pm uninstall -k --user 0 com.android.chrome
pm uninstall -k --user 0 com.android.calendar
pm uninstall -k --user 0 com.android.providers.calendar
pm uninstall -k --user 0 com.android.documentsui
pm uninstall -k --user 0 com.android.globalFileexplorer
pm uninstall -k --user 0 com.android.midrive
pm uninstall -k --user 0 com.android.calculator2e
pm uninstall -k --user 0 com.android.soundrecorder
pm uninstall -k --user 0 com.android.musicfx
pm uninstall -k --user 0 com.android.bookmarkprovider
pm uninstall -k --user 0 com.android.gallery3d
pm uninstall -k --user 0 com.android.calllogbackup
pm uninstall -k --user 0 com.android.traceur
pm uninstall -k --user 0 com.sec.android.AutoPreconfig
pm uninstall -k --user 0 com.sec.android.service.health
pm uninstall -k --user 0 com.google.android.tts
pm uninstall -k --user 0 com.google.android.apps.googleassistant
pm uninstall -k --user 0 com.google.android.apps.maps
pm uninstall -k --user 0 com.google.android.apps.setupwizard.searchselector
pm uninstall -k --user 0 com.google.android.pixel.setupwizard
pm uninstall -k --user 0 com.google.android.gm
pm uninstall -k --user 0 com.google.android.calendar
pm uninstall -k --user 0 com.google.android.calculator
pm uninstall -k --user 0 com.google.android.apps.recorder
pm uninstall -k --user 0 com.google.android.printservice.recommendation
pm uninstall -k --user 0 com.google.android.apps.books
pm uninstall -k --user 0 com.google.android.apps.cloudprint
pm uninstall -k --user 0 com.google.android.apps.currents
pm uninstall -k --user 0 com.google.android.apps.fitness
pm uninstall -k --user 0 com.google.android.apps.photos
pm uninstall -k --user 0 com.google.android.apps.plus
pm uninstall -k --user 0 com.google.android.apps.tachyon
pm uninstall -k --user 0 com.google.android.music
pm uninstall -k --user 0 com.google.android.apps.wellbeing
pm uninstall -k --user 0 com.google.android.email
pm uninstall -k --user 0 com.google.android.googlequicksearchbox
pm uninstall -k --user 0 com.google.android.talk
pm uninstall -k --user 0 com.google.android.syncadapters.contacts
pm uninstall -k --user 0 com.google.android.videos
pm uninstall -k --user 0 com.google.tango.measure
pm uninstall -k --user 0 com.google.android.youtube
pm uninstall -k --user 0 com.google.android.apps.docs
pm uninstall -k --user 0 com.google.ar.lens
pm uninstall -k --user 0 com.google.android.apps.restore
pm uninstall -k --user 0 com.google.android.soundpicker
pm uninstall -k --user 0 com.google.android.syncadapters.calendar
pm uninstall -k --user 0 com.google.ar.core
pm uninstall -k --user 0 com.google.android.setupwizard
pm uninstall -k --user 0 com.google.android.apps.wallpaper
pm uninstall -k --user 0 com.google.android.projection.gearhead
pm uninstall -k --user 0 com.google.android.marvin.talkback
pm uninstall -k --user 0 com.google.android.apps.magazines
pm uninstall -k --user 0 com.google.android.apps.subscriptions.red
pm uninstall -k --user 0 com.google.android.apps.podcasts
pm uninstall -k --user 0 com.google.android.apps.turbo
pm uninstall -k --user 0 com.google.android.as
pm uninstall -k --user 0 com.google.android.apps.youtube.music
pm uninstall -k --user 0 com.google.android.apps.nbu.files
pm uninstall -k --user 0 com.google.android.apps.walletnfcrel
pm uninstall -k --user 0 net.oneplus.commonlogtool
pm uninstall -k --user 0 net.oplus.commonlogtool
pm uninstall -k --user 0 com.oneplus.factorymode
pm uninstall -k --user 0 com.oplus.factorymode
pm uninstall -k --user 0 com.oneplus.factorymode.specialtest
pm uninstall -k --user 0 com.oplus.factorymode.specialtest
pm uninstall -k --user 0 cn.oneplus.nvbackup
pm uninstall -k --user 0 cn.oplus.nvbackup
pm uninstall -k --user 0 cn.oneplus.oemtcma
pm uninstall -k --user 0 cn.oplus.oemtcma
pm uninstall -k --user 0 com.oem.oemlogkit
pm uninstall -k --user 0 com.oneplus.account
pm uninstall -k --user 0 com.oplus.account
pm uninstall -k --user 0 cn.oneplus.photos
pm uninstall -k --user 0 cn.oplus.photos
pm uninstall -k --user 0 com.oplus.dm
pm uninstall -k --user 0 com.oneplus.dm
pm uninstall -k --user 0 com.oplus.calculator
pm uninstall -k --user 0 com.oneplus.calculator
pm uninstall -k --user 0 com.oplus.accessory
pm uninstall -k --user 0 com.oneplus.accessory
pm uninstall -k --user 0 com.oplus.chargingpilar
pm uninstall -k --user 0 com.oneplus.chargingpilar
pm uninstall -k --user 0 com.oplus.membership
pm uninstall -k --user 0 com.oneplus.membership
pm uninstall -k --user 0 com.oplus.opwlb
pm uninstall -k --user 0 com.oneplus.opwlb
pm uninstall -k --user 0 com.redteamobile.oneplus.roaming
pm uninstall -k --user 0 com.heytap.cloud
How to Reinstall Bloatware Apps on OnePlus 9 Pro
If you have uninstalled any bloatware app but after that, your device or any of its apps isn’t functioning along the expected lines, then you could easily reinstall that app.
- For that, execute the below command (after executing the adb shell command). Make sure to replace PackageName accordingly:
cmd package install-existing PackageName
- For example, if you wish to reinstall Heytap Cloud with package name com.heytap.cloud, then the above command will transform to:
cmd package install-existing com.heytap.cloud

That’s it. These were the steps to debloat your OnePlus 9 Pro by removing bloatwares from it. If you have any queries concerning the aforementioned steps, do let us know in the comments. We will get back to you with a solution at the earliest.
