In this guide, we will show you various methods to fix the Battery Drain issue on devices running Android 15. The fifteenth iteration of the OS has just been released by the Silicon Valley giant, so get ready to have a taste of the Vanilla Ice Cream. If we talk about its ingredients [aka features], then there are quite a few noteworthy ones to look forward to, including but not limited to Private Space, Lock Screen widgets, Battery Health Percentage, and App Archive
On the flip though, it isn’t free from its fair share of issues either. In this regard, numerous users have voiced their concern that their device is facing an astronomical amount of battery drain right after installing the latest Android 15 build. The issue isn’t linked to a particular app or device, so the underlying OS is the most probable culprit. With that said, there does exist numerous workarounds that should help you rectify this issue. So without further ado, let’s check them out.
Table of Contents
Fix Android 15 Battery Drain
It is recommended that you try out each of the below-mentioned workarounds and then see which one spells out success. So with that in mind, let’s get started.
FIX 1: Restrict App’s Battery Usage
We will start off by restricting the issue-causing app’s uncontrolled battery usage in the background. So let’s first identify the culprit app and then apply the said restriction:
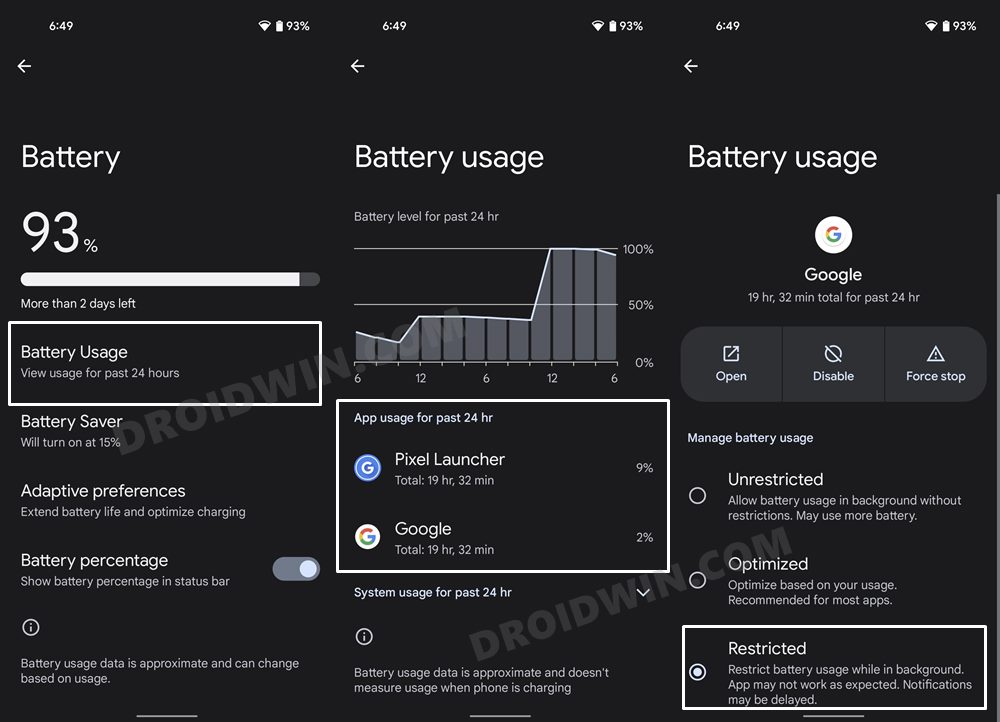
- To begin with, head over to the Settings menu on your device.
- Then go to Battery > Battery Usage section.
- Now refer to the apps under the ‘App usage for past 24 hr’.

- Tap on the first app in that list and select Restricted from the menu.
- Likewise, do so for all the apps that occupy a higher position in that list.
- Once done, verify if it fixes the battery charging issue on Android 15.
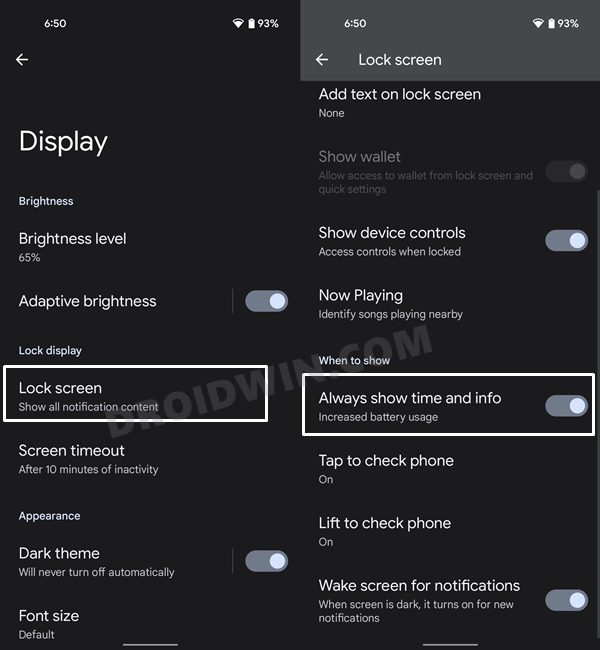
FIX 2: Disable Always On Display
Always on Display has ‘always’ been notoriously infamous for draining an astronomical amount of battery juice. So as of now, it’s better to keep it disabled.
- First off, head over to Settings > Display > Lock Screen.
- Then disable the toggle next to Always Show Time and Info.
- Check if it fixes the battery charging issue on Android 15.
FIX 3: Disable Mobile Data Always Active
Even if you are using WiFi, your device will still continue to have the Mobile Data active. This is because if your device isn’t able to pick up the WiFi signals, then it will automatically switch over to the carrier data.
On the plus side, there will be no considerable productivity loss and you will continue to be online. But on the flip side, it is sure to result in a drop in the battery percentage. Therefore you should consider disabling this feature, which could be done as follows.
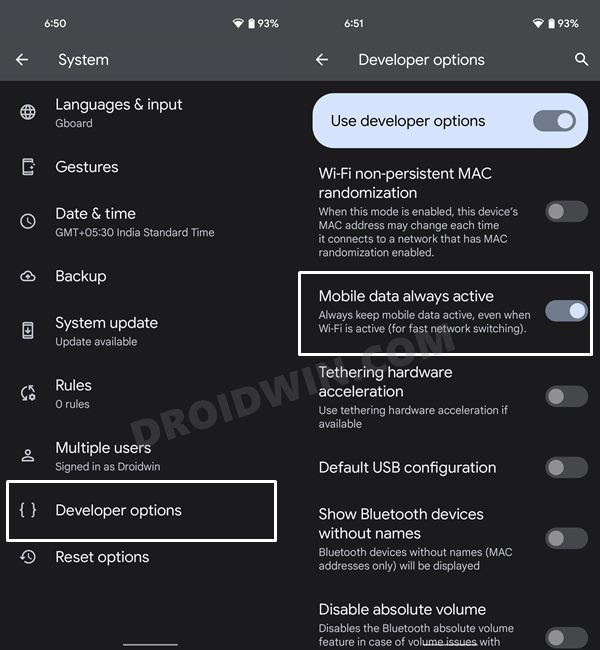
- First off, you will have to enable Developer Options. So go to Settings > About Phone > Tap on Build Number 7 times.
- You will now get a prompt that you are now a developer. Now go to Settings > System > Developer Options.
- Within that, scroll to the Mobile Data Always Active option and turn it off.
- Check if it fixes the battery charging issue on Android 15.
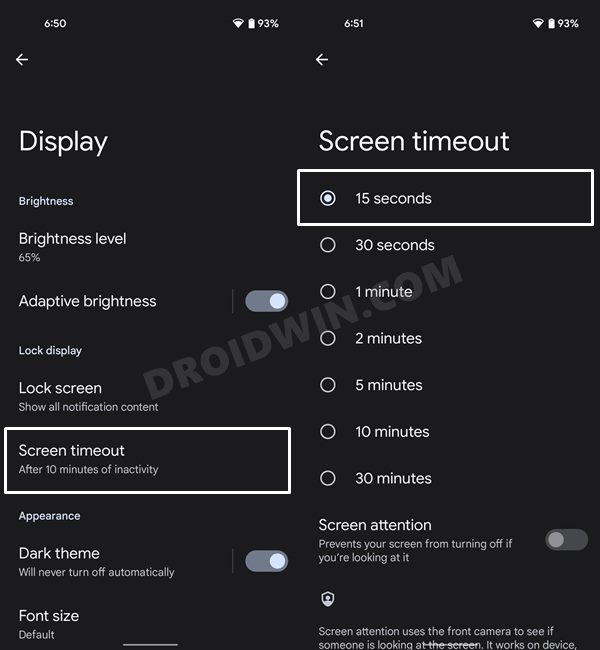
FIX 4: Lower the Screen Timeout
Screen Timeout is the duration after which your display will turn off. Every extra second the ‘pixel’ display is turned out, it will consume a minute amount of battery. But this when combined over the due course of time will lead to uncurbed battery use. So it’s better to limit its usage, using the instructions given below.
- So head over to Settings > Display on your device.
- Then go to the Screen Timeout option.
- Now select either 15 seconds or 30 seconds at the very max.
- Check if it fixes the battery charging issue on Android 15.
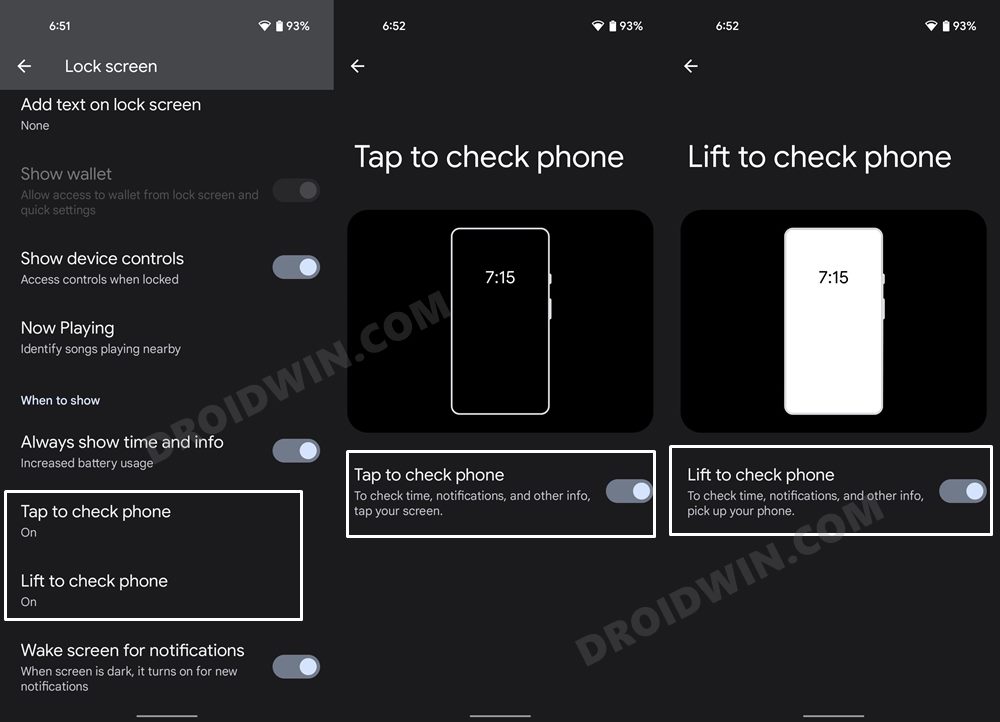
FIX 5: Disable Tap to Wake
Tap to Wake is an accessible feature (kind of) that allows you to wake up your device, check the pending notifications and carry out other related tasks, without the need to unlock your phone. While it is quite a handy feature, but it comes at a cost of lavish expenditure on the battery quota. So as of now, the best bet is to disable both its associated features, which could be done as follows:
- Start off by going to Settings > Display.
- Then go to the Lock Screen section.
- Now disable the Tap to Check Phone and Lift to Check Phone features.
- Check if it fixes the battery charging issue on Android 15.
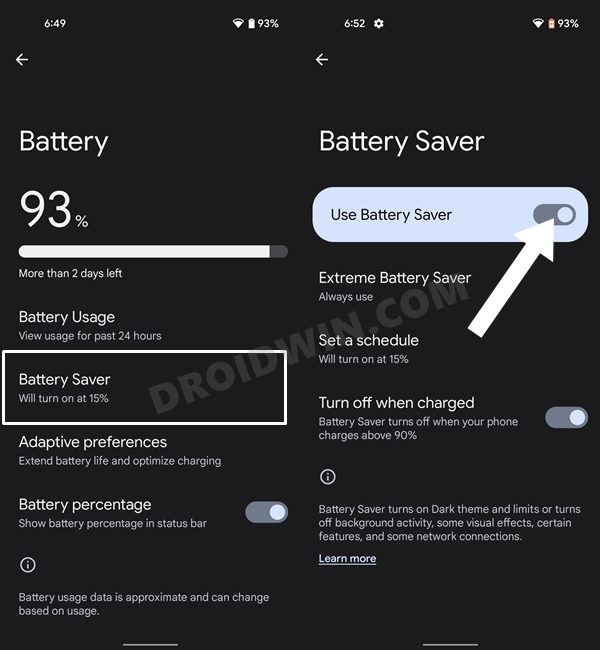
FIX 6: Use Battery Saver Mode
You all saw this coming, didn’t you? On a serious note though, this method gave out the best mileage when it comes to rectifying the battery issue. But why have we listed it in the end? Well, it’s because upon enabling it, you will have to sacrifice some other features.
This includes bidding adieu to the high refresh rate, the auto-sync feature, and the like. So if you are ready for this trade-off of gaining a few additional battery juices in return for a not-so-optimal usage experience, then here’s what you need to do:
- Head over to Settings > Battery > Battery Saver.
- Now enable the toggle next to Use Battery Saver.
- Check if it fixes the battery charging issue on Android 15.
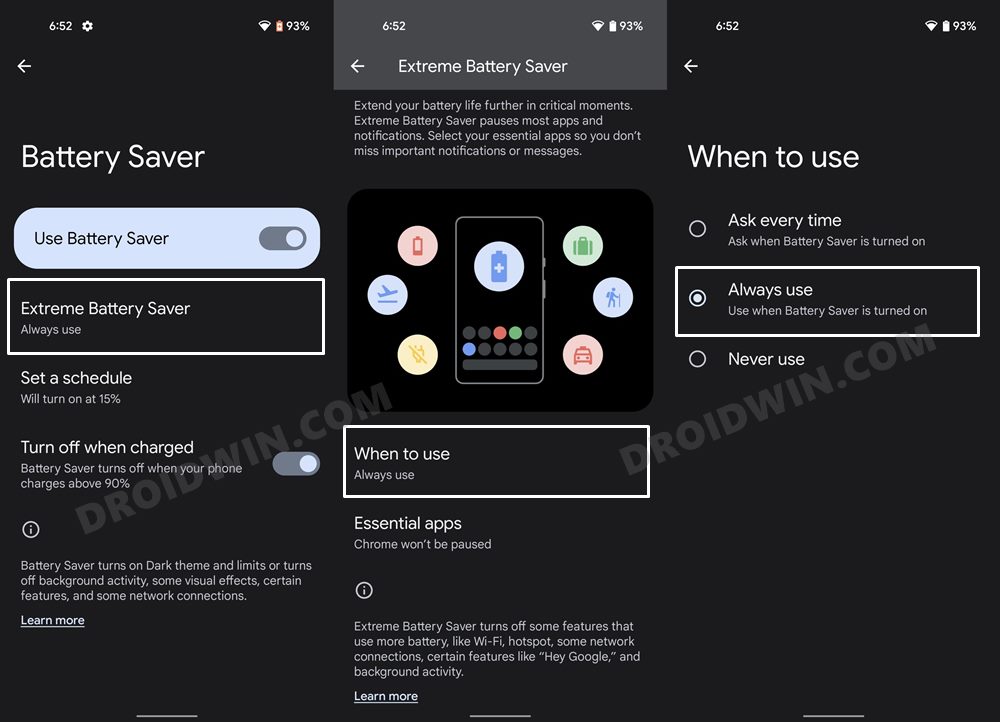
FIX 7: Enable Extreme Battery Saver
If you wish to take an even more aggressive approach, then consider enabling the Extreme Battery Saver Mode as well. This mode will pause the functionality of most apps and services. At the same time, it gives you the option to add the desired apps to the whitelist, that is, they wouldn’t be affected by this mode.
So before going to bed, you could consider enabling this feature and then turning it back on in the morning. At the same time, make sure that all your essential apps are added to the whitelist so that they don’t get affected by this feature. On that note, here’s how to enable and use this feature on your Android 12 device:
- Head over to Settings > Battery > Battery Saver option.
- Then go to Extreme Battery Saver > When to use and select Always Use.
- Now go back and go to the Essential Apps section and add your desired apps there.
- Check if it fixes the battery charging issue on Android 15.
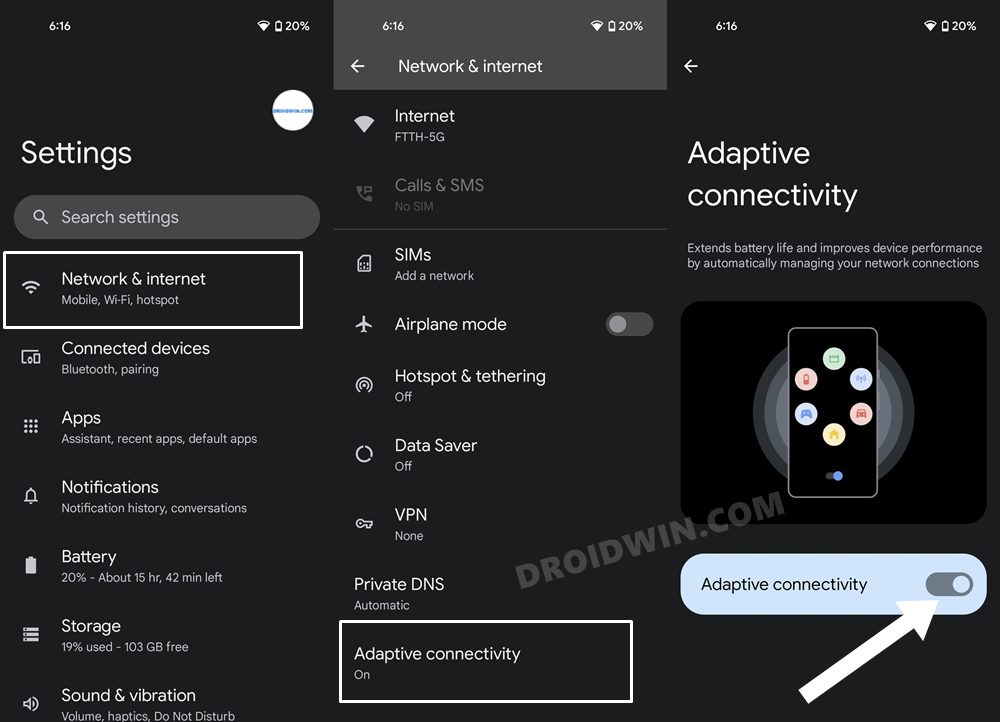
FIX 8: Turn off Adaptive Connectivity
One of the most underrated culprits of this issue seems to be Adaptive Connectivity. For the unaware, this feature helps your device to automatically switch from 5G to 4G whenever it deems fit. For example, when you are using an instant messenger app or just scrolling through feeds, then the Adaptive Connectivity feature will switch from 5G to 4G to preserve the battery life.
On the other hand, if you are streaming a movie, then it will again switch back to 5G. However, at the time of writing, various users have voiced their concern that Mobile Network Standby is draining an excessive amount of battery on their devices. Since the Mobile Network Standby is part of Adaptive Connectivity, turning off the latter has worked wonders in preserving the battery juice. Here’s how to do the same:
- Head over to Settings > Network and Internet section.
- After that, scroll to Adaptive Connectivity and disable the toggle next to it.
- Check if it fixes the battery charging issue on Android 15.
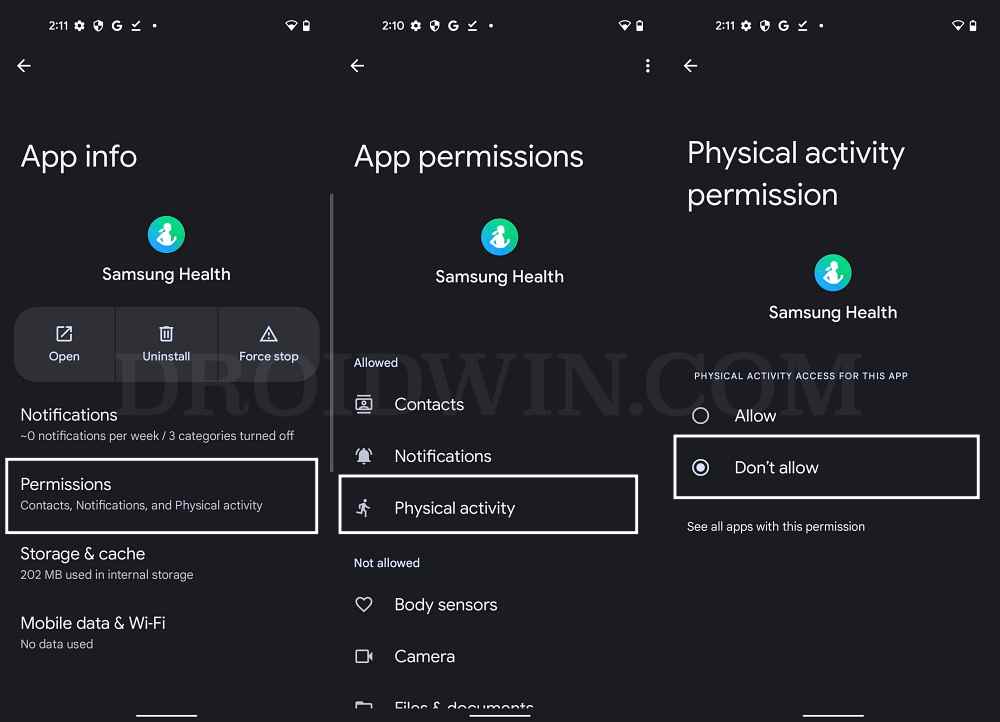
FIX 9: Disable Physical Activity Permission
If you have a Samsung Galaxy smartwatch, then you must have the Samsung Health app installed on your device. As of now, one of its components is proving to be a major culprit both in terms of battery drainage and device overheating. It’s the Physical Activity permission of the app that is hogging excessive resources.
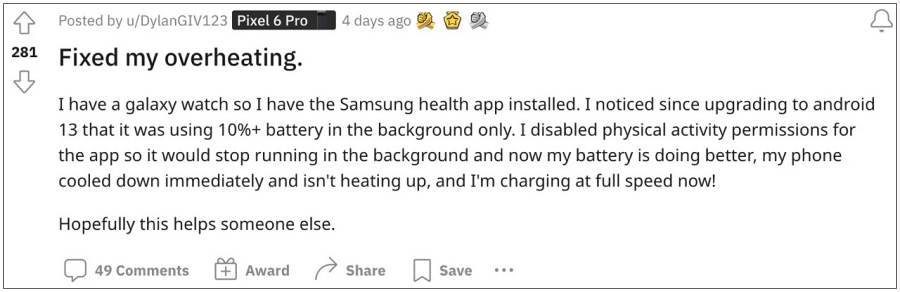
For the unaware, this permission allows your device to count the steps, without depending on your smartwatch. However, as of now, the app isn’t optimized for Android 13, so it’s better to restrict its aforementioned permission, which could be done as follows [Some users are speculating that Pixel has specifically done so to push their upcoming smartwatch! Well, we leave it up to you to decide!]
- To begin with, head over to Settings > Apps > See All Apps.
- Then select the Samsung Health App and go to its Permission section.
- After that select the Physical Activity permission under Allowed.
- Now change its permission to Don’t Allow and check out the results.
FIX 10: Downgrade to Android 14
If none of the aforementioned methods spelled out success, then your last course of action is to downgrade your device to the Android 14 OS. Do note that this will wipe off all the data from your device, so take a complete device backup beforehand. Once done, you could then start off with the below steps.
That’s it., These were the various methods to fix the battery drain issue on Android 15. If you have any queries concerning the aforementioned steps, do let us know in the comments. We will get back to you with a solution at the earliest.


