In this guide, we will show you the steps to add the Dark and Light Mode options in the Windows 11 right-click/context menu. The latest iteration of the OS beholds quite a few UI tweaks and customizations. These include the likes of Taskbar icons getting centralized, re-designed Start menu, revamped Settings menu, new icon set, and plenty more. Apart from that, you could also change the accent colors, tweak the transparency level, or switch between Dark and Light Modes.
Regarding the latter one, if you are one of those users who switches between the dark and light sides at regular intervals, then you might be aware of the long journey that you have to traverse. Heading over to Settings > Personalization > Colors > Choose your Mode and then selecting the desired theme, well it’s asking for way too much. So what is the alternate way out? You could add the Dark and Light Mode options directly in the Windows 11 right-click menu. This way you will be able to switch to the desired theme in just a few clicks. Here’s how.
Table of Contents
How to Add Dark/Light Mode in Windows 11 Right-Click Menu
There exist two sets of registry scripts that will get the job done. The first script will add the Light/Dark option for the Taskbar and Start Menu. On the other hand, the second script will add the theme option for the system apps (such as File Explorer, Settings, etc). You could add both these scripts or any one of out these two, the choice is all yours. Just make sure to take a backup of your registry files before starting.
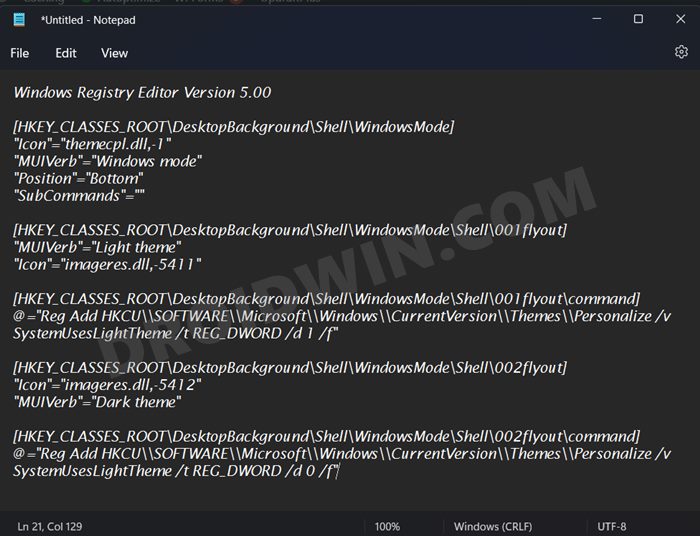
For Taskbar and Start Menu
- Right-click on your desktop and select New > Text Document.
- Then copy-paste the below command in that Notepad file:
Windows Registry Editor Version 5.00

[HKEY_CLASSES_ROOT\DesktopBackground\Shell\WindowsMode]
"Icon"="themecpl.dll,-1"
"MUIVerb"="Windows mode"
"Position"="Bottom"
"SubCommands"=""

[HKEY_CLASSES_ROOT\DesktopBackground\Shell\WindowsMode\Shell\001flyout]
"MUIVerb"="Light theme"
"Icon"="imageres.dll,-5411"

[HKEY_CLASSES_ROOT\DesktopBackground\Shell\WindowsMode\Shell\001flyout\command]
@="Reg Add HKCU\\SOFTWARE\\Microsoft\\Windows\\CurrentVersion\\Themes\\Personalize /v SystemUsesLightTheme /t REG_DWORD /d 1 /f"

[HKEY_CLASSES_ROOT\DesktopBackground\Shell\WindowsMode\Shell\002flyout]
"Icon"="imageres.dll,-5412"
"MUIVerb"="Dark theme"

[HKEY_CLASSES_ROOT\DesktopBackground\Shell\WindowsMode\Shell\002flyout\command]
@="Reg Add HKCU\\SOFTWARE\\Microsoft\\Windows\\CurrentVersion\\Themes\\Personalize /v SystemUsesLightTheme /t REG_DWORD /d 0 /f"

- After that, go to File > Save As and change Save as Type to All Files.
- Then name it Windows Mode, add .reg at the end, and hit the Save button.
- Now launch this file and click YES in the confirmation dialog box. That’s it, the registry values have been added.
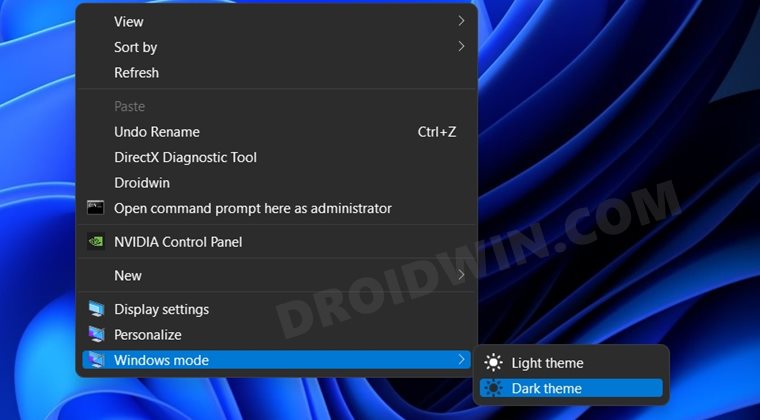
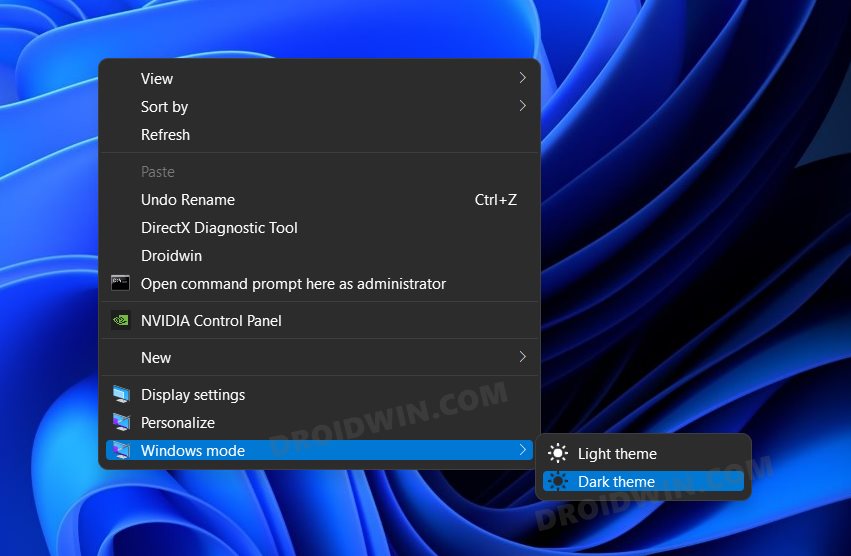
- To test it out, right-click on your Desktop and select Show More Options.
- You should now see the Dark and Light themes under Windows Mode.


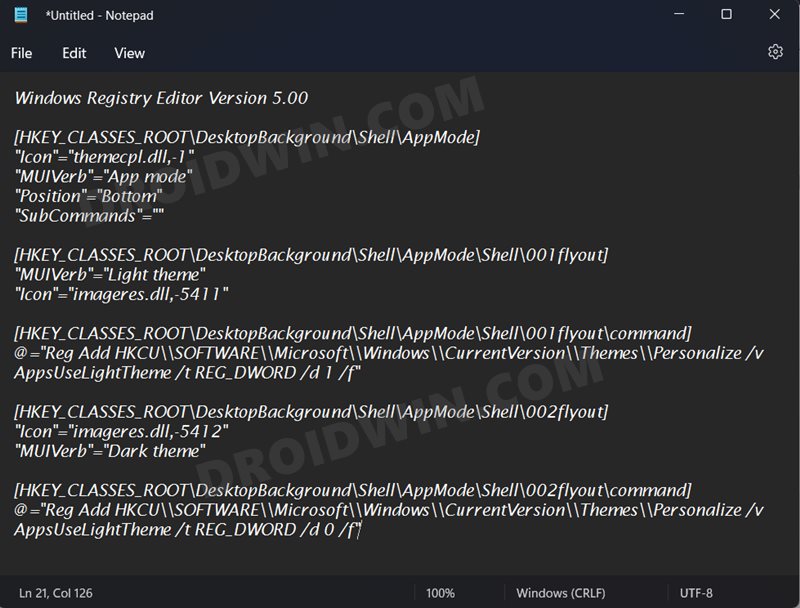
For Windows 11 Apps
- Right-click on your desktop and select New > Text Document.
- Then copy-paste the below command in that Notepad file:
Windows Registry Editor Version 5.00

[HKEY_CLASSES_ROOT\DesktopBackground\Shell\AppMode]
"Icon"="themecpl.dll,-1"
"MUIVerb"="App mode"
"Position"="Bottom"
"SubCommands"=""

[HKEY_CLASSES_ROOT\DesktopBackground\Shell\AppMode\Shell\001flyout]
"MUIVerb"="Light theme"
"Icon"="imageres.dll,-5411"

[HKEY_CLASSES_ROOT\DesktopBackground\Shell\AppMode\Shell\001flyout\command]
@="Reg Add HKCU\\SOFTWARE\\Microsoft\\Windows\\CurrentVersion\\Themes\\Personalize /v AppsUseLightTheme /t REG_DWORD /d 1 /f"

[HKEY_CLASSES_ROOT\DesktopBackground\Shell\AppMode\Shell\002flyout]
"Icon"="imageres.dll,-5412"
"MUIVerb"="Dark theme"

[HKEY_CLASSES_ROOT\DesktopBackground\Shell\AppMode\Shell\002flyout\command]
@="Reg Add HKCU\\SOFTWARE\\Microsoft\\Windows\\CurrentVersion\\Themes\\Personalize /v AppsUseLightTheme /t REG_DWORD /d 0 /f"
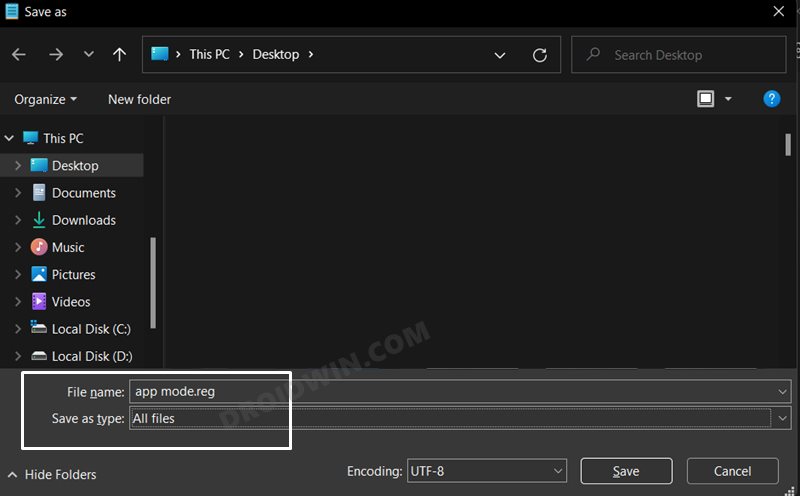
- After that, go to File > Save As and change Save as Type to All Files.
- Then name it App Mode, add .reg at the end, and hit the Save button.
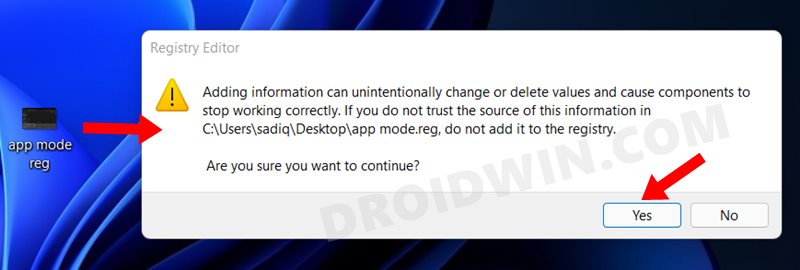
- Now launch this file and click YES in the confirmation dialog box. That’s it, the registry values have been added.
- To test it out, right-click on your Desktop and select Show More Options. You should now see the Dark and Light themes under Settings Theme (or whatever name you gave in STEP).

How to Remove Dark/Light Mode in Windows 11 Right-Click Menu
If you wish to revert the change, i.e. remove Dark/Light Mode from Windows 11 right-click menu, then here’s what you need to do:
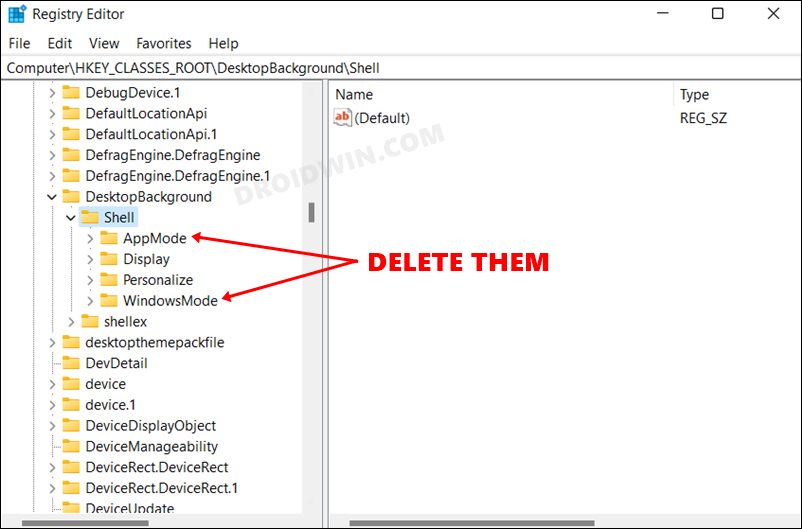
- Head over to the Start Menu, search Registry Editor, and open it.
- Then copy-paste the below location in its address bar and hit Enter.
HKEY_CLASSES_ROOT\DesktopBackground\Shell
- Now just delete the Windows Mode and App Mode keys that you had created earlier.
So with this, we round off the guide on how you could add the Dark and Light Mode options in the Windows 11 right-click menu. Likewise, we have also listed the steps to undo this tweak. If you have any queries concerning the aforementioned steps, do let us know in the comments. We will get back to you with a solution at the earliest.


