In this guide, we will show you the steps to add the ‘Create Restore Point’ option in Windows 11 right-click menu. If you are one of those power users who loves tinkering with the OS, tweaking its settings and configuration files, modifying the registry editor files or upgrading/downgrading drivers, or installing third-party apps from non-verified sources, then your first course of action should be to create a restore point beforehand.
This is an absolute must so that in case anything goes south by performing any of the aforementioned tweaks, then you could easily roll back your PC to the earlier working condition just by restoring this backup. And if you perform these tweaks on a regular basis, then you might be creating these restore points quite frequently. So there’s no hiding the fact that doing so does take quite a lot of effort, with the journey starting all the way from the Control Panel.
Well, it turns out there is a handy tweak through which you could shorten down this journey and get your work down in just a single click. This could be made possible by adding the Create Restore point in the Windows 11 right-click menu. And in this guide, we will show you how to do just that. So without any further ado, let’s get started.
Table of Contents
How to Add ‘Create Restore Point’ Option in Windows 11 Right-Click menu
There exists two different methods through which you could carry out the said task. The first one is by simply copy-pasting the provided commands in the Notepad file, converting it to the Registry File, and then running it. On the other hand, the second method requires you to manually create DWROD and Key files inside the Registry Editor and assign them their associated values. We have listed both these methods below. Go through them and then try out the one that you find easier to deal with.
METHOD 1: By Creating Registry File via Notepad
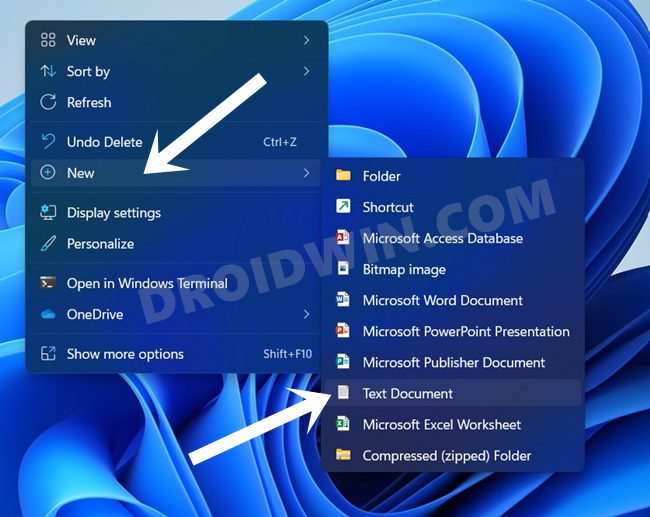
- Right-click in an empty location on the desktop and select New > Text Document.

- Then copy-paste the below commands in this Notepad file.
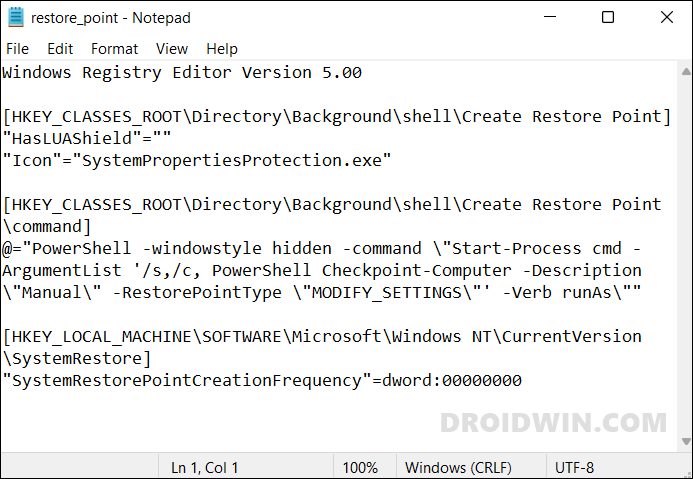
Windows Registry Editor Version 5.00

[HKEY_CLASSES_ROOT\Directory\Background\shell\Create Restore Point]
"HasLUAShield"=""
"Icon"="SystemPropertiesProtection.exe"

[HKEY_CLASSES_ROOT\Directory\Background\shell\Create Restore Point\command]
@="PowerShell -windowstyle hidden -command \"Start-Process cmd -ArgumentList '/s,/c, PowerShell Checkpoint-Computer -Description \"Manual\" -RestorePointType \"MODIFY_SETTINGS\"' -Verb runAs\""

[HKEY_LOCAL_MACHINE\SOFTWARE\Microsoft\Windows NT\CurrentVersion\SystemRestore]
"SystemRestorePointCreationFrequency"=dword:00000000
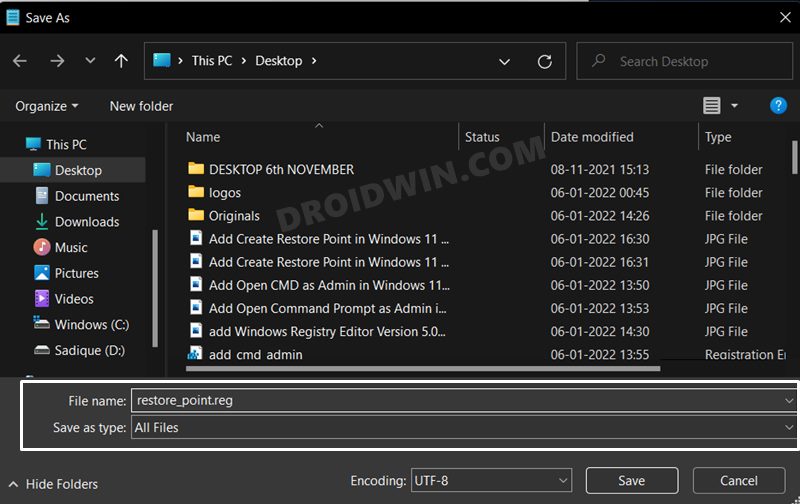
- After that, use the Ctrl+S to bring up the Save dialog box and change the Save As Type to All Files.
- Then give it any name of your choice and add .reg at the end (such as restore_point.reg).
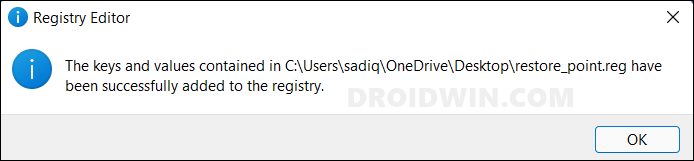
- Now launch this newly created registry file, and you will get a warning, click YES.
- You will now be notified that the registry files have been successfully added.
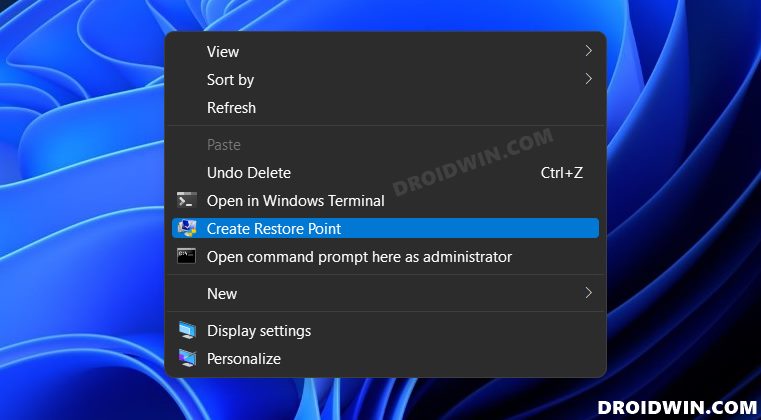
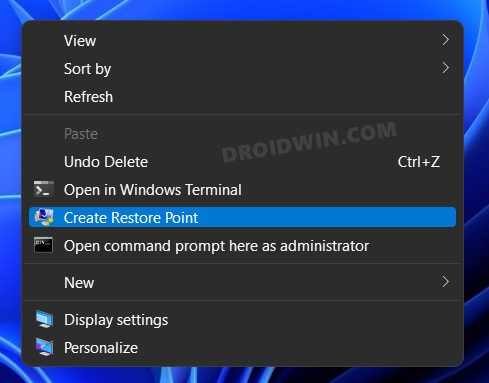
- Finally, restart your PC. Once it boots up, right-click on an empty location and select Show More Options.
- You should now see the Create Restore Point option added to the Windows 11 right-click menu.

METHOD 2: Via Registry Editor
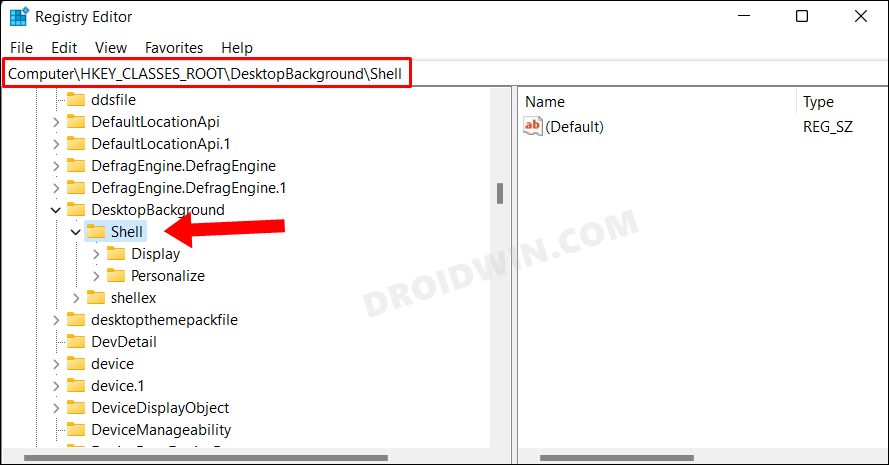
- Head over to the Start Menu, search Registry Editor, and open it.
- Then copy-paste the below location in the address bar and hit Enter:
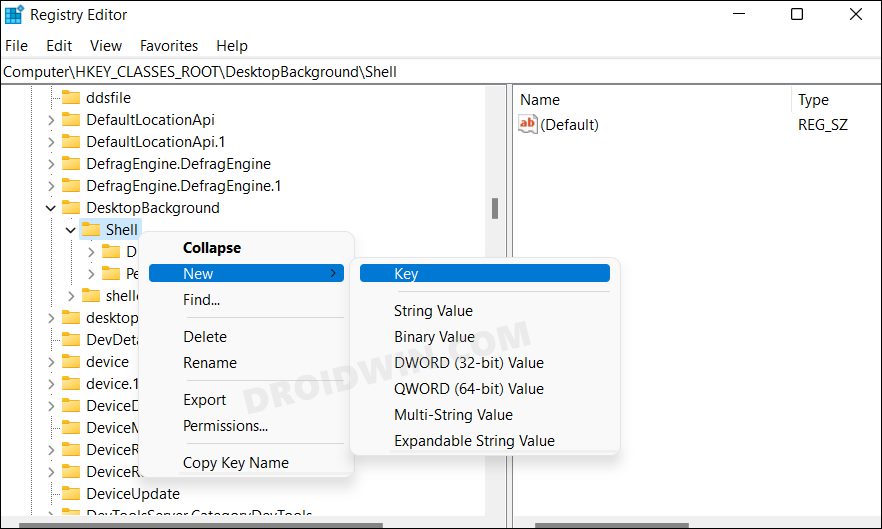
HKEY_CLASSES_ROOT\DesktopBackground\Shell
- Now right-click on the Shell folder, select New > Key. Name it RestorePoint.
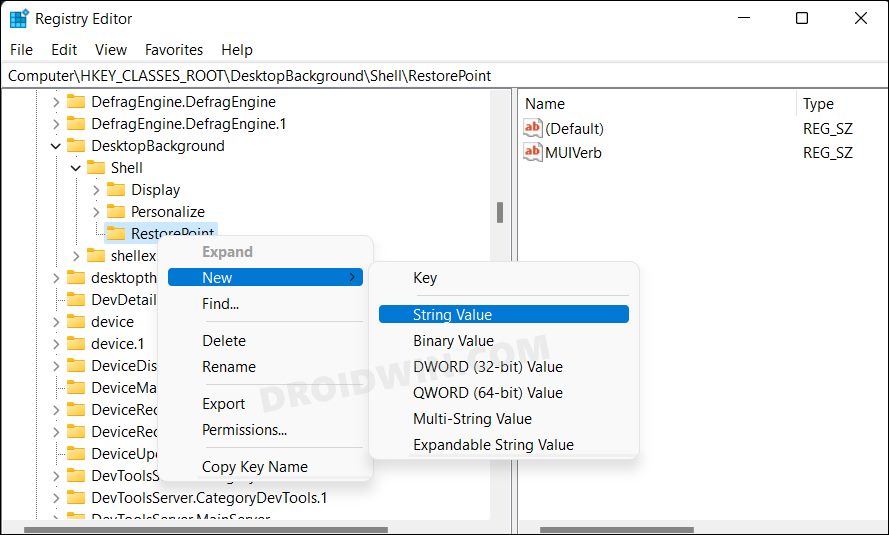
- Then right-click on RestorePoint and select New > String Value. Name it MUIVerb.
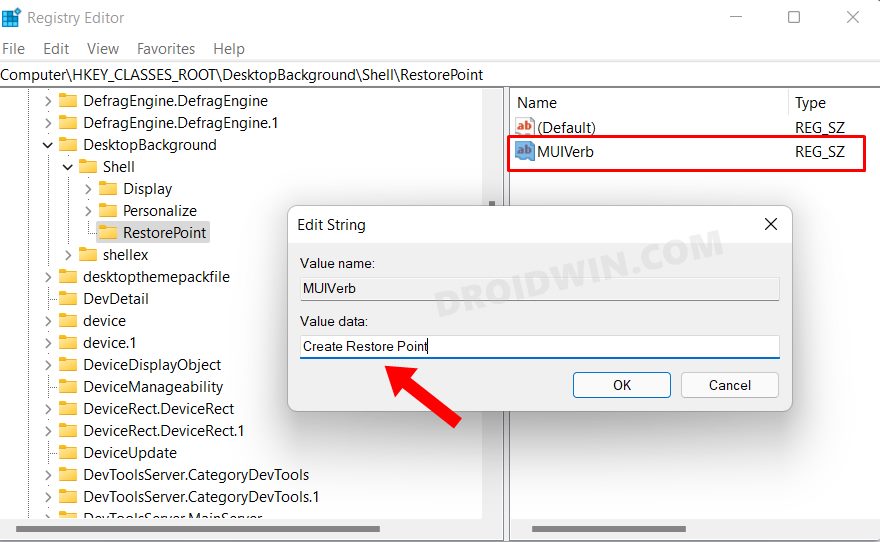
- Double click on MUIVerb to open it, type in Create Restore Point under its Value Data field, and hit OK to save it.
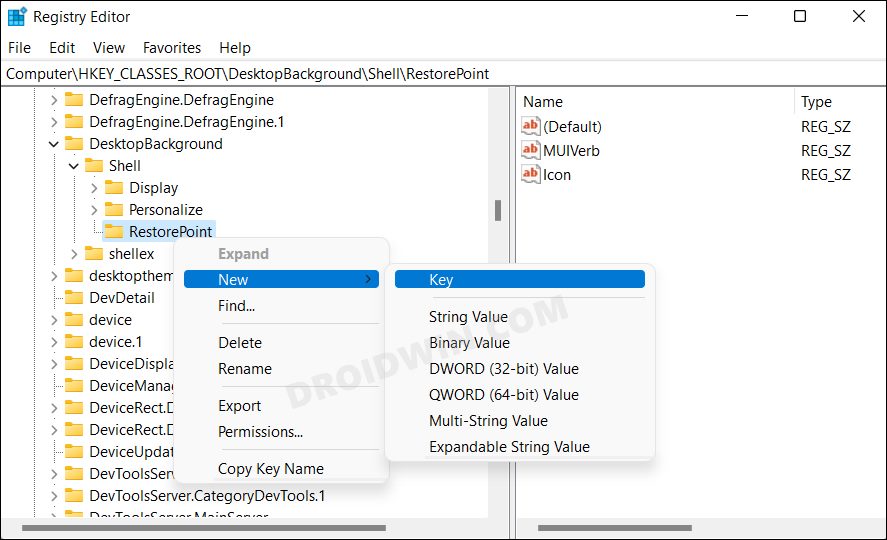
- After that, again right-click on RestorePoint and select New > String Value. Name it Icon.
- Double-click the Icon file to open it and then type in the below data in its Value Data field:
C:\Windows\System32\rstrui.exe
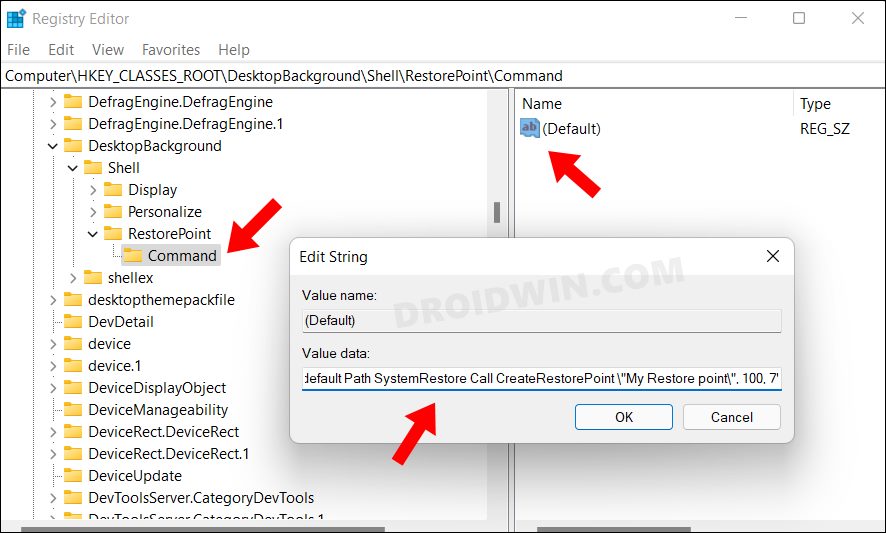
- Then click OK to save it. After that, again right-click on RestorePoint and select New > Key. Name it Command.
- Now go to the right-hand side, double click on the Default file to open it.
- Then copy-paste the below parameter in its Value Data field and hit OK to save it:
powershell.exe -c start -verb runas cmd '/k wmic.exe /Namespace:\\root\default Path SystemRestore Call CreateRestorePoint \"My Restore point\", 100, 7'
- Now restart your PC. Once it boots up, right-click in an empty location, select Show More Options and you should now see the Create Restore Point option.
So with this, we round off the guide on how you could add the Create Restore point option in the Windows 11 right-click menu. We have listed two different methods for the same. If you have any queries concerning the aforementioned steps, do let us know in the comments. We will get back to you with a solution at the earliest.
How to Remove ‘Create Restore Point’ Option in Windows 11 Right-Click menu
If you wish to revert the changes, i.e. remove the Create Restore point option in the Windows 11 right-click menu, then here’s what you need to do:
- Launch Registry Editor and head over to the below location:
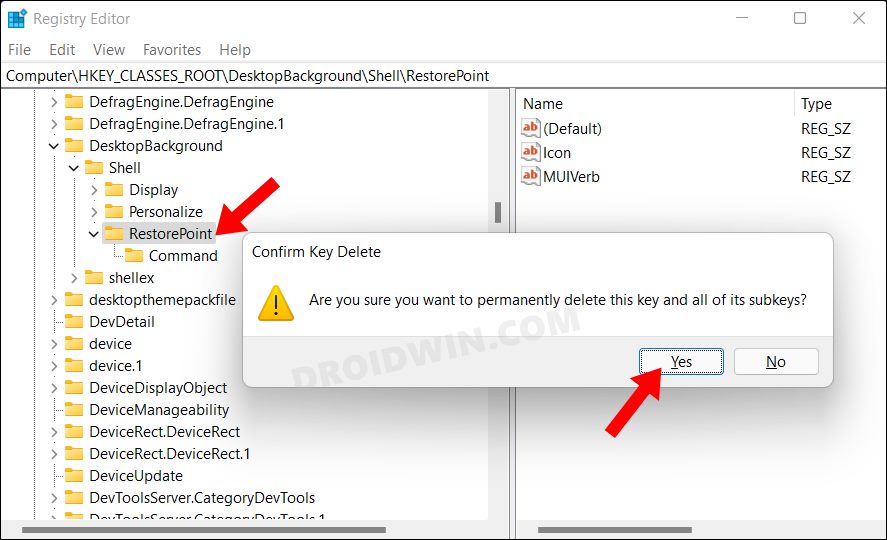
HKEY_CLASSES_ROOT\DesktopBackground\Shell
- Now select the RestorePoint folder and hit the Delete key.
- Then click YES in the confirmation dialog box that appears.
- Finally, restart your PC and the said option will be removed from the context menu.